Completed Project - Stic-o's 2nd gen. radius arm/coil SAS | Page 20 | Ford Explorer Forums - Serious Explorations

  • Register Today It's free!

Completed Project Stic-o's 2nd gen. radius arm/coil SAS

Use this prefix for completed projects that are not "How to" articles or threads asking for help.
Well it's Finaly Time to Start this thread.

Intro
In April of 2006 I will be doing a Solid Axle Swap on my '99 Explorer XL. Through the entire prosess I will be takink pics and updateing when there is is new info. I've pretty much always known I was going to do a SAS in my truck all along. For this reason, I have never but a dime into my front axle. I just never saw the point if I was going to rip it out.

The Plan

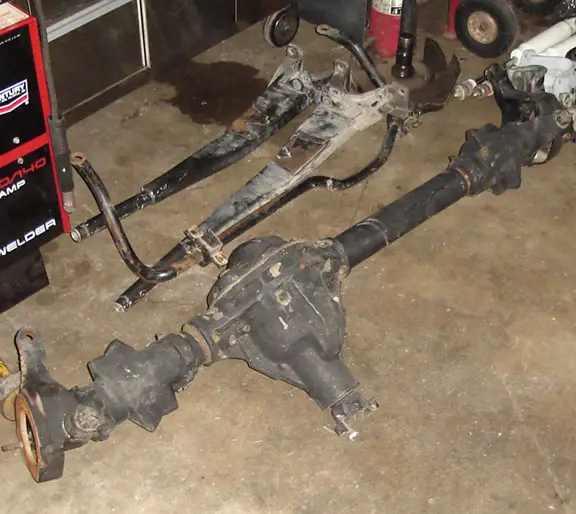
I plan to run a High Pinion Dana 44 full width in the front. I will be using Early Bronco Coils, posiablly 5.5" lift coils. I am still unsure of what I will be using for Radius arms, as we are still in the works. I would like to do a 3 link in the front but I don't think it's possiable with the cast wedges. I will be running 5.13 gears and plan to use anywhere from a 35" tire to a 37" tire, depending what I find. In the rear, I will be going to a 86-96 full width 8.8 off a Bronco/F-150. This will give me the ability to keep my speedometer, as well as reuseing my current locker, BTF Cover, and Disc Brakes. This will also give me a 5x5.5 pattern, and width almost dead on with the front. I would also like to move the rear leaf springs to the outside of the frame with the FW 8.8 to get rid of the spring hangers under the back doors that we all get caught on.

There alot of things still unsure, and I will figure it out as I go. Unfortally only small things will be done, until late March. Lack of funds will keep me from doing much until then. The axle will be set to go in the truck in April sometime though. Now let get to the goods. Pictures
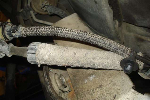
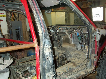
 :D


The Meat
12287D44.jpg


A side dish of parts

12287SAS_Parts.jpg


I can't wait for dessert :p


Join the Elite Explorers for $20 each year.
Elite Explorer members see no advertisements, no banner ads, no double underlined links,.
Add an avatar, upload photo attachments, and more!
.


How tight did you tighten the C-Wedge's? If there not tightened the same the arms will be at different angles. I had this problem, not quiet as bad though.


Join the Elite Explorers for $20 each year.
Elite Explorer members see no advertisements, no banner ads, no double underlined links,.
Add an avatar, upload photo attachments, and more!
.


Well I do have some good news today. I found my DOM tubing :bounce: Only I have to buy 20-24 ft. :rolleyes: But at least it's pretty cheap :D Any body need to do they're steering? :p


Stic-o said:
Only I have to buy 20-24 ft. :rolleyes: But at least it's pretty cheap :D Any body need to do they're steering? :p
If only if you were closer ;)


Stic-o said:
We put in 2x6 stock behind the the buckets like everyone else does, however it didn't come ot straight at all. The driver side looks like it does not need any spaceing at all, but the passanger does. Huh? :confused: We did center the axle, but this really shows you how important the trac bar is. and they scary part is, it did look worse at first.

are the RA bushings cranked down? maybe loosen them up a little until you get a track bar on there, could they be causing the skew?


Nick26 said:
are the RA bushings cranked down? maybe loosen them up a little until you get a track bar on there, could they be causing the skew?
I think he's already centered the axle laterally


The width of the frame at the coil buckets was 33 and 1/2.


inches


Kirby N. said:
The width of the frame at the coil buckets was 33 and 1/2.


Really? I think the Ex was 31 and a 1/2 or so. That would make sence :D


Guess What I just ordered :D :bounce:

icon.php


LOL those are the shocks hackers use


Got the steering box all done finally. Just have to do some triming, and run the lines. Then we can put the springs back up. Then it's just the drag link, track bar, brake lines and the mounting shocks/mounts. I think I figured out the d-shaft for the street :rolleyes: I'm going to hear it I know once you guys see a pic. Lets just say I made my own Double Cardagan :rolleyes:

I'll post pics later


if you did what I think you might have... FYI a real double cardan has a ball and socket joint in the middle to make sure the u joints on each side are always at the same but opposite angle... with out that joint the cardan could make a Z shape and cause major vibes..., not to mention probably fall apart at the slip.


Nick26 said:
if you did what I think you might have... FYI a real double cardan has a ball and socket joint in the middle to make sure the u joints on each side are always at the same but opposite angle... with out that joint the cardan could make a Z shape and cause major vibes..., not to mention probably fall apart at the slip.

I knew that it had a joint in the middle put did not understand the purpose, that helps, Thanks ;) The idea was to get it to work on the street for now. I have a lot to do before it can go off road again. :( I'll be happy with it back on the street for now. :rolleyes:


Instead of making your own double cardan, why not just sleeve it to make it longer? Why not just have a driveshaft shop extend and balance it for you? I had mine lengthened ~4" w/ all new tubing + balanced for about 120 out the door and I have no vibrations from it at all.


bmxking5 said:
Instead of making your own double cardan, why not just sleeve it to make it longer? Why not just have a driveshaft shop extend and balance it for you? I had mine lengthened ~4" w/ all new tubing + balanced for about 120 out the door and I have no vibrations from it at all.

Because I can't find anyone to do for under $200. I need a new shaft anyway :rolleyes: When I took the shaft out the other day, I noticed the u-joint clips were missing. Some where they fell out :eek: This goes back to the fist time I tried soing u-joints (Years ago :rolleyes:) I crushed the outer wall a bit, so the clip does not stay in :( If I have learned one thing in this project, it is that I hate U-Joints :mad:


The mounting of the steering box is made up of a 1/4" plate on each side of the frame, with welded on tube spacer to line up the box on the inside of the frame. These 1/4" plates will also be welded to the frame. For the top bolt which goes over the frame a tube spacer will be used in between the plates. the tube spacers are more then 1/4" thick wall. A stock first gen explorer box will be used, as well as the stock steering shaft.

Here is the inside of the frame where the box will mount to.
Steering_Box.jpg

Steering_Box2.jpg


and this is one of my stupid ideas....It will never make it on the truck, but interesting at least :rolleyes:

Dumb.jpg


New pictures of the box...

Inside bolted up ;)
Steering_Box3.jpg


Out side bolted up ;)
Steering_Box4.jpg


we're going to clean it up, cut part of the extra top part off, and we have longer bolts to go in.


and look what the nice UPS man got me yesterday :D

BBCS.jpg


Very nicely made :thumbsup:


Join the Elite Explorers for $20 each year.
Elite Explorer members see no advertisements, no banner ads, no double underlined links,.
Add an avatar, upload photo attachments, and more!
.


It Lives!

Part:1

After almost 3mo of sitting in the garage, and not being able to start the truck due to no power steering fluid. I hooked the Optima red top back up after sitting this whole time, and turned the key :D Varommmm! :bounce: Oh how wonderful it was to hear her voice again.

So we got the steering box all buttoned up and we figured out our spring problem....The one spring is trashed :( (Thanks Michael :thumbsup: ) So I'll have to order a new set of coils. Not sure what to get yet. So tomorrow we'll try to get everything else done and use the one good coil as I guide, and cross our fingers. Still working on the D-shaft issues, although I think I got the front figured out. I picked up a 92 Ex front shaft today for 15 bucks. I think I may be able to swap yokes from a older 1354. Not sure and can't seem to find a yes or no on yhis. With annother weekend I could finish it, but after tommorrow, I'm tied up for the next 3 weekends :(


Back
Top