How To: Upper Control Arm / Ball Joint Replacement (Lots of Pictures) | Ford Explorer Forums - Serious Explorations

  • Register Today It's free!

How To: Upper Control Arm / Ball Joint Replacement (Lots of Pictures)

MountaineerGreen

Towing Moderator
Moderator Emeritus
Joined
February 2, 2006
Messages
7,476
Reaction score
53
City, State
North East Arkansas
Year, Model & Trim Level
2012 F150 4x4
This is really simple, the only complication would be excessive rust or stuck parts. My truck being from the south, I am blessed with no rust.

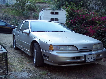
To start, jack up the truck, remove the tire and wheel on the afflicted side. It should look like this:

Sept07_004_Medium_.jpg


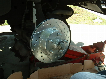
Remove the rubber flap held to the fender liner by push retainers. You'll see the front and rear camber adjusters on the top side of the frame.

This is the back:

Sept07_005_Medium_.jpg


The front:

Sept07_006_Medium_.jpg


Note the position of the camber adjusters-

Sept07_008_Medium_.jpg


Sept07_009_Medium_.jpg


Remove the large nuts on the end of the camber adjuster bolts.

Sept07_010_Medium_.jpg


Sept07_012_Medium_.jpg


Remove the camber adjuster, bolt and cams on both sides.

Sept07_013_Medium_.jpg


See the flat side on the bolt?

Sept07_014_Medium_.jpg


Remove the pinch bolt from the knuckle

Sept07_018_Medium_.jpg


Knock the UCA upward, the arm should come out.

The new one and the old one:

Sept07_020_Medium_.jpg


The empty spot:

Sept07_021_Medium_.jpg


The new one replaced.

Sept07_022_Medium_.jpg


Its just the opposite of the removal procedure, I put the camber adjusters in the same spots as they were. I recommend getting an alignment after replacing the UCA.

Hope this helps.


Join the Elite Explorers for $20 each year.
Elite Explorer members see no advertisements, no banner ads, no double underlined links,.
Add an avatar, upload photo attachments, and more!
.


Great series, although a bit late for me. I did mine about 4 months ago and basically followed the precedure you outlined. Piece O' cake.


trouble fitting the b/j stem into the knuckle

I'm putting new UCAs on my son's 98 Ranger (2wd, 4cyl). I bought them from Autozone (part #FA4054 for LH side; #FA5055 for RH side). I can't install the LH UCA, because the ball joint stem is larger than the slot on the knuckle. I compared it to the stem on the original UCA, and the new one appears to be a little larger in diameter. I've been able to expand the slot slightly by wedging a cold chisel into it, but can't expand it wide enough to allow the b/j stem to be inserted. Even if I were able to expand it more, I'm afraid it will cause the bolt holes to be misaligned. Any suggestions? Thanks.


Stems on ball joints on both control arms were larger than OEM, and wouldn't fit into the knuckle. I took the arms back to Autozone and bought the correct ones from Advance Auto Parts. Had to order them from Advance, but they were delivered next day, so not too bad.

Part No. 10929 TRW Control Arm W/Ball Joint Frt Susp; Upper; RH; 2WD; w/Coil spring Susp. $83.44
Part No. 10930 TRW Control Arm W/Ball Joint Frt Susp; Upper; LH; 2WD; w/Coil spring Susp. $69.98


Say Evan, where did you buy your upper arms from, how much, and was that the first time for the truck? I did just the upper Ford arms on my 98 Mounty when I bought it 76,000 miles ago. I have all new parts to do everything else now, and I haven't looked hard at my 76k uppers yet. Thanks for the good threads that you have done. I hope to do a BW4406 in mine sometime soon. Regards,


I got my drivers side upper from NAPA, it was just over $100, and has a greasable joint. I replaced it at ~135k. My passenger side (two piece) is stock and still good. I don't plan to replace it until I have to. When the time comes, I have a Moog on the shelf in the shop, its used, but for a short while. It should be fine.

Since I was doing a front end rehab, had the time and a digital camera, I thought I'd cover the how to's while I was it. We can't have the world largest Explorer community without write ups on common tasks.


Thanks, if when I look at my uppers they don't look great, I might take a look at the NAPA part.


sorry its a dumb question, why would i need to replace my UCA? they looked about the same in your pictures but one was obviously cleaner

TIA


When worn out the joint will move up and down in the bore, the new one was nice and tight. I didn't / couldn't diagnose it myself (truck assembled), I took it in for an alignment, they said I needed a new one. Once I removed it, it was obvious it was no good.


HEY there is a new RH UCA available from MOOG. the part number is a K80068, it is a direct replacement for the 2 piece design, it comes with control arm bushings and the same problem solver ball joint as the LH UCA. when i replace my ball joints, i will be going with the one piece design for the simple fact that it comes with control arm bushigns (which ALL of mine are completely F***ED!!!) i can feel my whole IFS system jiggle front and back at times in the bush and its a really annoying and uncomfortable movement. anyone else have this???

if your going to buy ball joints, go all out and get the MOOG ones because if you grease them they will literally outlast your vehicle!
check out moog's site if you are curiuos what a "powder metal gusher bearing" is.
it really is an incredible little piece of lubrication technology only MOOG has! they use this rather than grease veins and a nylon bearing.. lol...

i had a rep from federal mogul come in to my store and he did a demonstration with a piece of this metal and its mind boggling to see grease come out of a seemingly solid piece of metal.


Whats up yall. Thanks for the great instructions here. I'm having the eorst time trying to get the upper ball joint free from the knuckle. I've removed the pinch bolt and sprayed the thing down with PB Blaster, but it still wont budge. I've also tried using ball joint forks and a hammer. Any ideas?


Take a short screwdriver or something to wedge in the crack on the back of the knuckle. That will spread it open and help the ball joint slip out. A mini sledge and a few whacks up on the UCA usually does it though.


Thanks for the tip, Evan. I managed to get the tip of a ball joint fork in that slot and coax it to break free. Thanks again!


what is the difference really between the 2 piece and 1 piece design for the right side?


it shouldn't be a problem to make the conversion should it?


Anyone have torque specs?
Upper ball-joint pinch bolt
Lower ball-joint castle nut
Tie rod castle nut


Sorry.. My subsequent searching turned them up.. :)
Torque specs..

Bill MacLeod said:
The following is from a 99 shop manual for 4x4 (all in ft.lb):
Lower b/j nut - 83 to 112
Hub to knuckle - 74 to 96
Pinch bolt - 35 to 46
Hub nut - 157 to 213
Tie rod - 51-73
Upper ctrl arm bolts/nuts - 83 to 112
Sway bar end link nuts - 25 to 34


Join the Elite Explorers for $20 each year.
Elite Explorer members see no advertisements, no banner ads, no double underlined links,.
Add an avatar, upload photo attachments, and more!
.


Back
Top