aldive
Elite In Memoriam
- Joined
- January 17, 2001
- Messages
- 24,667
- Reaction score
- 28
- Year, Model & Trim Level
- 1999 XLT
I have had my Amsoil bypass oil filter system (http://www.explorerforum.com/forums/showthread.php?t=126111&highlight=amsoil+bypass+oil+filter ) installed for almost 3 years. While changing oil the other day, I noticed that the hoses were leaking oil ( small leak ). I did not want to make the long run to Atlanta in this state; therefore, a hose change was in order.
The previous routing of the hoses put them closer to the exhaust than I like. To remedy this, the new hoses were wrapped with header tape (http://www.jegs.com/webapp/wcs/stores/servlet/product_10001_10002_17168_-1 ) in the areas closest to exhaust components prior to installation.
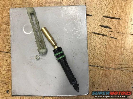
I ordered 8 feet of new 13/32" oil line hose (BP250 ) and 4 new fittings ( BP260 ) from Amsoil (Dead Link Removed ).
After removing the old hose and the oil filter adapter from the truck, I removed the hoses from the oil filter adapter and from the bypass manifold, I carefully measured the hoses and then cut the new hose to length ( 2 x 3 3/4” sections ).
The four new fittings were attached to each end of the hose as follows: Place socket in vice and screw in hose counter-clockwise until hose bottoms then back hose out 1⁄2 turn. Next, coat the inside of the hose and nipple threads liberally with motor oil. Screw nipple assembly into socket using 7/8” wrench on nipple hex until nipple hex shoulders against socket.
The old hose fittings could have been reused but I chose to get new ones.
The two hoses were then attached to the oil filter adapter and it was screwed into place on the motor. The hoses were then attached to the adapter prior to installing since there was no room to tighten them after the adapter was installed.
The hoses were wrapped with header tape in the area of the exhaust as well as in any impending “rub” areas.
The hoses were routed to be as far from the exhaust as possible. They were then secured with tie wraps and hose clamps.
Total install time was about 1 hour at a unhurried pace.
After a final check of the installation, the truck was started and evaluated for leaks; thankfully, there were none.
A brief road test to allow the oil to get up to operating temperature ( 200 F ) was conducted. This was followed by another look see for leaks; again, all was well.
Leak free and off to the ranch ….
The previous routing of the hoses put them closer to the exhaust than I like. To remedy this, the new hoses were wrapped with header tape (http://www.jegs.com/webapp/wcs/stores/servlet/product_10001_10002_17168_-1 ) in the areas closest to exhaust components prior to installation.
I ordered 8 feet of new 13/32" oil line hose (BP250 ) and 4 new fittings ( BP260 ) from Amsoil (Dead Link Removed ).
After removing the old hose and the oil filter adapter from the truck, I removed the hoses from the oil filter adapter and from the bypass manifold, I carefully measured the hoses and then cut the new hose to length ( 2 x 3 3/4” sections ).
The four new fittings were attached to each end of the hose as follows: Place socket in vice and screw in hose counter-clockwise until hose bottoms then back hose out 1⁄2 turn. Next, coat the inside of the hose and nipple threads liberally with motor oil. Screw nipple assembly into socket using 7/8” wrench on nipple hex until nipple hex shoulders against socket.
The old hose fittings could have been reused but I chose to get new ones.
The two hoses were then attached to the oil filter adapter and it was screwed into place on the motor. The hoses were then attached to the adapter prior to installing since there was no room to tighten them after the adapter was installed.
The hoses were wrapped with header tape in the area of the exhaust as well as in any impending “rub” areas.
The hoses were routed to be as far from the exhaust as possible. They were then secured with tie wraps and hose clamps.
Total install time was about 1 hour at a unhurried pace.
After a final check of the installation, the truck was started and evaluated for leaks; thankfully, there were none.
A brief road test to allow the oil to get up to operating temperature ( 200 F ) was conducted. This was followed by another look see for leaks; again, all was well.
Leak free and off to the ranch ….