jd4242
Explorer Addict
- Joined
- October 15, 2008
- Messages
- 10,790
- Reaction score
- 312
- City, State
- va beach
- Year, Model & Trim Level
- 92explorer&94 ranger
this is my write up on my 1st gen glo gauges i figured some one would have done this before but after i installed them and searched i came up with nothing so here it is.this is the set i used from ebay for $30 he also carries the ac and some other gauges.these things were a piece of cake to put in,didnt take more than 30 min and they look great.they are white at day and can be changed from blue to green and have a dimmer,witch you might have to use because they are really bright.
http://cgi.ebay.com/ebaymotors/1991...ptZMotorsQ5fCarQ5fTruckQ5fPartsQ5fAccessories
these pic were taken with it getting dark out so they are not the best

first you will need to set your ebrake and board your tires if your ebrake dont work,then you need to take your car out of gear and put it in first gear(just for auto) next you need to pull your ashtray out and you will see two screws on both sides,i used a torx bit set because its magnetic,they are two t15 screws

next remove the molding around the radio,gauges and headlight and vents its one piece and just pops out,you need to unplug the 4x4 switch first before it will come all the way out,you will also see why you needed to put your car in 1st gear now so the molding will clear.
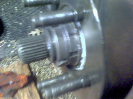
4x4 plug

now you will see a clear plastic lens that covers you gauges its next to go,there is 7 t10 screws that holds it in,they are the littler of the screws,you do not need to pull the gauges out to put this kit in

with that remove there will be a black piece that it mounts to you can remove that also

now you can start to slip the new gauges over your needles i started on the left side with the water and battery slip those on and do not bend the new gauges more than you need,next do the oil and fuel,do not secure these yet till both are in.now there is no screws that hold these two in so what i did was drill hole in the old gauges in the bottom and top,you will see notches where it looks like screws go,do not drill any bigger than the hole in the new gauges or drill the new gauges at all they will brake!!you can use glue if you do not want to drill,just make sure its really smooth and flat or else the needles will get stuck on it.


you can also see how i ran my wires in the second pic.
next is the speedo there is two screws that hold it in take them out carefully not to strip them and then slip the new speedo gauge on and aline it best you can,also i had to notch the black plastic where the new gauge connector is so it would sit flat,do not bend it,with it in place i took tin snips and sniped each side of the connector into the plastic and it made a notch for it to sit flat and then put the screws back in


next is the tach the harder part,you need to pull the tach out to be able to remove the screws the have nuts on the back,it just pulls right out,grab from the top and bottom and wiggle it till it pops out,you also might want to mark where the needle is just in case it falls off.when you have the old gauge out you will see three nuts on the back side remove them carefully and slip the new gauge on the front and put the screws and nuts back on.

not a very good pic but you cant miss them when you have the gauge out now put the gauge back in and run you wires where they wont get smashed by the black and clear thing,i ran them all towards the middle and down behind the steering wheel.put the black thing on first and make sure everything is clear then the clear piece,you are done with the gauges,next is the power,you have to hook it to a light that turn on with you head lamps the best place i found was the ashtray bulb.there should be three wires one in hot all the time and one is ground and the last is light blue with a dark red strip that is the switched power one that you will need,,hook you red to it and your ground to ground and mount your control switch.


put your molding back on and the two screws for the ashtray and turn your lights on and make sure your dimmer for you headlamps are all the way up then adjust the dimmer on the new switch to the brightness you want and if you want green or blue and your done no more dim dash or hard to see numbers,i love this mod its one you will see every day!!
couldn't get a good pic of the different colors but it bright and clear!!!!

so there it is simple as can be any question or comments,ask away,o and i hope i posted this in the right place
http://cgi.ebay.com/ebaymotors/1991...ptZMotorsQ5fCarQ5fTruckQ5fPartsQ5fAccessories
these pic were taken with it getting dark out so they are not the best
first you will need to set your ebrake and board your tires if your ebrake dont work,then you need to take your car out of gear and put it in first gear(just for auto) next you need to pull your ashtray out and you will see two screws on both sides,i used a torx bit set because its magnetic,they are two t15 screws
next remove the molding around the radio,gauges and headlight and vents its one piece and just pops out,you need to unplug the 4x4 switch first before it will come all the way out,you will also see why you needed to put your car in 1st gear now so the molding will clear.
4x4 plug
now you will see a clear plastic lens that covers you gauges its next to go,there is 7 t10 screws that holds it in,they are the littler of the screws,you do not need to pull the gauges out to put this kit in
with that remove there will be a black piece that it mounts to you can remove that also
now you can start to slip the new gauges over your needles i started on the left side with the water and battery slip those on and do not bend the new gauges more than you need,next do the oil and fuel,do not secure these yet till both are in.now there is no screws that hold these two in so what i did was drill hole in the old gauges in the bottom and top,you will see notches where it looks like screws go,do not drill any bigger than the hole in the new gauges or drill the new gauges at all they will brake!!you can use glue if you do not want to drill,just make sure its really smooth and flat or else the needles will get stuck on it.
you can also see how i ran my wires in the second pic.
next is the speedo there is two screws that hold it in take them out carefully not to strip them and then slip the new speedo gauge on and aline it best you can,also i had to notch the black plastic where the new gauge connector is so it would sit flat,do not bend it,with it in place i took tin snips and sniped each side of the connector into the plastic and it made a notch for it to sit flat and then put the screws back in
next is the tach the harder part,you need to pull the tach out to be able to remove the screws the have nuts on the back,it just pulls right out,grab from the top and bottom and wiggle it till it pops out,you also might want to mark where the needle is just in case it falls off.when you have the old gauge out you will see three nuts on the back side remove them carefully and slip the new gauge on the front and put the screws and nuts back on.
not a very good pic but you cant miss them when you have the gauge out now put the gauge back in and run you wires where they wont get smashed by the black and clear thing,i ran them all towards the middle and down behind the steering wheel.put the black thing on first and make sure everything is clear then the clear piece,you are done with the gauges,next is the power,you have to hook it to a light that turn on with you head lamps the best place i found was the ashtray bulb.there should be three wires one in hot all the time and one is ground and the last is light blue with a dark red strip that is the switched power one that you will need,,hook you red to it and your ground to ground and mount your control switch.
put your molding back on and the two screws for the ashtray and turn your lights on and make sure your dimmer for you headlamps are all the way up then adjust the dimmer on the new switch to the brightness you want and if you want green or blue and your done no more dim dash or hard to see numbers,i love this mod its one you will see every day!!
couldn't get a good pic of the different colors but it bright and clear!!!!
so there it is simple as can be any question or comments,ask away,o and i hope i posted this in the right place