Leaf Spring Refresh + bigger u-bolts and u-bolt skidplates | Ford Explorer Forums - Serious Explorations

  • Register Today It's free!

Leaf Spring Refresh + bigger u-bolts and u-bolt skidplates

Brian1

Elite Explorer
Joined
February 2, 2000
Messages
5,387
Reaction score
643
City, State
Albuquerque, NM
Year, Model & Trim Level
1991 XLT
Callsign
KG5BAQ
This past week I finished up rebuilding my rear leaf spring pack, added bigger 5/8" ubolts and made new leaf spring u-bolt skidplates.

My stock springs needed some attention, the teflon pads were broken and/or missing, The front eye bushing had never been replaced and they just needed a general cleaning up. I was happy with the lift they were giving me so I did not modify or re-arch my pack so this was just a simple and cheap rebuild.

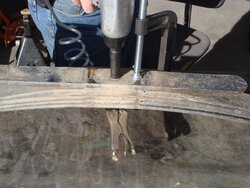
First I supported the frame with jackstands and then removed the u-bolts and then the leaf springs. Next the center pin was removed with a vice grip and impact. I removed what was left of the teflon pads and the stock clamp as well. Each individual leaf was wire brushed with a bench grinder, you can see the before and after on the leaf in the picture below.

I took the main leaf to the press and using a solid round piece of steel about the right size I pressed out the old bushing with its metal sleeve. I then took a small die grinder with wire wheel and cleaned the inside of the eye.
 

Attachments

  • m_DSC05100.jpg
    m_DSC05100.jpg
    100.6 KB · Views: 1,494
  • m_DSC05101.jpg
    m_DSC05101.jpg
    86.4 KB · Views: 1,452
  • m_DSC05104.jpg
    m_DSC05104.jpg
    109.3 KB · Views: 1,483
  • m_DSC05107.jpg
    m_DSC05107.jpg
    76.6 KB · Views: 1,721


Join the Elite Explorers for $20 each year.
Elite Explorer members see no advertisements, no banner ads, no double underlined links,.
Add an avatar, upload photo attachments, and more!
.


Next I used a flap wheel on my grinder to smooth any rough spots where the leafs had been rubbing together and wearing. I also added very small radiuses to the ends to eliminate the sharp corners that had been digging into the leaf above. Once that was all done each leaf got spray painted. I also bought new teflon pads from my local spring shop for $1 each and 2 spring clamps to replace the stock ones as well as new 3/8" center pins. I already had the bushing, I was just too lazy to replace it a few years ago when I did the rest of them.

The teflon pads didnt have as long of pins as the stock ones did so I put a little bit of clear RTV in hopes of gluing them to keep them from moving if the pins ever came out.
 

Attachments

  • m_DSC05113.jpg
    m_DSC05113.jpg
    70.2 KB · Views: 1,593
  • m_DSC05111.jpg
    m_DSC05111.jpg
    154.1 KB · Views: 1,474
  • m_DSC05110.jpg
    m_DSC05110.jpg
    108.6 KB · Views: 1,401
  • m_DSC05108.jpg
    m_DSC05108.jpg
    46.6 KB · Views: 1,428


Once the individual springs were rebuilt it was time to put them together using 2 c-clamps and a new center pin. A little blue loctite and then the impact to get them tight.

The new bushings were put in with a little coating of grease. I am using Energy Suspension Part # 4.3124G. Once the leaves were put back together I put the new clamp on, 1 per pack, where the stock clamps were and then reinstalled them on the Explorer with a new 9/16" grade 8 bolt in the front eye, the rest of the bolts were fairly new.
 

Attachments

  • m_DSC05114.jpg
    m_DSC05114.jpg
    106.1 KB · Views: 1,488
  • m_DSC05115.jpg
    m_DSC05115.jpg
    65.6 KB · Views: 1,440
  • m_DSC05120.jpg
    m_DSC05120.jpg
    95 KB · Views: 1,432


The whole reason I did this project was to upgrade my u-bolts from the stock ones to the bigger 5/8" ubolts that were also a bit longer. Since I have an add-a-leaf the stock ubolts were barely long enough.

I also redesigned my ubolt and shock skidplates to be made entirely from new steel and not rely on getting stock plates from the junkyard and modifying them. I installed them with the new ubolts and then reinstalled the shocks. I torqued the u-bolts to 125 ft-lbs and will recheck them after getting some miles on them.
 

Attachments

  • m_DSC05116.jpg
    m_DSC05116.jpg
    115.4 KB · Views: 1,519
  • m_DSC05117.jpg
    m_DSC05117.jpg
    123.5 KB · Views: 1,419
  • m_DSC05123.jpg
    m_DSC05123.jpg
    100.6 KB · Views: 1,450
  • m_DSC05124.jpg
    m_DSC05124.jpg
    97.7 KB · Views: 3,303


:thumbsup: Good work!


Wow, sweet work! Nice and beefy.


Thanks!

Since this was brought back up I might as well put in an update. Don't waste your time with putting in new Teflon pads, my springs have spit out most of them already. Next time I will use SlipPlate paint and just brush it on and not even use the Teflon pads. http://slipplate.com/


What was in the OME boxes?

I may have to change my springs out (I just re-packed them again) after this season.. They are starting to get an W shape on a couple of leaves..

~Mark


The box I painted the springs on? That is an ARB Skydome tent

Ahh.. I thought those were 2 different boxes. an ARB box for the tent and something else in the OME boxes.. its just different sides to the same box.. See what happens when I get on EF before I finish my first cup of coffee

~Mark


Since this was brought back up I might as well put in an update. Don't waste your time with putting in new Teflon pads, my springs have spit out most of them already. Next time I will use SlipPlate paint and just brush it on and not even use the Teflon pads. http://slipplate.com/

I used those same pads, they seem to just be nylon / hard plastic, not the fancy teflon kind. They actually fit ok in some stock springs, the second leaf on my X tapers pretty thin on either end so the outermost clip holds them in fine, and they haven't gone anywhere, even with the rear flexing and the rear of the springs spreading apart. Didn't even use silicone or glue or anything else. I'm not so sure slippery paint will do the job between sliding metal parts, I'd think it will just scrape off and leave metal to metal contact and wear pretty bad. I'd say scrounge for factory pads off newer vehicles at the junkyard instead. Or use stronger adhesive.


Hey Brian, do you remember the dimensions for the 5/8" ubolts? I'm swapping axles this weekend and want to replace my ubolts but don't know the dimensions.


Hey Brian, do you remember the dimensions for the 5/8" ubolts? I'm swapping axles this weekend and want to replace my ubolts but don't know the dimensions.

5/8" x 3 1/4" x 8" were the ones I ordered. The only dimension that really matters is the 3.25" to fit the 8.8 as you can always cut off excess threads. With my add-a-leaf and u-bolt skids I didn't need to cut off any from the 8", they were perfect.


I don't know if it will help, but when I did my SOA I got 10"x5/8"x3.25" u-bolts. I can't say if they would be the same for SUA.

~Mark

Edit: looks like we posted at the same time (yours posted first).. At least we now know soa and sua bolt dimensions are the same EXCEPT for length. I had to cut a good 2"+ off my bolts anyway so that would have made it 8"-ish..


Thanks! I'm getting some before this weekend.


Those plastic pads never worked for me either. I've had good luck with taking the packs apart, sanding and/or hitting them with a wire wheel, paint and finally rub some paraffin wax on the leafs to keep them moving smoothly.


Back
Top