How To: No-Weld Hitch for Body Lift | Ford Explorer Forums - Serious Explorations

  • Register Today It's free!

How To: No-Weld Hitch for Body Lift

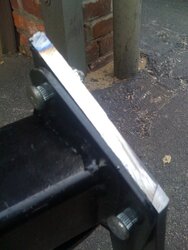
Not sure all the years this will work for. This is done with the Reese 37012 hitch, so if that's listed for your vehicle, you're good.

Refer to my thread for a list of all 2nd Gen hitches and why I chose the 37012. The 37012 is pretty pricey (over $200) compared to other hitches for some reason.
Complete List of Hitch Specs & Body Lift Fix

You'll need:
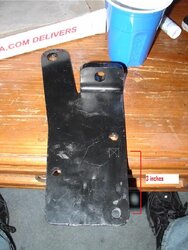
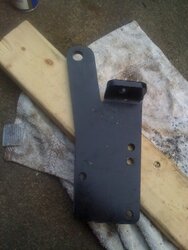
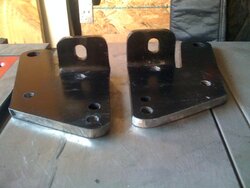
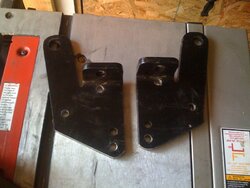
1) A drill (press is ideal) with a 3/8" bit;
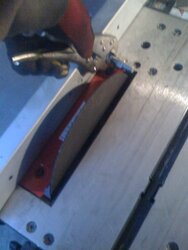
2) If you're body lift is 3" (like mine) and you want to raise the hitch more than 2.5", then you need something that can cut metal, grinder at the least;
3) Some kind of black paint to touch up the bare metal you just exposed; and
4) The courage to start drilling and cutting a brand new $200+ hitch, especially in light of Reese's "DO NOT DRILL OR WELD TO THIS HITCH" warnings.


Join the Elite Explorers for $20 each year.
Elite Explorer members see no advertisements, no banner ads, no double underlined links,.
Add an avatar, upload photo attachments, and more!
.


Step 1 - Bottom Hole

Start with the bottom most hole. Measure and mark your body lift (3" in my case) above the bottom hole. Measure carefully and accurately. Then drill. A drill press would have given me a much more accurate hole.

*Edit - If you have a 3" body lift but don't want to do all the extra drilling and cutting as described below, then you'll want to measure about 2.5".
 

Attachments

  • Step 1a - Marked Hole.JPG
    Step 1a - Marked Hole.JPG
    44.6 KB · Views: 1,168
  • Step 1b - Drilled Hole 3-8 inch drill.JPG
    Step 1b - Drilled Hole 3-8 inch drill.JPG
    63.5 KB · Views: 1,194


Step 2 - Chop Top Tab (only for 3" body lifts)

The most you can lift this hitch without cutting the top is 2.5". If you have a 2" lift, skip this step. If you have a 3" and don't care about the extra 0.5", skip this step.

You need to cut about 1/2" (measured from the very tip of the tab). I used a table saw and cut a little bit less, then slowly ground off more with a grinder until it fit with the bracket.
 

Attachments

  • Step 2 - Chop Top.JPG
    Step 2 - Chop Top.JPG
    46.4 KB · Views: 1,196


Step 3 - 2nd Hole

Attach the side bracket with the hitch with one of the 3/8" knurled bolts through the newly drilled bottom hole in Step 1.

Don't torque the knurled bolts in until the very end when you're ready to permanently attach the hitch to your Ex. Just hand tighten them through all these steps. The knurling smashes down and expands the holes, so if you keep pushing them in and out of the holes, the holes may start to get loose and no longer hold the bolts tightly when you try to torque them.

Clamp somewhere else on the hitch to the bracket, making sure you line up the front edge, then tighten the clamp.

Now you can put the drill bit through the 2nd hole to start the hole to get accurate placement. After you drill a little bit, remove the side bracket and then drill it seperately.
 

Attachments

  • Step 3a - Clamp.JPG
    Step 3a - Clamp.JPG
    77.9 KB · Views: 1,184
  • Step 3b - Line Up.JPG
    Step 3b - Line Up.JPG
    50.2 KB · Views: 1,191
  • Step 3c - Marked Hole.JPG
    Step 3c - Marked Hole.JPG
    74.9 KB · Views: 1,171
  • Step 3d - Drilled Holes.JPG
    Step 3d - Drilled Holes.JPG
    41.4 KB · Views: 1,190


Step 4 - New Top Hole in Hitch (only for 3")

If you're lifting 2.5" or less, then skip this step.

For us 3"ers, we have to drill a new top hole because we chopped off the original one. I guess the hitch is strong enough with the 2 bolts on each side, but I went this extra step.

Find a spot in the middle of the remaining top tab where there will be enough room for a 3/8" hole. I measured the halfway distance in the picture, then just eyeballed the depth.

I then used a dremel to grind out some of the welding so the head of the 3/8" knurled bolts would sit flush.
 

Attachments

  • Step 4 - Relief.JPG
    Step 4 - Relief.JPG
    77.2 KB · Views: 1,251
  • Step 4 - Relief with Knurled Bolt.JPG
    Step 4 - Relief with Knurled Bolt.JPG
    93.7 KB · Views: 1,170
  • Step 4 - Outer End.JPG
    Step 4 - Outer End.JPG
    31.8 KB · Views: 1,151
  • Step 4 - Inner End.JPG
    Step 4 - Inner End.JPG
    60.7 KB · Views: 1,144


Step 5 - Top Hole in Bracket

Repeat Step 3 for the 3rd top hole in the side brackets. Hand tighten two bolts now, clamp it down tight, start the hole, then remove the bracket and finish the hole.

Notice the diagonal line I razored in when I had the bracket clamped to the hitch. This follows the bottom hitch's edge. This is where I plan to saw off the bottom of the brackets for Step 7.
 

Attachments

  • Step 5 - 3 hole drilled bracket.JPG
    Step 5 - 3 hole drilled bracket.JPG
    60.8 KB · Views: 1,185


Step 6 - Cut Bolt (only for 3")

If you're going with the 3" lift, then you only have 1" of room between the bottom of the frame rail and the top of the hitch.

You'll either have to cut the 1/2" carriage bolts shorter or install them in reverse. The setup doesn't seem to work as well when you reverse the carriage bolts, and I wanted to retain Reese's design as much as possible.

I cut off 1/3" off the bolts. Just about perfect.

Remember to screw the nut on all the way to the end before you chop, so you can "re-die" the bolt as you thread the nut back off, otherwise you might have trouble getting the nut on.
 

Attachments

  • Step 6 - Cut one-third inch off bolt.JPG
    Step 6 - Cut one-third inch off bolt.JPG
    51 KB · Views: 1,167


Step 7 - Cutting Brackets (optional)

I was going to cut 3" off the bottom of the brackets straight across, but then I thought it would look sleeker if I did an angle cut. I think there's room for the extended Warrior shackles with the stock hitch, but the angle cut makes it no question that the shackles will clear at any flex.

This step is optional for looks and it takes a lot of power to cut through these bad boys. If you're ever contemplating removing your body lift or selling the hitch in the future, then these would be considerations to skip this.

I used my table saw to rip cut the angle. I then ground it closer and rounded the edges with a grinder.

Then spray the most durable black paint (I used Plasti-Dip Spray) over all the silver you created.
 

Attachments

  • Step 7d.JPG
    Step 7d.JPG
    105.9 KB · Views: 1,320
  • Step 7c.JPG
    Step 7c.JPG
    107.9 KB · Views: 1,154
  • Step 7b.JPG
    Step 7b.JPG
    62.3 KB · Views: 1,135
  • Step 7a - Cut In Half.JPG
    Step 7a - Cut In Half.JPG
    47.8 KB · Views: 1,253


Installation

You have to stop and think about the installation a little bit. The clearances are tight with the top bolt with the 3" lift. The only way I could think this could be done is to install the top 3/8" knurled bolts before installing the 1/2" carriage bolt. Then drop the 1/2" carriage bolt down in and work the nut on and torque with a 3/4" open-end box wrench.

If you used the reversed carriage bolt method (nut goes inside the frame rail), then you won't have a problem.
 

Attachments

  • Installation.JPG
    Installation.JPG
    59.8 KB · Views: 1,193


Before

Before:
 

Attachments

  • Before Far.JPG
    Before Far.JPG
    119.8 KB · Views: 1,142
  • Before Close.JPG
    Before Close.JPG
    116.4 KB · Views: 1,158
  • Before Left.JPG
    Before Left.JPG
    112.7 KB · Views: 1,195
  • Before Right.JPG
    Before Right.JPG
    114.5 KB · Views: 1,282


After!

After!
 

Attachments

  • After Close.JPG
    After Close.JPG
    107.6 KB · Views: 1,264
  • After Far.JPG
    After Far.JPG
    110 KB · Views: 1,160
  • After Left.JPG
    After Left.JPG
    57.9 KB · Views: 1,152
  • After Right.JPG
    After Right.JPG
    49.4 KB · Views: 1,236


Please excuse my bumper; I am trying to paint it. It doesn't have the plastic top to it and I removed the black shield that covers that gap, so keep that in mind when you scrutinize the looks; it will look better on your ride.
 

Attachments

  • Before Full Shackle.JPG
    Before Full Shackle.JPG
    70.5 KB · Views: 1,139
  • After Shackle 1.JPG
    After Shackle 1.JPG
    72.8 KB · Views: 1,148
  • After Shackle 2.JPG
    After Shackle 2.JPG
    64.3 KB · Views: 1,157


BTW, that's the 16" oversized spare that fits with this hitch. It also hides the tire perfectly. I didn't carry around my spare before because you could see it's hideousness with the body lift, but now the hitch covers it nicely and I can have the peace of mind of carrying a spare.


Back
Top