kylecolb
Well-Known Member
- Joined
- October 4, 2010
- Messages
- 134
- Reaction score
- 0
- City, State
- Oshkosh, WI
- Year, Model & Trim Level
- 2002 XLT
I hope this helps. I could not find any topics anywhere on how to remove the cowls on the 3rd gens and it was quite tricky.
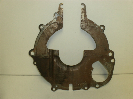
I figured this out, but didn't snap any pictures of the process. Sun wasn't working with me to get good shots. It is rather difficult to get out, you need to have the hood half open, half closed. Unlike previous generations the cowl for the 3rd gens are in reality 1 solid piece. Yes they are attached in the middle, but once the two pieces are together, it is near impossible to get them apart.
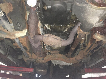
Step 1: Remove windshield wiper arms! Then open the hood all the way. Look under where the cowl would be and you will see 4 metal/plastic clips holding the cowl on. Push them upwards with your finger or a wrench if it hurts your finger.
Step 2: Look at the ends (front piece edges facing the headlights) and you will see an arrow on each side pointing towards the sides. There are two hidden clips here. I used a flathead screw driver and turned it, held the cowl, and tried prying it up. I got the clip out on the ends then. (i got some minor scratches from the screwdriver on the paint, but this paint will all be hidden under the cowl never to be seen again)
Step 3: Now you should have the whole front side of the cowl unlatched/unhooked. There ARE NO SCREWS INVOLDED IN THE 3RD GENS!!
Step 4: Here comes the hard/tricky part: Getting the clips unhooked near the windshield. These cannot be seen unless peeling the front of the cowl up and squinting under. For this step, I started on the drivers side and worked towards the middle where the 2 cowls come together. You need to pop up the very edge of the cowl, I did mine from the under the hood side by just pulling up. Once the edge is popped up, put one finger between the cowl and the windshield and the other hand holding directly across the cowl under the hood (IT IS OK TO HAVE THE HOOD ALL THE WAY OPEN AT THIS POINT, IT ONLY NEEDS TO BE HALF OPEN FOR FINALLY REMOVING THE COWL AND PUTTING THE COWL BACK INTO PLACE). Now with your hands directly across from eachother pull up a little section at a time to pop the rest of the cowl out of place, but be careful as the cowl is fragile.
Step 5: Work your way to the middle doing this. Once you get to the middle start on the other side. Work your way to the middle there. Once you feel everything is popped out of place, you might still be missing one as i was. I grabbed a sturdy metal rod and went under the cowl from the under the hood side and used the rod to push a clip out i had missed and wasn't able to pull up and pop out.
Step 6: Careful with the final removal of the cowl. This is where you might need the hood half open/half closed to get out. I needed to do it that way. Try and lift the whole connected cowl at once so you don't damage or break the clips holding the cowl pieces together. From what I tried and saw, they do not come apart once attached.
Step 7: Spray the cowls off to clean them and let them air dry.I laid the connected cowls on a large piece of cardboard to paint and clear coat them. I have them all done now and they look beautiful. I went to the hardware store to buy paint, and spoke with the employee in the paint dept. I explained to him what I wanted to paint and he pointed me in the right direction (he said he had just painted the cowls on his truck the year before and the paint was holding up great).
--I'm sure you can figure out how to reinstall.
I did about 3 coats of paint and 1 good coat of clear coat like the paint employee directed me to.
The paint I used was Krylon Fusion for plastic. Picture of paint cans below. This paint type involves NO PRIMING OR SANDING! I'm sure you could if you wanted to but there is no need.
Paint used

Final Result: no before picture but it looked like pure crap before

I figured this out, but didn't snap any pictures of the process. Sun wasn't working with me to get good shots. It is rather difficult to get out, you need to have the hood half open, half closed. Unlike previous generations the cowl for the 3rd gens are in reality 1 solid piece. Yes they are attached in the middle, but once the two pieces are together, it is near impossible to get them apart.
Step 1: Remove windshield wiper arms! Then open the hood all the way. Look under where the cowl would be and you will see 4 metal/plastic clips holding the cowl on. Push them upwards with your finger or a wrench if it hurts your finger.
Step 2: Look at the ends (front piece edges facing the headlights) and you will see an arrow on each side pointing towards the sides. There are two hidden clips here. I used a flathead screw driver and turned it, held the cowl, and tried prying it up. I got the clip out on the ends then. (i got some minor scratches from the screwdriver on the paint, but this paint will all be hidden under the cowl never to be seen again)
Step 3: Now you should have the whole front side of the cowl unlatched/unhooked. There ARE NO SCREWS INVOLDED IN THE 3RD GENS!!
Step 4: Here comes the hard/tricky part: Getting the clips unhooked near the windshield. These cannot be seen unless peeling the front of the cowl up and squinting under. For this step, I started on the drivers side and worked towards the middle where the 2 cowls come together. You need to pop up the very edge of the cowl, I did mine from the under the hood side by just pulling up. Once the edge is popped up, put one finger between the cowl and the windshield and the other hand holding directly across the cowl under the hood (IT IS OK TO HAVE THE HOOD ALL THE WAY OPEN AT THIS POINT, IT ONLY NEEDS TO BE HALF OPEN FOR FINALLY REMOVING THE COWL AND PUTTING THE COWL BACK INTO PLACE). Now with your hands directly across from eachother pull up a little section at a time to pop the rest of the cowl out of place, but be careful as the cowl is fragile.
Step 5: Work your way to the middle doing this. Once you get to the middle start on the other side. Work your way to the middle there. Once you feel everything is popped out of place, you might still be missing one as i was. I grabbed a sturdy metal rod and went under the cowl from the under the hood side and used the rod to push a clip out i had missed and wasn't able to pull up and pop out.
Step 6: Careful with the final removal of the cowl. This is where you might need the hood half open/half closed to get out. I needed to do it that way. Try and lift the whole connected cowl at once so you don't damage or break the clips holding the cowl pieces together. From what I tried and saw, they do not come apart once attached.
Step 7: Spray the cowls off to clean them and let them air dry.I laid the connected cowls on a large piece of cardboard to paint and clear coat them. I have them all done now and they look beautiful. I went to the hardware store to buy paint, and spoke with the employee in the paint dept. I explained to him what I wanted to paint and he pointed me in the right direction (he said he had just painted the cowls on his truck the year before and the paint was holding up great).
--I'm sure you can figure out how to reinstall.
I did about 3 coats of paint and 1 good coat of clear coat like the paint employee directed me to.
The paint I used was Krylon Fusion for plastic. Picture of paint cans below. This paint type involves NO PRIMING OR SANDING! I'm sure you could if you wanted to but there is no need.
Paint used
Final Result: no before picture but it looked like pure crap before