TheGTkid
Well-Known Member
- Joined
- October 3, 2012
- Messages
- 220
- Reaction score
- 2
- City, State
- Jackson, Michigan
- Year, Model & Trim Level
- 2002 Ford Explorer XLT
So I replaced the rear brakes the other day, I took some pics, and this won't be a "formal" write-up but it will give some advice!
The brakes are 4 wheel disc, so that can be helpful info as you read
Disclaimer: I am not responsible for your vehicle not stopping, going, or the damage you do to yourself and/or vehicle
The rear brakes on my 02 terrified me at first, but its okay, I took my time, assessed the situation and moved on
The slider pin and bolt to hold the rear caliber in place is one piece, so that was weird to me, never seen it, but its Ford, you never know what the engineers are thinking!
There are 2 slider pins with threads at the very end of the "bolt"/slider pin with a size 10 hex head.
Tools needed:
Socket wrench
Socket line (metric)
Screw drivers
Anti-seize
Helper (bleeding brakes)
Brake Fluid
Air ratchet (or just the regular tire iron)
Jack
Jack stands
and if you're over the age of 21, a beer
Procedure:
Step 1: Remove tire
Step 2: Loosen the bolt/slider pin, slide it out, move on to the next bolt
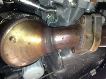
Step 3: Wiggle the caliper off the disc (for some it might come easy, for others I am sorry but it could be a little difficult, just be patient and wiggle, and pull towards the rear of the vehicle)

(the pics are blurry, sorry, it was cold!)
Now you'll find yourself in this position!

See that clip on the left side (outside when mounted on vehicle)? A couple screw drivers will be your friend
Step 4: Pull off the outside pad by prying the clip, and the pad up at the same time (This will be hard, you might consider cursing and throwing things to get your frustration out)
Step 5: Removing the inner pad is simple, the outter pad needs to be gone first though. Simply pull the pad away from the piston, there is a triple prong that grips the inside of the piston, it came out easy for me and is easy to replace
Step 6: Depress the piston, pop the hood, open the brake booster, and get a c-clamp large enough to fit around the caliper
I will edit the pictures to be more understandable soon, but I will describe the best I can now

the rounded part on the caliper is where you will want to put the threaded end of the clamp

the back side of the caliper isn't shown very well, but you see the metal line going into the caliper, don't damage that, but there is a mounting bracket where you can place the stationary part of the clamp on that bracket and put a pad on the piston
start turning the clamp to depress the piston
When the piston is depressed it will be flush to the inside of the caliper and the rubber boot will help you determine that
Step 7: Make sure you have matching pads, there is a double lipped side on all the pads, make sure your left side (of the vehicle) pads have the double lip on the bottom and the right side have the double on the bottom as well (I am not very descriptive but I will get more pics as this is informal and just advise at this point)
Step 8: Install the inside of the caliper pad, this piece has a triple prong that goes into the piston, just slide it in there and it is fine
Step 9: The outside pad is easy (the pad with the large clip) just slide it on, make sure Step 7 is correct or like me, you will have to pry the clip off the caliper to put the right pad on. You will know you did it wrong when you go to put the caliper on to the mounting bracket, thats when I learned
Step 10: Grease up your slider pins, and mount the caliper onto the caliper mounting bracket
Step 11: Do the same for the opposite side
Step 12: Get a helper to bleed your brakes
Step 13: Clean your garage, or don't but test the brakes real quick
Remember: Heavy braking right after putting fresh brakes on isn't good, get about 50 miles on them before you beat them up real good doing 60-0 distances
Harah! My first "write-up" and it's not the best
more pics on the way
better advice and description soon
Any questions, or other advice is helpful to post here!
Thank you for reading
The brakes are 4 wheel disc, so that can be helpful info as you read
Disclaimer: I am not responsible for your vehicle not stopping, going, or the damage you do to yourself and/or vehicle
The rear brakes on my 02 terrified me at first, but its okay, I took my time, assessed the situation and moved on
The slider pin and bolt to hold the rear caliber in place is one piece, so that was weird to me, never seen it, but its Ford, you never know what the engineers are thinking!
There are 2 slider pins with threads at the very end of the "bolt"/slider pin with a size 10 hex head.
Tools needed:
Socket wrench
Socket line (metric)
Screw drivers
Anti-seize
Helper (bleeding brakes)
Brake Fluid
Air ratchet (or just the regular tire iron)
Jack
Jack stands
and if you're over the age of 21, a beer
Procedure:
Step 1: Remove tire
Step 2: Loosen the bolt/slider pin, slide it out, move on to the next bolt
Step 3: Wiggle the caliper off the disc (for some it might come easy, for others I am sorry but it could be a little difficult, just be patient and wiggle, and pull towards the rear of the vehicle)
(the pics are blurry, sorry, it was cold!)
Now you'll find yourself in this position!
See that clip on the left side (outside when mounted on vehicle)? A couple screw drivers will be your friend
Step 4: Pull off the outside pad by prying the clip, and the pad up at the same time (This will be hard, you might consider cursing and throwing things to get your frustration out)
Step 5: Removing the inner pad is simple, the outter pad needs to be gone first though. Simply pull the pad away from the piston, there is a triple prong that grips the inside of the piston, it came out easy for me and is easy to replace
Step 6: Depress the piston, pop the hood, open the brake booster, and get a c-clamp large enough to fit around the caliper
I will edit the pictures to be more understandable soon, but I will describe the best I can now
the rounded part on the caliper is where you will want to put the threaded end of the clamp
the back side of the caliper isn't shown very well, but you see the metal line going into the caliper, don't damage that, but there is a mounting bracket where you can place the stationary part of the clamp on that bracket and put a pad on the piston
start turning the clamp to depress the piston
When the piston is depressed it will be flush to the inside of the caliper and the rubber boot will help you determine that
Step 7: Make sure you have matching pads, there is a double lipped side on all the pads, make sure your left side (of the vehicle) pads have the double lip on the bottom and the right side have the double on the bottom as well (I am not very descriptive but I will get more pics as this is informal and just advise at this point)
Step 8: Install the inside of the caliper pad, this piece has a triple prong that goes into the piston, just slide it in there and it is fine
Step 9: The outside pad is easy (the pad with the large clip) just slide it on, make sure Step 7 is correct or like me, you will have to pry the clip off the caliper to put the right pad on. You will know you did it wrong when you go to put the caliper on to the mounting bracket, thats when I learned
Step 10: Grease up your slider pins, and mount the caliper onto the caliper mounting bracket
Step 11: Do the same for the opposite side
Step 12: Get a helper to bleed your brakes
Step 13: Clean your garage, or don't but test the brakes real quick
Remember: Heavy braking right after putting fresh brakes on isn't good, get about 50 miles on them before you beat them up real good doing 60-0 distances
Harah! My first "write-up" and it's not the best
more pics on the way
better advice and description soon
Any questions, or other advice is helpful to post here!
Thank you for reading