bdriver000
New Member
- Joined
- May 29, 2002
- Messages
- 9
- Reaction score
- 1
- City, State
- Austin, TX
- Year, Model & Trim Level
- '96 4-door XLT
This is an illustrated How-To for a 1996 XLT 2WD and similar models. I'm not sure which other years use the same setup, but some people might find this useful.
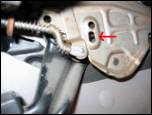
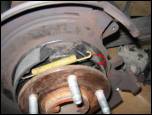
Before you start work on the parking brake, you need to loosen the cable. Right above the parking brake lever (that you push with your foot to engage the parking brake) there is a small hole. Reach under the car under the driver's seat and pull on the parking brake cable (or get a helper to pull on it). You can stick a nail or a drill bit through the hole shown here to keep the spring from pulling the slack out of the cable so you can work on the brakes.
Click the thumbnails to view full picture
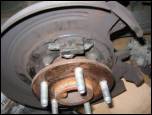
Loosen the lug nuts, and jack up your back end. I put it on jack stands then loosened the lugs all the way and removed the tire. The caliper is very easy to remove with two nuts facing the center of the truck.
Wheel Removed, Caliper taken off, Rotor Removed
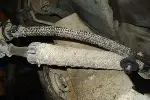
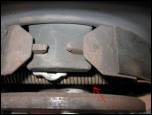
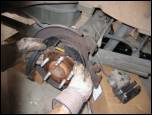
This picture shows the axle blocking your view of the parking brake assembly. I originally thought I would have to remove the axles to work on this--but some other very helpful posters said it was possible to do this without this step.
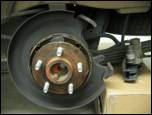
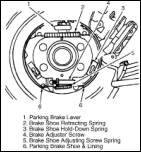
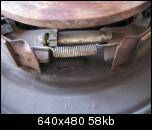
Illustration of Parking Brake Assembly
This shows the terminology and locations of the parts we will be removing/replacing/installing
Adjuster and Adjuster Spring
Tighten the adjuster with a screwdriver (rotate it up towards you to tighten). You want to make it easier to take off the spring. This picture is looking up at the assembly.
The first thing to remove is the hold down springs. These are easy to remove with a pair of long needle-nose pliers and a screwdriver. There is a little piece that attaches to the housing from behind the assembly. Be careful not to lose these. There is one on the right and left side.
Hold Down Spring
Once the two hold down springs are removed, you can take off the adjuster spring then the adjuster. The picture above shows those two components.
Now you can take off the retracting springs at the top of the assembly. These are stronger than the adjuster spring, so a bit harder to take off. Remove the one facing you first, then the brake pads will move so easily you can get behind them to remove the second retracting spring.
Retracting Spring
Now you should have all the parts removed and a bare assembly site to put everything back together on.
Bare Site
All the parts

Edit by Turdle.
add these parts to be removed. Parking brake levers. When assembled correctly they will be stamped for the correct side, but beware, you can assemble them incorrectly and get the same stamping, which results in them being in backwards.
replacement kits ofr these are available, however they are listed for f150 and expedition. this results in the stamping being incorrect, but, otherwise they will be the same parts. Use pics for proper assembly and everything should go well.
Dorman 924741 is the part number. This is what you get in the box


In my experience and after reading thru this thread, I feel the root cause of the e brake issues are from the parking brake levers being siezed , or in a state of lack of motion. This causes the e brakes to not fully release, and then a chain of problems from that.
Be sure to take pictures of how they are assembled, then remove them, clean the real well with a scotch brite. Use emery cloth and brake cleaner. give them a good polishing, then apply a dab of lithium grease to the pivot nipple. Set them aside --way aside and proceed.
/edit
Now spray the site and parts down with brake cleaner. If your car was anything like mine it is filled with the stuff.
Now you are ready to start putting everything back together. If you have someone to help you, it can save you a lot of headaches--but it can be done alone.
Connect the two brake pads with the back retractor spring. You can slide it between the axle and the top of the assembly as shown in this picture. The top of the pads are notched so they fit snug where the lever pushes them. I had to move the lever with a screwdriver to get the left side to fit.
Now you can choose the path you want to take:
1) Attach the front retractor spring now, then put the adjuster and adjuster spring on.
2) Put the adjuster and adjuster spring on first, then the front retractor spring.
I did #2 because it was too hard to spread the bottom of the pads to get the adjuster in with both springs on. You might have an easier time with it so go for it!
So spread the pads outward at the bottom and insert the adjuster. Then insert the adjuster spring. This will help keep the pads together when you are getting that last retracting spring on.
Now put the front adjusting spring on. This was hard to do, I used a pair of spring pliers (for drum brakes) to get it over and my buddy snapped it in place with the needle-nose. The angle is tough because of the axle in the way but you can do it. If you can't get it on the right side, try it on the left.
The last pieces of the assembly are the hold down springs. Hold the piece on the back of the brake shield with one hand then use a pair of needle nose to get them back in. If you have a pair of angled needle-nose they would work great here. It took me a few tries but I got them back on. Now everything is back together.
EDIT FROM TURDLE.
PLEASE SEE POST 930 IN THIS THREAD FOR A TOOL UNDER 10 BUX THAT WILL ATTACH THIS SPRING EASILY! http://www.explorerforum.com/forums...ogress-log-thread.329322/page-38#post-3637952
OEM 25000 is the tool. Buy it!
/edit
Adjustment
Now you can expand the adjuster outward by rotating the notched wheel away from you. Expand it out a quarter/half inch and put the rotor back on. If it slides on easily, take it off and expand it some more. When you get it wide enough where there is resistance putting the rotor back on--back it off a bit and you are good to go. Put the rotor, caliper, and wheel back on. Now you are ready for the other side!
Don't forget to remove the nail/drill bit from the hole by the parking brake lever!
I hope this can help someone. If you have any tips or if I said anything blatently wrong please respond!
Thanks
Before you start work on the parking brake, you need to loosen the cable. Right above the parking brake lever (that you push with your foot to engage the parking brake) there is a small hole. Reach under the car under the driver's seat and pull on the parking brake cable (or get a helper to pull on it). You can stick a nail or a drill bit through the hole shown here to keep the spring from pulling the slack out of the cable so you can work on the brakes.
Click the thumbnails to view full picture
Loosen the lug nuts, and jack up your back end. I put it on jack stands then loosened the lugs all the way and removed the tire. The caliper is very easy to remove with two nuts facing the center of the truck.
Wheel Removed, Caliper taken off, Rotor Removed
This picture shows the axle blocking your view of the parking brake assembly. I originally thought I would have to remove the axles to work on this--but some other very helpful posters said it was possible to do this without this step.
Illustration of Parking Brake Assembly
This shows the terminology and locations of the parts we will be removing/replacing/installing
Adjuster and Adjuster Spring
Tighten the adjuster with a screwdriver (rotate it up towards you to tighten). You want to make it easier to take off the spring. This picture is looking up at the assembly.
The first thing to remove is the hold down springs. These are easy to remove with a pair of long needle-nose pliers and a screwdriver. There is a little piece that attaches to the housing from behind the assembly. Be careful not to lose these. There is one on the right and left side.
Hold Down Spring

Once the two hold down springs are removed, you can take off the adjuster spring then the adjuster. The picture above shows those two components.
Now you can take off the retracting springs at the top of the assembly. These are stronger than the adjuster spring, so a bit harder to take off. Remove the one facing you first, then the brake pads will move so easily you can get behind them to remove the second retracting spring.
Retracting Spring
Now you should have all the parts removed and a bare assembly site to put everything back together on.
Bare Site
All the parts
Edit by Turdle.
add these parts to be removed. Parking brake levers. When assembled correctly they will be stamped for the correct side, but beware, you can assemble them incorrectly and get the same stamping, which results in them being in backwards.
replacement kits ofr these are available, however they are listed for f150 and expedition. this results in the stamping being incorrect, but, otherwise they will be the same parts. Use pics for proper assembly and everything should go well.
Dorman 924741 is the part number. This is what you get in the box
In my experience and after reading thru this thread, I feel the root cause of the e brake issues are from the parking brake levers being siezed , or in a state of lack of motion. This causes the e brakes to not fully release, and then a chain of problems from that.
Be sure to take pictures of how they are assembled, then remove them, clean the real well with a scotch brite. Use emery cloth and brake cleaner. give them a good polishing, then apply a dab of lithium grease to the pivot nipple. Set them aside --way aside and proceed.
/edit
Now spray the site and parts down with brake cleaner. If your car was anything like mine it is filled with the stuff.
Now you are ready to start putting everything back together. If you have someone to help you, it can save you a lot of headaches--but it can be done alone.
Connect the two brake pads with the back retractor spring. You can slide it between the axle and the top of the assembly as shown in this picture. The top of the pads are notched so they fit snug where the lever pushes them. I had to move the lever with a screwdriver to get the left side to fit.
Now you can choose the path you want to take:
1) Attach the front retractor spring now, then put the adjuster and adjuster spring on.
2) Put the adjuster and adjuster spring on first, then the front retractor spring.
I did #2 because it was too hard to spread the bottom of the pads to get the adjuster in with both springs on. You might have an easier time with it so go for it!
So spread the pads outward at the bottom and insert the adjuster. Then insert the adjuster spring. This will help keep the pads together when you are getting that last retracting spring on.
Now put the front adjusting spring on. This was hard to do, I used a pair of spring pliers (for drum brakes) to get it over and my buddy snapped it in place with the needle-nose. The angle is tough because of the axle in the way but you can do it. If you can't get it on the right side, try it on the left.
The last pieces of the assembly are the hold down springs. Hold the piece on the back of the brake shield with one hand then use a pair of needle nose to get them back in. If you have a pair of angled needle-nose they would work great here. It took me a few tries but I got them back on. Now everything is back together.
EDIT FROM TURDLE.
PLEASE SEE POST 930 IN THIS THREAD FOR A TOOL UNDER 10 BUX THAT WILL ATTACH THIS SPRING EASILY! http://www.explorerforum.com/forums...ogress-log-thread.329322/page-38#post-3637952
OEM 25000 is the tool. Buy it!
/edit
Adjustment
Now you can expand the adjuster outward by rotating the notched wheel away from you. Expand it out a quarter/half inch and put the rotor back on. If it slides on easily, take it off and expand it some more. When you get it wide enough where there is resistance putting the rotor back on--back it off a bit and you are good to go. Put the rotor, caliper, and wheel back on. Now you are ready for the other side!
Don't forget to remove the nail/drill bit from the hole by the parking brake lever!
I hope this can help someone. If you have any tips or if I said anything blatently wrong please respond!
Thanks


")