SOHC V6 Timing Chain Saga | Page 6 | Ford Explorer Forums - Serious Explorations

  • Register Today It's free!

SOHC V6 Timing Chain Saga

yikes!

I called Advance back and got a different guy. He stated that they don't have shortblocks (only longblocks) but the price I was quoted was a little off....... more like $2700.00! Maybe I misunderstood! The local junkyard has a shop that installs used engines with a 1 yr warranty if they do the swap. But, I didn't get a price as he didn't have a 4.0 sohc anyway.
I'm gonna look for something to tide me over while I figure out what to do next. Bummer, cuz I really liked this girl!
Thanks for the input and I'm sure to keep watching Dale's progress.


Join the Elite Explorers for $20 each year.
Elite Explorer members see no advertisements, no banner ads, no double underlined links,.
Add an avatar, upload photo attachments, and more!
.


I called Advance back and got a different guy. He stated that they don't have shortblocks (only longblocks) but the price I was quoted was a little off....... more like $2700.00! Maybe I misunderstood! The local junkyard has a shop that installs used engines with a 1 yr warranty if they do the swap. But, I didn't get a price as he didn't have a 4.0 sohc anyway.
I'm gonna look for something to tide me over while I figure out what to do next. Bummer, cuz I really liked this girl!
Thanks for the input and I'm sure to keep watching Dale's progress.

Work on finding a place to do the valvetrain work. If you can get that done for under $500 for labor, that makes the repair a better route(if the engine is still sound).


Confirm the problem

. . . I'm gonna look for something to tide me over while I figure out what to do next. Bummer, cuz I really liked this girl!
Thanks for the input and I'm sure to keep watching Dale's progress.

Don't just assume the worst. Do a compression test on one plug on each bank before giving up on your engine. It could be the engine won't start because of something besides the timing chains.


Stubborn exhaust bolt

Well I've tried everything I can think of to loosen the last bolt holding the right exhaust manifold to the downpipe. I used the bottle jack under the catalytic converter to take all the weight off of the bolt. Then I cut sheet metal to use as shims between the bolt head and the socket and drove it on with a hammer. The socket backed off the head before the bolt would turn. I tried locking pliers and an adjustable wrench but neither would hold tight enough. So I finally decided, after spending more than 3 days of my work time on this bolt, to just cut it off. I became thoroughly disgusted when I found that my Dremel would not fit at the correct angle to cut the bolt flush with the inside of the downpipe flange. I want to keep as much of the bolt shaft as possible for future removal after the engine is pulled. So my only option is to grind the head off the bolt working from underneath the vehicle laying on my back. Using my Dremel with a cutoff wheel I removed about half of the bolt head during the last 15 minutes of work today. Tomorrow I'll finish cutting off the bolt head, reinstall the valve covers and lower the vehicle front in preparation for hooking the crane to the engine.

For the last 15 years or more I have used antiseize compound on spark plugs and exhaust bolts. You can bet I'll be using it on my Sport!


I understand that frustration, exhaust bolts are almost always hell. I recall one of those two bolts giving me a hard time, but I had the body off. I at least could get my breaker bar and a short socket on it. The torque to break it loose was more than you could apply with smaller tools and extensions. I hate those.


As stated I cut mine, when I had the engine out I still could not get the studs out of the head pipe. So I just ground them flush center punched them and drilled them out. Surprisingly the process was very easy. For the cutting of them I used a combination of dremel, sawsall, and angle grinder. Much of the cutting was done with a carbide cutting bit from the side.

ones kinda like these
Router-bit-2.jpg


Crane boom reach

I finished cutting the exhaust bolt head off with my Dremel. I reinstalled the valve covers and hooked the chains up to the engine. I had to raise the front of the vehicle more than I wanted in order for the crane legs to fit under the front crossmember. When I rolled the crane up to the front of the vehicle I was disappointed that the boom is too short for the hook to be positioned above the engine center of gravity. The problem is the bumper prevents the crane from moving far enough aft as shown in the photo below.
ShrtBoom.jpg

I thought about trying the boom positioned at the side instead of the front but don't want to have to work around the lower A arm. I'll probably just remove the bumper. It's awkward for one person to remove but I have my "orange helper" to hold it up while I unbolt it.


Dale, extend the boom, for the engine you should be able to use the longest if needed.

FYI, be sure to also extend the legs to match the length of the boom.


boom positions

The crane is rated for 1 ton maximum. There are four possible boom positions: 1, 3/4, 1/2, 1/4 ton. The boom in the photo is set at the minimum weight position for the maximum lift which is also the maximum reach. The leg length is not adjustable. The legs are either raised for storage or lowered for lifting.

It's easy to remove the bumper: disconnect the fog lamps, remove 4 bolts.


Hey Dale not to get side tracked or anything but for future reference wouldn't running a thicker oil reduce the wear and tear on the guides and cassette?


Thick oil

Hey Dale not to get side tracked or anything but for future reference wouldn't running a thicker oil reduce the wear and tear on the guides and cassette?

Actually, I think just the opposite would be better. I had the same idea and was afraid to switch from standard weight non-synthetic to synthetic because I thought the oil would drain from the cassette quicker and cause more wear at startup. When I switched, however, the startup noise was actually less than before. I did more investigation and learned that it is more important for the oil to get to the cassette sooner at startup which happens with synthetic oils. I believe the most effective cassette life extension will come from adding a pre-oiler which I plan to do after repairing my timing chain components. I keep hoping to win a bargain Accusump on eBay but keep getting outbid.


Oh ok...didn't think about it that way...I just read your thread on the rear tensioner, I'm going to replace some stuff on my replacement motor as preventative maintenance. And was thinking in oil terms when I add oil to the motor afterwords


Crane test

Removing the front bumper was easy using the crane to hold it in place while I loosened the bolts. I routed the two rear chains thru a length of pipe insulation to help prevent scratching the valve covers. I spent a lot of time adjusting the chains to get the side to side and the front to back tension equal as shown in the photo below.
CraneTst.jpg

Then I raised the engine about 1 inch to let it sit overnight to see how fast the engine would settle.
I plan to tie the transmission to each frame rail to keep it from moving from side to side when removing and installing the engine.


Hi Dale, I had to sign up just to comment on your thread.

I didn't see anywhere if you ever managed to get your balancer bolt out, a novel method I've used on cast flywheels might work for you once you get the engine out and on the floor. Normally I'll tie a piece of 1/2" rope around the crank between the block and flywheel as tight as I can get it then wrap about 3 feet of the rope around, tie a loop on the end and hook it around some protruding part of the block or mount bracket. Then just ratchet the crank over until it grabs, lay the engine over on it's side, apply my breaker bar in a near horizontal level and stand on it. I keep an old couch cushion for this to protect the engine and it hasn't failed me yet. Your flexplate will be slippery in comparison to the cast flywheel, but it worked on the pushrod 4.0 we're putting in a 94 Ranger with no damage to the flexplate.

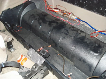
Also, if your engine has a cast aluminum oil pan like the 4.0 Cologne, be very gentle when setting the engine down/moving it around on the floor. Ford cast pans are notoriously fragile.

<rant>

On another note, I have to agree with your sentiments on the designs Ford decides to implement in their engines. I must to say I'm not familiar with the 4.0 OHC engine, but the timing setup on this engine is asinine.

Just from looking at the engine I can see why they've set it up the way they have, but I have to guess at how they're actually doing it. My guess is that this jackshaft you fellows have been speaking of is somewhere in the area of where the camshaft would normally be in a pushrod engine, It runs the whole way through the engine to a sprocket to run a single cam, while the other is run from the front.

They only did that to save on the cost of having to have two different cylinder heads designed and made, and in the process doubled, tripled? the amount of expertise, time, tools and patience required to do this job. Which usually means their dealer gets paid and they get to sell you overpriced parts to fix a bad design. Those chains should be on the front of the engine like on every other automotive design. Not to mention that the system is needlessly complex, is inefficient, and has more parts to wear out (which will, because they're made to "Ford's specification").

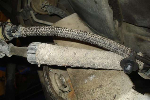
As far as your intuition about the chain guides, yeah. There are only a few engines that use guides similar to yours, and they're part of the aluminum block in some of those engines but there's a huge difference. They use roller chains, similar to a bicycle's, roller chains will only take a tiny bit of metal out and then they ride gently on the metal on the bearings in the links, these engines use separate tensioners. Their guides also don't put nearly as much curve into the chain. Before anyone crys 'oh my god metal shavings', how much do you think your hardened steel pump internals care about aluminum powder?

My old MGB had a rubber tensioner that worked in this manner, sacrifice some material initially so the design of the chain works WITH the design of the tensioner. It was 28 years old and didn't need replacing.

In the case of your engine the chain is not long enough to warrant a tensioner or guide on the working side of the chain for any reason, not even slap. If Ford wanted to be paranoid about slap they should have used an idler gear or smooth pulley, not a piece of plastic against steel, those chains don't exactly have the smoothest backsides.

I could go on about Ford's horrible/nonexistant parts interchangeability, or their inferior fasteners, or electrical connectors that require 4 hands to disconnect. I'll spare you.

As far as the sentiment expressed by petetheengineer that some automakers would be glad if they could produce cars that go 100k miles, I would challenge him to name one manufacturer whose cars don't regularly break that. I think he'd be hard pressed to name one with such a bad reputation for not going 150k miles. Even the worst of cars, a Saturn, will do 150k.
If he's proud of his Ford for making it to 100k, I can't imagine how he'd feel about the 260k Honda that just got a new engine because it was easier and cheaper for me to drop a new engine in it than replace the 1 burnt valve, or the 215k Honda that got an engine because I couldn't be arsed to replace the broken front pulley. Those replacement engines came from cars that had been hit hard in the front, and they run better than any 5 year old Ford I've ever been in and they're 17 and 16 years old, respectively.

</rant>

I'm sorry for the long (and angry) post, but let me assure you, I wish you luck and patience. I offer the sympathy of someone who's worked on quality cars but is now working on (seemingly in vain) putting a 4.0 Cologne into a 94 Ranger that came with a 3.0 Vulcan. I'm up to my **** in bad Ford designs, right now you're up to your ankles and the water's just going to keep getting deeper.


Engine pulled!

The crane passed the weight and leak test. It held up (1 inch above the motor mounts) the engine with transmission still bolted on for 24 hours without dropping a detectable amount. So I proceeded to raise it until it could clear the motor mounts easily when slided forward. I used two stacked 4x8x16 inch solid concrete blocks, a scissor jack and a block of wood to support the bellhousing just aft of the engine. I raised the jack until it supported some of the weight and then removed the remaining lower 4 bolts holding the bellhousing to the engine. As I pried the two apart with a large screw driver the rear of the engine dropped as it came off the transmission shaft. I did not do a good job of adjusting the chains to keep the rear up far enough. Anyway, nothing was damaged and the engine came up easily out of the engine compartment as I raised the boom. The photo below shows me with the engine as it was coming up out of the engine compartment.
EngPull.jpg

I was able to raise the boom high enough for the oil pan to clear the radiator support. Unfortunately, I do not have the correct size star socket to unbolt the flexplate from the engine. I bought a 7 piece (E6 thru E16) star socket set but none of them fit properly. Apparently the E set is not metric so the crane will have to hold the engine up again overnight.


And just because I can't shut up when I get going:

I looked up an exploded view of this abomination of an engine and discovered that it has a balance shaft. But only on 4x4 applications. Check me if I'm wrong, but I'm pretty sure that the only reason an engine would need a balance shaft is if it's an odd-fire engine or an inline 4. Odd-fire engines intrinsically require extra balancing (usually more than can be added economically to the crankshaft) and novel crankshaft designs such as journal separation of 120 degrees like the 9V 1.2 Subaru Justy (of which I've owned 4) and the 1.3 Suzuki Swift 3 cylinders.

Inline 4 cylinders have harmonic issues that sometimes require a balance shaft also. On an older 90 degree 6, yes, but that's for other reasons similar to the 3 cylinder.

But the idea of needing one on a 60 degree V6 is ridiculous at best, and reeks of stupidity, laziness and cheapness. Here again complexity, moving parts, inefficiency, difficulty of service and service expertise have been added to an engine that would most likely run fine and smooth with a split journal crankshaft and camshaft design adjustments.

If I recall correctly, the general consensus is that the balance shaft isn't there because of motor issues, per se. I believe that it is there, only on the 4x4 model, due to a "strange" harmonic interaction with the front diff/drive train, that only occurs at a very narrow and specific RPM range, and only on the 4x4 Explorers. So, technically, it's not really an engine design issue, but more of a whole vehicle NVH issue.


That is indeed strange and I stand corrected. I'll take your word for it, as my experience with Fords is limited to "I'm never touching another one after this Ranger".


Ditto, and the real weak link of the balance shaft version is the tiny chain and tensioner. Those are extremely fragile, I broke mine with fingers just trying to change the tensioner.


Join the Elite Explorers for $20 each year.
Elite Explorer members see no advertisements, no banner ads, no double underlined links,.
Add an avatar, upload photo attachments, and more!
.


Removing balancer bolt

. . . I didn't see anywhere if you ever managed to get your balancer bolt out, a novel method I've used on cast flywheels might work for you once you get the engine out and on the floor. Normally I'll tie a piece of 1/2" rope around the crank between the block and flywheel as tight as I can get it then wrap about 3 feet of the rope around, tie a loop on the end and hook it around some protruding part of the block or mount bracket. Then just ratchet the crank over until it grabs, lay the engine over on it's side, apply my breaker bar in a near horizontal level and stand on it. I keep an old couch cushion for this to protect the engine and it hasn't failed me yet. Your flexplate will be slippery in comparison to the cast flywheel, but it worked on the pushrod 4.0 we're putting in a 94 Ranger with no damage to the flexplate. . .

Thanks for the suggestion. Now that I have the engine out I'll have to loosen the balancer bolt. What I plan to try is to bolt one end of a chain to one of the flexplate torque converter bolt holes and the other end to one of the block bellhousing bolt holes. The chain tension should keep the crankshaft from rotating when I loosen the balancer bolt.


Back
Top