Lower Ball Joint Replacement How To (lots of Pictures) | Page 30 | Ford Explorer Forums - Serious Explorations

  • Register Today It's free!

Lower Ball Joint Replacement How To (lots of Pictures)

Pickle forks work very well for separating the knuckle from the ball joints. Dont use one unless you plan to replace the ball joint as it often times will rip the boot. But havent encountered one yet that didnt separate with the fork and I'm in the heart of the rust bucket and salt zone.


Join the Elite Explorers for $20 each year.
Elite Explorer members see no advertisements, no banner ads, no double underlined links,.
Add an avatar, upload photo attachments, and more!
.


Did my LB's the other day thanks to this forum. Saved me at least $350.


I replaced mine about 2 years ago with this technique and it worked perfectly and saved hundreds of $$. Now this weekend I needed to remove the spindle to replace the CV axles and Wheel hubs and found the threads below the castle nut were rusted and in rough shape. It made the removal and re-thread of the castle nut very difficult. Word to the wise. After all is said and done, apply a sealant or cap of some kind to the threads below the castle nut (or even include the castle nut). If you ever need to do this again or remove the spindle for another job, this extra step will save you a ton of time. Cheers.


It's also funny how they never post who the manufacture is, except that's it's an "OEM exact replacement part" for your vehicle and about 1000 other vehicles too...

I email's one seller about who the manufacture was and this is the response I received:

Hello,
Our aftermarket parts are made by a variety of manufacturers. The brand of the part is usually determined by the warehouse that it’s shipped from. Since the shipping warehouse is determined by the closest one to you that has the item in stock, the brand you receive will vary unless a specific brand is listed. However, we only send the highest quality parts that will fit and function just as the originals do.
Thank you,

Hilarious!!!!!! :D:eek::thumbsup:


What are you doing Jon, shouldn't you be supporting the ebay strike?:D


I just did the driver's side LBJ today; here's a couple
tips:

Leave your new ball joint in the freezer for a few hours
before installation. This makes it much easier to get it
started straight and snugged up. (The cold shrinks it
slightly relative to the lower control arm.)

On 2WDs, there's no need to remove the caliper, rotor, etc.
I did remove the tie rod end to gain room to work, and
pushed the spindle assembly to the rear to gain access to
the ball joint. This works if you turn the wheel full lock
to the outside.

PB Blaster and a heavy hammer are your friends in doing
this job...


Just a friendly note to folks who have never seen a ball joint before, like yours truly. If you use a press to remove the ball joint, make sure the receiving cup is large enough for the widest part of the ball joint.

14487451367_2c1caf2cce_n.jpg


This may sound silly, but before I started the job, I looked briefly at the underside of the lower control arm, and thought that the flange around the ball joint is part of the control arm. So I picked a cup that exactly sits on the flange. I only realized my mistake after trying my impact driver for 5 minutes without making any process. I was partially misled by the diagram that came with the Ford adaptor for OTC ball joint press. If you are working on a 2001 Explorer, the only thing you need from the adaptor set is the smallest cup.

51oVaNi0drL._SL1500_.jpg


For removal, you need the largest ring in the OTC ball joint press kit. Luckily it doesn't seem that I have deformed the lower control arm for installation.


I've not seen anyone mention this but all of the lower ball joints I've done on 2nd gens have certain direction they must be Iinstalled. The movement of the joint is restricted in the forward and aft directions and there is an arrow to show you where it should point.


I've not seen anyone mention this but all of the lower ball joints I've done on 2nd gens have certain direction they must be Iinstalled. The movement of the joint is restricted in the forward and aft directions and there is an arrow to show you where it should point.
Applies to aftermarket UPPER control arms when pressing in the UPPER ball joints. Moog may be different from other brands.
http://www.moogproblemsolver.com/_pdf_En/MOOG_PS_Bulletin_27028_R_Elliptical_ball_joints_En.pdf


Direction arrow on Moog lower ball joint is to direct flushed grease away from the inner rotor surface.
http://www.moogproblemsolver.com/_pdf_En/MOOG_PS_Bulletin_27014_Boot_Design_En.pdf


http://www.moogproblemsolver.com/


Nope these were Moog lowers. The instructions in the box specifically explained how to install them correctly for the direction of movement. You're referring to the boot and I'm referring to the aactual movement in the joint.


Having a terrible time...

not on a 4WD.
the CV housing on the halfshaft will prevent you from pulling the knuckle down far enough to get it off the balljoint stud.

trust me... the first time I did the job, I spent HOURS attempting to remove the knuckle without removing the half shaft. And I still lost that fight. Had to remove the halfshaft.

I am at the point where I am trying to get the knuckle out of the way... The drive shaft can slide freely and the crown nut has been removed. I cannot seem to move the knuckle far enough out to allow the drive shaft to completely slip out and the knuckle is not sliding at all on the ball joint stud... Should the knuckle slide freely off the ball joint stud? I am tempted to bang on the knuckle to see if I can free it from the ball joint stud but I am afraid to do this with the drive shaft still in it... Any suggestions??


I am at the point where I am trying to get the knuckle out of the way... The drive shaft can slide freely and the crown nut has been removed. I cannot seem to move the knuckle far enough out to allow the drive shaft to completely slip out and the knuckle is not sliding at all on the ball joint stud... Should the knuckle slide freely off the ball joint stud? I am tempted to bang on the knuckle to see if I can free it from the ball joint stud but I am afraid to do this with the drive shaft still in it... Any suggestions??

I pulled the knuckle from the UCA, and I was then able to pull the knuckle outward while prying the half shaft inward, to get the shaft out of the wheel bearing.
If that makes sense.

The knuckle will not slide freely off the lower balljoint; you'll most likely need a pickle fork, although some have had luck simply hitting the "nub" that sticks inward on the bottom of the knuckle.


Nope these were Moog lowers. The instructions in the box specifically explained how to install them correctly for the direction of movement. You're referring to the boot and I'm referring to the aactual movement in the joint.
^ PLEASE TAKE A PIC OF THE INSTRUCTIONS IN THE BOX AND POST THEM. ^

pdf linked below applies to the Moog K8695T lower ball joint used on all Gen 2 Explorers.
Full-Ball Hardened Stud with Grease Grooves

"Hardened steel stud ball combines superior movement with a full 360-degree range of movement, allowing for consistent stud articulation throughout the life of the part. Grease grooves allow full lubrication between the housing and the ball stud for extended life."


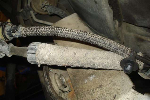
i use a large 2-jaw puller to pop the lower bj free from the knuckle. a pickle fork will also work, but unless you're replacing the bj (which you are) the pickle fork tears it up. sometimes you can get the bj free by hitting the knuckle where the bj goes through it with a ball-peen hammer, but i rarely seem to have success with the hammer method unless i have the help of a spring. after tensioning the 2-jaw puller fairly well, hit the knuckle with the hammer an the bj should pop right out (also works on outer tie-rod ends).

FYI, the bj press i rented was so wasted that i found i could not use it. so, i've also found that a 5 lb hammer (after removing the c-clip and supporting the the LCA with a floor jack) is an effective way of removing the old lower bj. i've used the hammer (with a suitably sized piece of pipe) to install the new lower bj by supporting the LCA, under the bj and pipe, with the floor jack and hitting the LCA on the outside edge. this caused zero damage to the LCA. this method would probably go easier if you leave the new lower bj in the freezer for a feee hours and heat the LCA with a torch, but it wasn't that hard to do without the doing this.


I am at the point where I am trying to get the knuckle out of the way... The drive shaft can slide freely and the crown nut has been removed. I cannot seem to move the knuckle far enough out to allow the drive shaft to completely slip out and the knuckle is not sliding at all on the ball joint stud... Should the knuckle slide freely off the ball joint stud? I am tempted to bang on the knuckle to see if I can free it from the ball joint stud but I am afraid to do this with the drive shaft still in it... Any suggestions??

Drive some kind of a wedge in between the knuckle and the ball joint. Maybe a large thick screw driver and 4lb hammer or something along those lines. A stubby pickle fork is only about $15 or so.


Drive some kind of a wedge in between the knuckle and the ball joint. Maybe a large thick screw driver and 4lb hammer or something along those lines. A stubby pickle fork is only about $15 or so.

a screw driver will not separate the lower BJ taper. a pickle fork will work or just borrow a large 2-jaw puller from the parts store (deposit required, but free when tool is returned). the engineered taper needs to be "shocked" in order to release.


Still trying

Ok it seems like no matter what I do here is not enough room to get that drive shaft out of the knuckle.... Seems like I should have the bottom (the part around the bottom ball joint) off first... Is that right or do I work on that after the drive shaft is out of the way? Is there someing I'm missing? Does my steering wheel need to be turned a certain way to give me the room?

Thanks for the replies!! You guys are so helpful and all your pics and tips are great!

if you've removed the axle nut, the axle (not drive shaft) should slide out of the back of the hub/knuckle. the last time i worked on my AWD, i just removed the knuckles completely and set them aside. it's a bit more work, but gives you total access. i've also watched youtube videos where they manage to get the axle out without removing the knuckle, but i don't recall exactly how they did it.


I also removed the entire knuckle when I did my upper and lower ball joints. U have a lot more room to work.


Yeah, you won't get the drive shaft out without the bottom ball-joint disconnected. There's just not enough play in the joints.


Join the Elite Explorers for $20 each year.
Elite Explorer members see no advertisements, no banner ads, no double underlined links,.
Add an avatar, upload photo attachments, and more!
.


Yeah, you won't get the drive shaft out without the bottom ball-joint disconnected. There's just not enough play in the joints.

Not true...
I've done it on more than one occasion.
I've replaced my halfshafts without completely pulling the knuckle.
I did it one winter in 0F, in about 30 minutes.


Back
Top