347 Stroker swap with pics and specs | Ford Explorer Forums - Serious Explorations

  • Register Today It's free!

347 Stroker swap with pics and specs

Mankorn427

Active Member
Joined
October 5, 2009
Messages
65
Reaction score
0
City, State
Burnsville, NC
Year, Model & Trim Level
1999 Ford Explorer V8 AWD
Ok so I swapped a 347 Stroker into my 1999 AWD V8 Explorer. Took me about 2 weeks from the first to last bolt and about a week of break in. I've got it running good with the help of an SCT X4 programmer (custom tune on the way).

I started off with the purchase of a 347 Stroker long block from TRE Performance with about 10.5:1 CR. It has the following:
Stock ignition
AFR 185 58cc heads
Comp cams 1.6 roller rockers and lifters
Trick Flow Track heat upper and lower intake
Trick Flow stage 2 cam
AFR valve covers
Ford Racing breather
I beam rods
Scat forged crank
28oz balancer from Damperdudes.com
Stock throttle body for now
I remove the breather behind the throttle body to fill oil with a funnel
20140624_080751_zpsf4554c46.jpg


20140909_044355_zpse26b091f.jpg


20140911_203010_zps09ba8136.jpg


I had a Pro-M MAF meter with filter from a 93 331 stroker I ran for a while that is calibrated for 30lb injectors running 30lb injectors. So I used it on this project but need to put an external IAT sensor in the intake pipe somewhere. I went to the salvage yard and found one. Modified the wiring to work the MAF meter and temp sensor. Works fine.
20140911_203034_zps201fb1e1.jpg


20140911_203019_zps8559c0c2.jpg


20140911_203030_zps400ce41f.jpg


It took a little thought to connect the vacuum lines because the Trick Flow upper didn't have the same connections on it as the OEM. You can see in the picture what I have connected prior to putting the upper on. The port without a hose goes to the EVAP system.
20140911_172005_zpsd835d923.jpg


I'm still running the stock exhaust manifolds, but I will probably just go with the Torque Monsters. I have modified the back half of the exhaust by removing the back two cats and using a dual in/dual out magnaflow I kept from my Lightning. I will have some pipes bent and complete the exhaust probably after winter.
20140909_044335_zps7fb013dd.jpg


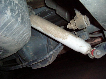
I relocated the oil filter behind the front bumper. Probably not the best place for it but I need to route the trans cooler lines differently to mount to the inner frame rail under the hood.
20140913_180906_zpsdcffd178.jpg


Overall the truck runs good and the trans is reacting very well with the added power from the new engine. The explorer already has 3.73 gears and will probably stay. I will try to get a video to post of idle and driving.

I had a problem with the cam sensor shaft being 180deg out because I didn't use the alignment tool. I couldn't get the sensor out. Well, I had to remove the timing cover and pry it up from behind the cam chain. Don't know why it was stuck, but I think because it was a chinese replacement the shaft gear wasn't machined very good or was cast. It seem to stick with the camshaft gear. Bought a motorcraft replacement and it sits in fine. I didn't notice a difference with it being connected or not. I still get hard starts because it runs rich cold. I'm waiting on Henson Performance for a tune.

Also need to come up with a dipstick solution because the stock one interferes with #7 spark plug. I was thinking of purchasing a flex tube dipstick.

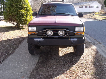
Here's the old tired 302
20140909_044435_zps5d4da940.jpg


This is a true basement build in the basement of my house. I am looking to sell my old upper and lower intake and I have a fresh set of 8 19lb injectors. May sell both as set. Also have the old injectors off the Explorer.
I will try to take more pics as I get more done.

Hurricane Creek
20140629_165208_zps387d89e9.jpg


Join the Elite Explorers for $20 each year.
Elite Explorer members see no advertisements, no banner ads, no double underlined links,.
Add an avatar, upload photo attachments, and more!
.


Here's another pic of everything put together running. Coils in stock location.
20140928_092614_zps0d5a33c3.jpg


I couldn't fit a breather on the left valve cover so the way I come up with is using one of the breather hole grommets and some 3/8 hose I had left over from plumbing the brake booster. I heated the hose up at the end and made a 90deg which fit snug in the breather hole on the valve cover. Run the hose up to the top of the power steering pump and just zip tied it with a $10 breather from Advanced Auto.
20140928_092745_zpsed596d45.jpg


I noticed my IAT was getting high around 120s to 130deg when driving around town or slower highway speeds. I have looked for air filter shields or intake kits that come with the air shield but haven't seen anything for what I'm looking for. So, I had some 1/4 plywood and some left over pipe insulation. I cut some wood to size that fits above the frame from the side of the radiator back past the reservoirs. Cut a piece for the bottom and painted the pieces with black spray paint. After drying I but the pipe insulation to the sizes I needed and used silicone to adhere the insulation to the wood. They fit tight enough that I didn't need to secure them. That made a big difference in IAT. I still get temps around 120 if it idles for a few minutes or so but cruising around town the temps are about 10deg higher than outside max.
20140928_092632_zpseefdc95b.jpg


20140928_092619_zps567e314a.jpg


Here is what I have done for exhaust already. This has been done for about a year now. At first I was doing this kind of temporarily so the muffler is still tack welded. I welded these myself with a MIG but didn't have gas to use.
20140928_092930_zps0966e02c.jpg


20140928_092936_zps3c97965e.jpg


20140928_093008_zpsd40a51d5.jpg


20140928_093027_zps374dea2c.jpg


Looks good!

Just one thing for you though. your oil breathers NEED to be plumbed to the air intake breather, otherwise you are allowing unmetered air into the system when the PCV is working at full throttle. Other than that it looks like good build! Impressive!


This is amazing work! Well done!


I have the Lokar Dipstick tube I used on my old Engine, it's a flexible style, I mounted it with one of my Exhaust bolts. $30 to your door.


For the oil breather system I did a little research about pcv systems. From what I found is the pcv is for an engine that doesn't have valve cover breathers for the positive crank pressures to escape the crank case. I did have the pcv connected at first and I kept throwing lean codes. I checked for vacuum leaks but no leaks. I disconnected and plugged the pcv and haven't had any lean codes yet.


I have the Lokar Dipstick tube I used on my old Engine, it's a flexible style, I mounted it with one of my Exhaust bolts. $30 to your door.

Where did you get the dipstick from? Flexible ones I have found were more than $30. That sounds good.


Very nice!
Your right, with the pcv capped off, or ran to another breather, your good (As long as the vac sources are capped off as you have done.

So, the motor was 28oz balanced? What harmonic balancer and flex plate was used?
The factory balancer is 50oz, and the trigger wheel is on it. Did you move the trigger wheel over and get a different flex plate? I'm super curious.

Looks very nice, I'm really looking forward to more on this build.


I'm not sure what brand flexplate it is but it's all 28oz balanced. I ordered the balancer and sent it to TRE performance and they balanced it all together. The balance feels great and the machinist that balanced the bottom end said the balancer was as good as any sfi he's had to balance with. Here is the balancer. TRE got it in a few days.
Damperdudes.com
http://www.damperdudes.net//product_info.php?products_id=224&osCsid=5a3f0698c8777a3434e44de20f59a0f1

As for the pcv i capped both pcv and intake port. Still waiting on Henson to write my tune but I've got it running good with just the X4. Winter is around the corner and for me means work slows down. So beginning of the year I'll finish the exhaust. I ordered a summit racing 75mm TB. I will pull the throttle linkage from the old and put on the new TB.

It's a work in progress. Honestly I wasn't going to swap the engine until I had everything but I couldn't wait. I also pushed my 81 t-top mustang out of the basement temporarily for the swap. It's torn apart and stripped to a shell so I wanted it back in the basement asap.


great find on that balancer!
That alone takes a lot of pain go away in a 347 swap.

Your crank venting looks good. Are you getting an oil smell when stopped in traffic? Im fighting that smell. My wife really complains about it.

Beautiful work! Your not alone on waiting on James, I think he's pretty backed up these days.


Yeah I smell oil all the time. I am constantly checking for leaks but find none. The exhaust smell gets in the cab too but not real bad. Probably because it doesn't go out the back or exit from under the truck. I want to bring it out from under the running board like my lightning did if there isn't enough room to run dual out the back.


I got bored so I put my brand stickers under the hood.
20141003_134714_zpse8c87886.jpg


20141003_134705_zpsa205e986.jpg


20141003_134701_zps072ee765.jpg


Any issues with the trick flow intake bolting up? Any bracket mods or anything need to be done? I'm guessing you are running external egr. Did the elbow and egr tube bolt right up?


No issues with brackets or any clearances. Everything fit like factory. I did however have to add a couple of washers to the bolt heads of the elbow bolts and t-stat housing because a couple of bolts were too long and bottomed out. I did not connect the egr back and disabled it with the sct tuner. I left the valve to close the hole for now. When I get my throttle body ready to put on I will make a plate to cover the egr hole and port match the elbow.


I have been driving it for about a month now and noticed my oil pressure gauge dropping. Bought a new sending unit and no change. So then I started freaking out. I tested oil pressure with a universal gauge and it shows 7-8lbs after it idles for a minute then drops to barely reading. Now I'm seeing stars! It looks like I won't be able to pull the pan with the engine in because of the cross member even removing the steering rack and front axle. So out comes the engine! I started pulling everything Sunday and hope to have it out today and diagnose.


Turdle thanks for your input. I was scared to try pulling the pan with engine in the truck. I didn't think about dropping the oil pump in the pan then pulling the pan out.

I was going to remove the axle and rack but I was looking at it and referencing from my old engine and it looked like I wouldn't have enough room to pull the pan form under the pump when lifting the engine. I didn't want to pull the axle and rack and be dead in the water.

Took me all day today to pull the engine, but I'm glad I did pull the engine becuase my problem wasnt in the pump. It was the shaft where it inserts into the sychro shaft. The old one I had pulled it from my old engine must have been a little too big where it slid into the guide in the block because it was a little meleted. Maybe i didn't get it set right. I guess that did something to the pump shaft and made it start to spin in the sychro shaft. I bought another synchro from rock auto and i will order a new pump shaft from summit when i order new gaskets

The old engine had 277,000+ miles on it so I guess using old parts to save a little money wasnt a good Idea. Also working 6 days a week and working on it late at night until 12-1am and getting up at 5am i wasn't thinking right. I mean I must be out of my mind swapping a 347 into an explorer!

Sorry i don't take alot of photos especially when my hands are greasy


Also working 6 days a week and working on it late at night until 12-1am and getting up at 5am i wasn't thinking right. I mean I must be out of my mind swapping a 347 into an explorer!

been there done that. do a v8 swap in a sport. then supercharge it. then do a bigger supercharger. then do it outside in the dark and forget that you left the tape on in the blower mount after you have siliconed it and bolted it down.....twice.
sometimes it is better to just bite the bullet and yank the motor out. because you dont know what kind of can of worms will be waiting.


here is what the original syhcro shaft looked like when i finally pried it from the engine after taking the front cover and timing chain to pry it out. I also had the top of it broke off and vice grips on the shaft itself and pulling up on it with the engine lift while prying from behind the removed cam sprocket.
20141014_051802_zps3a14b318.jpg


Join the Elite Explorers for $20 each year.
Elite Explorer members see no advertisements, no banner ads, no double underlined links,.
Add an avatar, upload photo attachments, and more!
.


Not sure what happened. Maybe I didn't lube it before first start or it didn't get any oil running. This is a set back but I get to repaint my oil pan because my paint is chipping off already. I didn't prep it very well and I didn't use engine enamel.


Back
Top