M90 rotor case swap | Ford Explorer Forums - Serious Explorations

  • Register Today It's free!

M90 rotor case swap

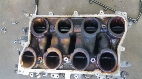
I got an m90 about a month ago but the rotor case was damaged in shipping. NBD, I got a refund. So I got a different rotor case to swap. Swapped them today. Undid the bolts and hammered on the case to get it loose. Then used a crow bar to start lifting th snout and rotors out. I placed the assembly on my benched and, about 5 minutes later, noticed alot of oil leaking. So I'll need new supercharger oil I guess. The bearings on the new rotor case were not in as good condition as I thought. The little rubber seal was deteriorating. So, I took the bearings out of my new one (used a socket to hammer them out, no damage). But ended up going to "All Star Auto Parts" in Redlands, CA to have them install the bearings. I didn't want to mess that up. I read that some high temp wheel bearing grease would work fine for this application so that's what I used to re-grease. Put it all back together. Only used 4 bolts though. I originally was missing two but decided to not put all of them back since I'll need to take it apart to put oil anyway. So if anyone would like to give me any pointers or suggestion for this restoration, that would be great :)
photo.php
photo.php
photo.php
photo.php
photo.php
photo.php


Join the Elite Explorers for $20 each year.
Elite Explorer members see no advertisements, no banner ads, no double underlined links,.
Add an avatar, upload photo attachments, and more!
.


sorry about the blower case (i packed it btw). looking at the new case you have, i am not sure if its the way the lighting is but it looks pretty scared up. not sure how will it will work


No worries. I'm not too picky about the exterior of it. If you are referring to the inside, it is actually smoother that the first rotor case. The first one had a pretty considerable gash internally, as if it were caused by the rotors. I cleaned the rotors and they seemed smoothed though. I can post a picture of the old one if you'd like


Id get the blades coated and the case ported if it was me..also does the ford ones not have a fill plug on the front snout cover??


Id get the blades coated and the case ported if it was me..also does the ford ones not have a fill plug on the front snout cover??

According to the previous owner, the rotors are already coated. not sure with what exactly. Honestly, I don't know too much about the blowers themselves. I am still learning. Is it the nipple on the left side of the snout? That seems like it could be a spot to fill it with oil


According to the previous owner, the rotors are already coated. not sure with what exactly. Honestly, I don't know too much about the blowers themselves. I am still learning. Is it the nipple on the left side of the snout? That seems like it could be a spot to fill it with oil

Those blades dont appear to be coated,they look like bare metal to me..normally the coating is black and resembles a powder coating..the fill should be a allen plug on the front,they typically are filled sealed together. .


Here is my ported and coated charger.its a CNC ported GM charger but same principle stands..notice how open and triangular the outlet is and the black coating on the blades
scoutlet.jpg


Is there a real significant difference in coated vs non coated? I would run an intercooler so I'm not sure if having the rotors coated would actually do anything to lower temp. I'm sure porting adds performance


Is there a real significant difference in coated vs non coated? I would run an intercooler so I'm not sure if having the rotors coated would actually do anything to lower temp. I'm sure porting adds performance

O yea huge difference in a coated blade and one thats not..they seal wayy better which means more boost with less effort/rpms.flow the air way better,which means less friction/heat.porting getting the air out easier which means less restrictions,friction and heat..

Obviously not needed as the earlier ford m90 didnt come with coating but look at any newer blower and its coated and has worked inlets and outlets..if you look at the gen 3 and gen 5 gm blowers the gen 5 is like 30% more efficient. .its basically the same blower but has a different coating and worked inlets/outlets.


how much would that cost? I don't want to spend money on things that aren't exactly necessary for the build.

Also, when rotating the shaft to make sure everything works(barely did this today), there is a clunk sound once in a while. I'm pretty certain it is not the rear needle bearings. They were practically new when I installed them in the new housing. Plus, the clunk is not predictable. I looked up videos to figure out what bad bearing for superchargers sound like. With my blower, the clunk can happen twice in one rotation or not happen for 5 rotations. This isn't the pattern, just an example on how unpredictable it is. The sound seems to come from the gears. A couple of times it felt like the rotors were hitting something as it required more effort to rotate them. Nothing too crazy. I was rotating the shaft by holding it almost as if it were a pencil and twisting my wrist. I couldnt have been applying too much force. Any ideas on what's loose or wrong?


Sorry for the confusion, the rotors on that m90 ARE NOT coated.
The m90 on my explorer does have coated rotors. That must have been the confusion.

Did I notice a real difference between coated and not coated....No. There are always other factors in this though.

Who knows, maybe its the early generation m90 that doesn't really benefit from it.

JD, didn't you stick the m90 shaft on a drill to test your m90 a bit? That might be an option to check for clunking. Also, make sure you are turning the rotors the correct way.

Yea coating isn't necessary. OP wanted suggestions what to do and thats what id do,if i had the money..lol

I think that might have been [MENTION=81804]4pointslow[/MENTION] .mine has the press on hub and dont think ive spun it by a drill but does sound like something id do..


drill spinning

Was not me, I have always spun mine with the belt. LOL.


Yes I assumed they were coated. But, I'm just glad I have a supercharger haha. As long as The blower is functional, I'll be ok. How do I know which direction to rotate the shaft? Say I am looking directly at the nose, clock-wise or counter?


I wanted to paint my supercharger (I'm going with pretty much the same color the snout is) so I decided to take remove the snout so I could paint it and the rotor case at the same time.
Taking off the case took more brute force than I like using. I guess I'm just scared of breaking something haha. I was told to use a rubber mallet and repeatedly bang the snout sideways and upward (assuming the snout is pointing straight up). I tried this a while ago but it didn't work. Probably wasn't hitting hard enough and gave up too soon. Anyways, I heard that the gasket sealant really holds it in place.
I decided to use some dental floss to gradually work it, side to side like a saw, through the crack between the intermediate plate (the one that holds the gears) and the snout. Making multiple passes around the supercharger. It would break too often so I used 12lb fishing line. Not sure of the size but it's pretty dang thin. Once I felt practically no resistance, I hit the snout with the rubber mallet as described earlier.
I purchased carpenter shims, composite but it shouldn't matter, because my original plan was to bang these into the crevice between the intermediate plate and snout to separate them. Banging the snout with the mallet was enough but I found as I would hit one side the other would try to go back together. So I used the shims to keep the plate an snout separated as I would hit the opposite side. I also used a plastic tucking tool to help me separate the two pieces. I used it as a driving wedge (as I planned to use the shims) and a lever once the last things stuck together was the 3 pins from the snout and the coupler.
Here are some pics http://www.explorerforum.com/forums/showthread.php?t=436432
There is some grime and was wondering, would some brake cleaner be good? I'd like to clean everything well before paint and reassembly


A spray with brake cleaner would clean it right up.
Your not going to hurt anything.


Alright I thought it would be fine. Thanks


Join the Elite Explorers for $20 each year.
Elite Explorer members see no advertisements, no banner ads, no double underlined links,.
Add an avatar, upload photo attachments, and more!
.


Back
Top