Radiator, Rhermostat, and Transmission Flush
First time changing out a radiator, thermostat, etc. I hope I have done everything correctly. Once again, I have a 95 Exploder XLT 4x4 4dr with 151,000 miles as of today.
(Begin with this PAGE)
REMOVAL OF RADIATOR
1. PRAY!
2. Disconnect NEGATIVE battery cable.
3. Spray ALL areas to be broken loose and/or ‘removed’ with Liquid Wrench.
4. After making sure there is a catch pan underneath the radiator, open the radiator drain. Leave opened & let drain.
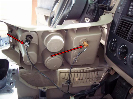
5. Remove the intake hose area by disconnecting the mass air flow thingy & the other attached connections (both sensor plugs, and the vacuum line). Just get this thing out of your working area!
6. Using the (2) proper tools you will now “break” loose the fan clutch bolt from the water pump pulley.
7. Now, you should be able to fairly easily spin the plastic fan off with your hand.
8. Remove the (2) bolts from the fan shroud, both located at top.
9. Remove reservoir hose from radiator filler neck.
10. Pull out the fan & shroud together. You will now have full access to the radiator hoses.
11. Disconnect the entire upper radiator hose. Inspect hose. Clean if necessary.
12. STOP. Make sure there is a catch pan underneath the lower radiator hose area(s); carefully disconnect it because it WILL drain liquid. Inspect hose. Clean if necessary.
13. Using the (2) proper tools you will now disconnect BOTH transmission lines. Be sure not to bend transmission lines!
14. Remove the (2) bolts from the radiator, both located at top.
15. Pull out old radiator.
16. STOP. The next procedure is: REMOVAL OF THERMOSTAT.
REMOVAL OF THERMOSTAT
1. Remove the (2) bolts from the throttle cable cover. Set aside the housing.
2. Disconnect the belt pulley. Use ratchet.
3. Place the loose belt above itself (near alternator area).
4. Remove ALL (3) bolts on thermostat housing. (One bolt is easy to remove; one is underneath & hard to see; and the 3rd bolt is a pain in butt to remove).
5. Remove the thermostat housing. Inspect housing. Clean if necessary.
6. Pop out the old thermostat. It may need a wiggle. Inspect it. Notice if a gasket was/is on it. (We may need one if the new thermostat does not have a gasket).
7. Install the new thermostat with vent hole facing top, (12 o’clock).
8. Reconnect the thermostat housing, starting with the pain in butt bolt.
9. STOP. Go to: INSTALLATION OF RADIATOR procedure
INSTALLATION OF RADIATOR
1. First, compare the old radiator with the new radiator.
2. ALL missing hardware (radiator cap & two bolts) from the old radiator must be installed onto the new radiator. The (2) transmission bolts should be hand-tightened onto the new radiator. Not necessary, but if no sealant included, use Teflon tape around threads.
3. Reinstall pulley.
4. Reinstall belt, making certain the belt is firmly in place and is correctly inserted into the grooves.
5. Slide the new radiator into place—it sits on perches.
6. Install the (2) bolts into the radiator, both located at top.
7. Using the (2) proper tools you will now reconnect BOTH transmission lines.
8. Reconnect lower radiator hose.
9. Reconnect the upper radiator hose, also making certain that ALL other hoses are returned to their appropriate housing stations.
10. Slip the fan & shroud into place, just as you removed it.
11. Line up the attached threaded fan bolt to the fan hole.
12. Reconnect the fan by hand-spinning the fan into hole firmly, then using the (2) proper tools tighten fan further onto pulley.
13. STOP. The LAST procedure is: COOLANT INSTALLATION.
(Begin this page LAST)
COOLANT INSTALLATION
1. Make certain radiator drain plug is closed & the reservoir hose is connected to both the radiator and reservoir tank.
2. Fill coolant system with antifreeze-water mixture. (Use 50/50 mixture. Do not exceed 70% of straight anti-freeze into radiator!)
3. Reconnect NEGATIVE battery cable.
4. Start engine.
5. Check for leaks.
6. Allow engine to get to “normal” temperature—you will have reached “normal” temperature when the upper radiator hose gets hot.
7. Re-check coolant level & coolant reservoir. Adjust if necessary.
8. STOP. You now have 2 choices:
a. Drop Transmission pan & dump ALL existing transmission.*
b. TRANSMISSION FLUSH! (This procedure will pressure-clean/vacuum the torque converter, orifices, and other housing areas for transmission, but will not clean the transmission filter fluid).
9. Pray again, and thank God for His guidance.
*STEP 8a: CHANGING EXISTING FLUID IN THE TRANSMISSION SYSTEM
1. Remove the transmission pan.
2. Remove the old transmission filter.
3. Replace with a new transmission filter.
4. Remove the old pan gasket material.
5. Replace the pan gasket with a new gasket.
6. Reinstall the pan.
7. Refill the transmission with new transmission fluid.
8. TRANSMISSION FLUSH! (Includes the torque converter and transmission cooler).
")