PLAN B Build | Page 18 | Ford Explorer Forums - Serious Explorations

  • Register Today It's free!

PLAN B Build

Some of you may know, and some may have suspected, but I'm starting a new project and it starts with a truck you all will recognize.

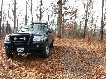
I picked up R.J.'s Navajo today. She is a little tired and was facing being parted out, but now will start a new chapter, a very different chapter. I give you Plan B.

(dead links)

So let's start off as to why "Plan B"? Well, it has multiple meanings.

  • It starts off as I really wanted a early Bronco. I first learned to drive on Zukmans '71 Bronco he had years ago. But myself owning a early Bronco was not going to happen. There just way to ridiculous priced these days.:eek: So this is My Plan B.
  • JP is not going anywhere, I really just wanted to to do another build and JP is...well, JP!. It works, but it has a following and presence that really can't be changed....it's almost become, dare I say, an Icon of this forum. :jp: So this is My Plan B
  • The Navajo was on it's death bed. R.J. himself had already give it a time of death... :dead: So this is it's Plan B.....or maybe for it C...But for my plan, we'll say B :D
So what does the Plan B build look like? You'll have to watch and find out. But I'll give you some teasers..

  • Starting Base : 1991 Mazda Navajo JX 4x4
  • SOHC - donor: 2000 Explorer Sport 4x2 103k
  • 5R55E - donor: 2008 Ranger FX4 45k
  • 1354 manual - still looking for
  • :sawzall: to smell the fresh air;)
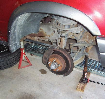
  • Super Duty Axles - '99 F350 4x4 PSD
  • 40's - settling for 37's now
  • Grabber Blue
I think that should be enough to entice you all for now...

This is My Plan B


Join the Elite Explorers for $20 each year.
Elite Explorer members see no advertisements, no banner ads, no double underlined links,.
Add an avatar, upload photo attachments, and more!
.


I have a thought. Those aren't Navajo seats


Join the Elite Explorers for $20 each year.
Elite Explorer members see no advertisements, no banner ads, no double underlined links,.
Add an avatar, upload photo attachments, and more!
.


Do you need the extension?

If not, get rid of it, then you are down to one pivot point.

If yes, then make a bracket that incorporates that little piece sticking out of the extension to keep it from moving. Or, weld a tab onto those brackets with a little hole in it to keep the extension from moving as was intended in their design.


The extension is part of the factory set up, to get the belt guide at a correct height to go over your shoulder. In a 2 dr, the window is in the way where, normally the belt guide would mount to the body, so they solved it by using the extension to go above the window. (full size broncos do this too) There is a finger tab that locks to a hole in the body, that normally prevents it from pivoting on the top bolt. With no body, this not possible.

My original plan, was to just weld a nut to the cage, and bolt it in, but with the cage sitting more into the "interior" it would put the belt in your face. So I figured this double sheer mount was a better idea, and I could get the belt in a much better spot.

Long term, I will swap out the seats for something better with a 5 point, and add to the cage, but just trying to get it to a usable point first, then expand.


I think I would use the double shear end as the pivot.


what is wrong with having the double pivot points?


what is wrong with having the double pivot points?

My guess is that it would allow too much movement not letting the belt do it's job as quickly.


I dunno about that, If the belt tensioner is working the belt should already be in the correct position, I do not see an issue with two pivots.............but Im just talking out of my %$^, throwing things out there for sake of discussion.


The line of force through the belt is the issue I think. You want to move the belt to a comfortable location, but the force in an impact would straighten out the belt from the main mounting point. So consider what a high force would do from the main mount at the roll cage.

That's the best input I can offer, and it's hard to visualize all of that from a narrow picture or two. Sit in the seat and imagine what might happen with the belt etc, look at it from a few perspectives. You can figure it out I'm sure.


It would be stronger to have the pivot point be the double sheer mount.

However, looking at it more I think it needs to have one pivot point just because it would allow the shoulder portion of the belt to move forward and/or backwards in the event of a collision, possibly moving it out of alignment with the person using it's shoulder. The person wearing that belt's shoulder and upper body would move much farther than the belt was designed to handle. Might be able to slip out of the harness which would be bad. The top mounting point of the extension needs to be rigid, just for the same reasons. It should pivot at the shoulder, not several inches above the shoulder. If its your kids you are planning on having in the back most of the time, set the belt shoulder height for them.

Edit: You thought about getting a set of 4 door rear seat belts and adding a bar to the cage in the right position? That would take care of all the above mentioned issues, and it would be as strong as it can get. Shorter is always stronger.


Safety Question.

I need to weld in these double sheer tabs for the rear seat belts. However, there is already a pivot point in the seat belt extension bracket. I don't think it's a good idea to have two pivot points on the top of the belt.

Do I

A. Weld the belt guide to the extension
B. Weld the double sheer to the extension ( I would think this defeats the purpose of the double sheer)
C. I'm over thinking it. Let people fall out if they are crazy enough to sit back there.

Thoughts?View attachment 320535
More on this. Where is the C pillar located in reference to the shoulder harness? That would be the ideal location for the mount. You could weld a threaded sleeve into the pillar, get rid of the extension, and bolt the shoulder slider directly into the sleeve allowing it to pivot like OEM.


More on this. Where is the C pillar located in reference to the shoulder harness? That would be the ideal location for the mount. You could weld a threaded sleeve into the pillar, get rid of the extension, and bolt the shoulder slider directly into the sleeve allowing it to pivot like OEM.

The C Pillar is what is traditionally used yes. But the c pillar (the cage) is right in front of the rear tail light. It is way to far back to use (2 feet away). I do plan to add additional bracing in the cage, but not at this time. When that, happens there will be difficult seats as well.


After delivering an Explorer (Icarus) to a fellow member (Froader) today, I felt inspired, and crawled under the Navajo to finish what I started earlier in the year. Last time I drove the Navajo on it's maiden voyage, I discovered a check engine light with two issues. 1. No speedometer reading, because the tone ring was missing. 2. Fuel gauge was not working.

With the pandemic, I started working from home in March, and I made my garage into my temporary office. Although the Navajo made for an awesome background on conference calls, working in my garage on a computer 10 hrs a day, made me not want to be out there anymore. My sanctuary, turned upside down. About 6+ weeks ago, I started going back to the office full time, and the garage has started to become appealing again.

Having finished the tone ring install earlier in the year, I had started to track down the fuel gauge issue , but then life just happened and everything just sat idle. Gas tank on the floor, and everything getting piled on and around the Navajo.

So tonight, with a new fuel pump installed, I bolted the gas tank back up In place, and tested the key. Fuel gauge went to "E" where it should, so fingers crossed, both issues should be resolved now. I even programmed a remote keyless entry fob for it, and it WORKS! Which is pretty cool I think.

So tommorow I'll put some fuel in it and see what happens.

Also I picked up another set of axles today from Froader. '04 Super Duty axles, with 4.56 gears already installed. Being '04 axles, also means the front is a Dana 60 vs. my '99 axle I have, which is a Dana 50.

20201128_150949.jpg


04 has a dana 60?? please teach me.
I thought 05+ was the big coil spring dana 60 unit bearing upgrade year for the superduty.
My 97 has a Dana 60, the excursion is a dana 50 (unit bearings)
04 has a 60 again?
There is not much difference between a 50 and a 60....now I gotta go google!

Glad to see Froader getting a rig and you back on the Navajo!!
Test that fuel gauge before you final install the tank

Somebody chopped that rear driveshaft a little crooked :)
'99 through about mid '02 have Dana 50, after that everything went to Dana 60. The outers are all the same, including outer shafts. The differences are ring gear size, pinion size, and the inner shafts neck down at center section, which becomes there week point. Most of all is locker options really open up for the 60.

These axles can be difficult to identify between the two as they look so similar. (Same diff cover even) In fact I was not not knowledgeable, when I bought my first set of SD axles, and ended up with a Dana 50. Easiest was to identify a Dana 60 axle is to look for a "248" stamping on the axle. Since I have both axles, I should probably do a comparison thread. It would be good for the site.


Had a chance to take the Navajo out today.

Last weekend it was running really crappy and the check engine light came back. Said was running rich on bank 2. Could not figure out what was up, so I threw it back in the garage and walked away.

Yesterday, I had a few minutes to poke around, and discovered a lose plug wire on #1. That would definitely do it.

So today I drove it on the street, and for the first time took on a busy street. I didn't push, but it's pretty fast for a explorer on 35's. You could run circles around JP.....if the steering worked right:frown:

It seems I have a steering issue now. It feels like I have almost no power steering, or it has flat spots. A few other super minor issues. But progress at least.


It definitely wasn't fast with the ohv motor and the roof on it. Always good to hear progress on the build


^ so sorry you never got to drive her again @R.J. It was my full intention to finish this and put you back behind the wheel of her one more time.🥺

Beyonce would be proud though. I put ring on it. 😁

20210119_193346.jpg


Nice !!


Join the Elite Explorers for $20 each year.
Elite Explorer members see no advertisements, no banner ads, no double underlined links,.
Add an avatar, upload photo attachments, and more!
.


Looks great, more pics when you get a chance. . . Glad the build is continuing amid office-sharing in the Man Cave. . .


Back
Top