- Joined
- March 4, 2007
- Messages
- 26,320
- Reaction score
- 122
- City, State
- anaheim hills,california
- Year, Model & Trim Level
- 95 ranger 4x4/ 91 X 4x4
...I hope this will help those of you out who do your own maintenance and are tired of taking the tranny fluid bath in order to change your tranny filter every 15,000 miles...
...The temp guage is an item I wanted to add in order to help prolong the life of my A4LD...")
This is what I did...If you choose to do the same or similar, you do so at your own risk......And please excuse the bad pics...
...I just installed these on my '91 Project "X" while replacing a front pump seal...
The first pic shows the standard 1/2" drain plug which seems to be at every parts store I went to and the cost was $3.99-$4.99, depending on the store...Included in that pic is the copper sealant I used for both of the installations...
The second pic shows the Sunpro water/oil temp, mechanical guage, also found at all the stores for $16.99...


...The first thing I wanted to do was find the lowest point of the pan for the drain plug... The idea may be simple but, you need to look at your tranny with the pan off and the filter still on for installing both of these items...
On my A4LD and using this low profile drain plug it was simple...(If you look back at the first pic you can see that only the thin nut and nylon washer will be in the pan)...
After locating the placement I wanted for the drain plug, I then drilled from the inside of the pan, out...This will leave the main burrs on the outside of the pan...You will notice in the pic I also left some tranny fluid in the pan...This helps in keeping the bit cool, moves the debris away, but also keeps the debris mainly contained in the fluid...

The next item was a lot more difficult...Trying to locate a place in the pan that was deep enough to insert the 1 1/2" long probe into, while also not interfering with the operation of the tranny's parts as in the shifter inside, shifter outside, and the linkage...
...At the same time, I was also concerned that I definately didn't want the return line of the guage near the exhaust at all, but I still needed the return line as close to the front as possible due to wanting to put the guage itself up in the dash area...This lead me to put it on the drivers side...I had to dry drill this from the outside in...
This pic shows the placement in the pan of these to items before the pan was installed...

This pic is from the drivers side looking at the tranny...The red circle reflects the area of placement of the probe...The yellow area shows the inner shifter all the way to the rear position...From where it is shown, it moves toward the red circle....I found placement of this item to be very critical...

These following pics are just for the basic installation and will be updated when I final set the guage...
These pics are looking from the rear forward, to show the placent of these items with the pan installed...


This pic is viewing from the front left tire, back to the tranny pan...

...This is showing how the guage return line came up and thru the clutch pedal cover plate...If I ever change this I can easily get another plate..This return line will be covered by corrugated tubing...

...These pics show the temporary placement until I final set the guage...


...So far so good...On the brief first 7 mile trip in stop and go city traffic my temp went up to 180*-182*...I have confirmed that this is the proper tranny operating temp reading for an A4LD ...I also know that the best place to get a true tranny temp reading is from the pan...
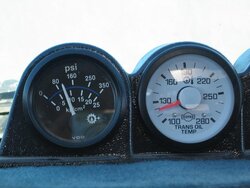
Final setting of the temp guage...
I wanted to get this guage installed in the pan and see where the return line would let me place the guage...The guage I chose gives me exactly enough room to mount it on the A pillar...
...I have shopped 1-3 guage, pillar pods and they are the same price for 1 or 3...$20-$30 and they seem to only come in black...I can get an Autometer guage pod that is exclusive to the Ford A Pillar for $10-$20 more...
My concern is visibilty thru the windshield while wheeling but I also want to easily be able to read the guage at the same time, so I am looking for a 1-guage pillar pod....
I am thinking of getting a 3-guage pillar pod and cutting it...This would give me 1 guage for now and if I wanted to add another guage, I will have a 2-quage pillar pod for free...
...My Temp Reading Updates = per driving situations and outside temps...
1)....First drive about 7 miles, in town afternoon traffic (about 90* outside)...182* max
2)...Test drive, 27 miles thru carbon canyon uphill 50 mph max, 6p.m. afternoon traffic (A cool 70*) 192* max
3)...Freeway test, 9 am at 65 for 15 miles (A cool 70*max)... 140*-150* max
4)...Same drive as 2), 6 p.m., (100* outside) 185*-190* max
5)...Return trip at 9 a.m. 50 mph max (75* outside) ...140*-150*
6)...30 freeway mi. each way to 4wheelparts warehouse in Compton(70*outside)...140*-142*
...Installed corrugated tubing...
7)...Same drive as 2), 1:30p.m., (85* outside) 168*-178* max
8)...Return trip at 8 a.m. 50 mph max (65* outside) ...130*-140*
9)...Same drive as 2), 5:30p.m., (75* outside) 160*-168* max
10)...Return trip at 8 a.m. 50 mph max (59* outside) ...130*-138*
...The temp guage is an item I wanted to add in order to help prolong the life of my A4LD...
This is what I did...If you choose to do the same or similar, you do so at your own risk......And please excuse the bad pics...
...I just installed these on my '91 Project "X" while replacing a front pump seal...
The first pic shows the standard 1/2" drain plug which seems to be at every parts store I went to and the cost was $3.99-$4.99, depending on the store...Included in that pic is the copper sealant I used for both of the installations...
The second pic shows the Sunpro water/oil temp, mechanical guage, also found at all the stores for $16.99...
...The first thing I wanted to do was find the lowest point of the pan for the drain plug... The idea may be simple but, you need to look at your tranny with the pan off and the filter still on for installing both of these items...
On my A4LD and using this low profile drain plug it was simple...(If you look back at the first pic you can see that only the thin nut and nylon washer will be in the pan)...
After locating the placement I wanted for the drain plug, I then drilled from the inside of the pan, out...This will leave the main burrs on the outside of the pan...You will notice in the pic I also left some tranny fluid in the pan...This helps in keeping the bit cool, moves the debris away, but also keeps the debris mainly contained in the fluid...
The next item was a lot more difficult...Trying to locate a place in the pan that was deep enough to insert the 1 1/2" long probe into, while also not interfering with the operation of the tranny's parts as in the shifter inside, shifter outside, and the linkage...
...At the same time, I was also concerned that I definately didn't want the return line of the guage near the exhaust at all, but I still needed the return line as close to the front as possible due to wanting to put the guage itself up in the dash area...This lead me to put it on the drivers side...I had to dry drill this from the outside in...
This pic shows the placement in the pan of these to items before the pan was installed...
This pic is from the drivers side looking at the tranny...The red circle reflects the area of placement of the probe...The yellow area shows the inner shifter all the way to the rear position...From where it is shown, it moves toward the red circle....I found placement of this item to be very critical...
These following pics are just for the basic installation and will be updated when I final set the guage...
These pics are looking from the rear forward, to show the placent of these items with the pan installed...
This pic is viewing from the front left tire, back to the tranny pan...
...This is showing how the guage return line came up and thru the clutch pedal cover plate...If I ever change this I can easily get another plate..This return line will be covered by corrugated tubing...
...These pics show the temporary placement until I final set the guage...
...So far so good...On the brief first 7 mile trip in stop and go city traffic my temp went up to 180*-182*...I have confirmed that this is the proper tranny operating temp reading for an A4LD ...I also know that the best place to get a true tranny temp reading is from the pan...
Final setting of the temp guage...
I wanted to get this guage installed in the pan and see where the return line would let me place the guage...The guage I chose gives me exactly enough room to mount it on the A pillar...
...I have shopped 1-3 guage, pillar pods and they are the same price for 1 or 3...$20-$30 and they seem to only come in black...I can get an Autometer guage pod that is exclusive to the Ford A Pillar for $10-$20 more...
My concern is visibilty thru the windshield while wheeling but I also want to easily be able to read the guage at the same time, so I am looking for a 1-guage pillar pod....
I am thinking of getting a 3-guage pillar pod and cutting it...This would give me 1 guage for now and if I wanted to add another guage, I will have a 2-quage pillar pod for free...
...My Temp Reading Updates = per driving situations and outside temps...
1)....First drive about 7 miles, in town afternoon traffic (about 90* outside)...182* max
2)...Test drive, 27 miles thru carbon canyon uphill 50 mph max, 6p.m. afternoon traffic (A cool 70*) 192* max
3)...Freeway test, 9 am at 65 for 15 miles (A cool 70*max)... 140*-150* max
4)...Same drive as 2), 6 p.m., (100* outside) 185*-190* max
5)...Return trip at 9 a.m. 50 mph max (75* outside) ...140*-150*
6)...30 freeway mi. each way to 4wheelparts warehouse in Compton(70*outside)...140*-142*
...Installed corrugated tubing...
7)...Same drive as 2), 1:30p.m., (85* outside) 168*-178* max
8)...Return trip at 8 a.m. 50 mph max (65* outside) ...130*-140*
9)...Same drive as 2), 5:30p.m., (75* outside) 160*-168* max
10)...Return trip at 8 a.m. 50 mph max (59* outside) ...130*-138*