mrboyle's new wheeling rig | Page 2 | Ford Explorer Forums - Serious Explorations

  • Register Today It's free!

mrboyle's new wheeling rig

Here you go Gary! :p:

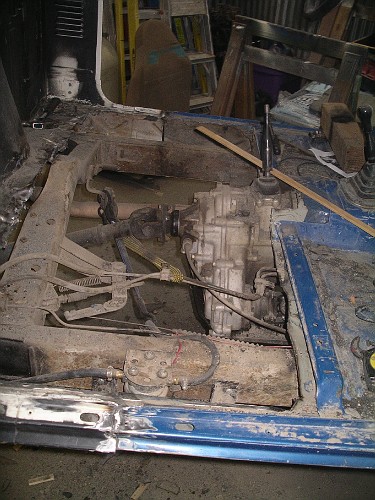
Finally did something noticable. Bobed the bed 13" today. Didn't turn out too bad for 2 guys that have never attempted anything like this before.

IMGP2780-vi.jpg


IMGP2783-vi.jpg

Plasma cutter made the job go a lot faster.

IMGP2795-vi.jpg

Yes, I love having my picture taken!

IMGP2796-vi.jpg

Added in a crossmember
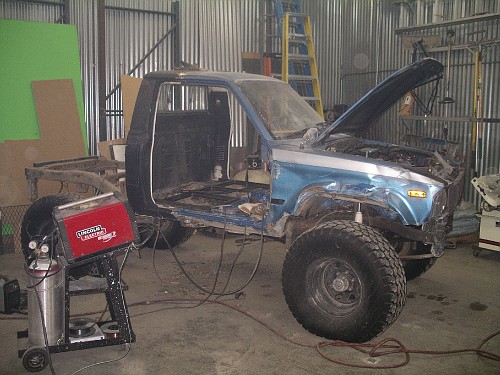
IMGP2800-vi.jpg

Welding her up.

IMGP2804-vi.jpg


IMGP2805-vi.jpg

Finished product!

One step closer to getting it on the road! :bounce:


Join the Elite Explorers for $20 each year.
Elite Explorer members see no advertisements, no banner ads, no double underlined links,.
Add an avatar, upload photo attachments, and more!
.


Looks a whole lot better than when I bob'd my Ranger.


Time for this weeks episode of Why Me? :banghead:

Yesterday I was planning to finish up a bunch of loose ends and take it for a test run today. Guess what? The test run didn't happen. Swapping the steering wheel I pushed down on the brake pedal hard enough to blow one of the braided steel front brake lines. It had been rubbing on the frame and wore enough that it blew. Positive side is at least it happened in the shop and not on the road or trail somewhere.

I did get several things accomplished though (forgot the cammera so no pics). Got the old interior stripped, new seats and steering wheel installed. Doors removed (plan to make 1/2 or tube doors sometime this summer), tow points added front and rear, t-case skid plate finished and hub replaced. Next friday/Saturday I plan to finish everything else up (battery hold down, tool box mounted, cb installed, carb vent rerouted and tune up). Oh and replace the bad brake line. :mad: Hopefully I'll be able to get it out next Sunday and do a test run. Monday I have to work on the tow rig and trailer I'm borrowing. Can't wait till I can relax and enjoy some wheeling!


Nice job! :thumbsup:

Hope everything works out soon, I know exactly how you feel.


Guess its time for an update! as it stands the Toyota has yet to complete a full day on the trail. First try was Posion Spider Mesa (during this year's Explorer4x4 run). Made it aprox. 3 miles up the trail when I developed carb issues. This is the first time I've ever dealt with a Weber and I'm learning fast how picky they can be. The PO never put a regulator on when he swapped to the Weber. I went ahead and rebuilt the carb and picked up a Holley FPR. First regulator ended up only being able to adjust down to 4psi. Ran 21rd. (Grand Junction, CO) and made it to the alcove (1/2 way through the trail) when fuel problems returned. Got a low pressure regulator and dialed the pressure down to 2.5psi. Truck ran great for a few hours, then the fuel pump failed. :mad: So last week I installed the new fuel pump and have driven it for three days and haven't had one issue.

Installing the fuel pump didn't come without its own set of issues. I couldn't install it where I origionally wanted due to interfearance issues with the e-brake cable. So I settled for the outside of the passenger frame rail.

IMGP2808-vi.jpg


Between the mounting location and the fact that the pump is taller than the frame rail, left the pump exposed to trail damage.

IMGP2809-vi.jpg


So today I built a skid plate to protect the pump.

IMGP2825-vi.jpg


IMGP2827-vi.jpg


IMGP2835-vi.jpg


Currently its held in place with 6- 1/4" screws. If that doesn't hold up I'll have to drill and sleve the frame (the only downfall to a boxed frame). I would have gone ahead and drilled through but I didn't have a bit long enough and there is no room to get the drill in from the inside of the rail without removing the e-brake assembly. I'm not holding my breath as to how well the screws are going to hold up, but time will tell.


Looks good. Now get some sliders on that thing.

You don't like my custom rockers?


Actually that is what I was origionally planning to do this weekend, but I never got time to get to the metal supply place last week and they are closed on Saturday. Mabey I'll get to it next weekend! :rolleyes:


Looks like as long as the screws hold up that pump doesnt have anything to worry about...:thumbsup:


It has begun! :eek:

After driving the Toyota around this past summer I discovered that the lack of leg room just wasn't cutting it. It was ok for around town and on the trail, but when driving long distances my right knee would cramp up. So I decided to do something adout it.

First step was to remove the back half of the cab from my donor truck and trim it 6" longer than where I planed to cut the other cab.

IMGP2920-vi.jpg


Next remove the bed, seats and fuel tank.

IMGP2922-vi.jpg


IMGP2921-vi.jpg


Then it was time to mark the cab and cut the floor.

IMGP2924-vi.jpg


IMGP2923-vi.jpg


While I was cutting the floor I decided it was a good time as any to remove the rusty parts of the floorboards. In the process I "tubed" the firewall back to the front cab mount to add tire clearance.

IMGP2927-vi.jpg


IMGP2943-vi.jpg


Rust on the driver side isn't near as bad as the passenger side.

IMGP2946-vi.jpg


IMGP2947-vi.jpg


I also decided to fix this monstrocity! This is the PO(S) attempt at trimming the floor to fit the shifter for the rear case.

IMGP2936-vi.jpg


IMGP2937-vi.jpg


All trimed and ready to go.

IMGP2953-vi.jpg


That's where it sits as of tonight. Monday I need to get the sheetmetal to redo the floors and we'll make the final cut across the roof and remove the rear of the cab. Then its time to relocate the rear cab mounts and attach the new rear. Yea its a lot of work for six extra inches of leg room. Any more and I feel it would throw the proportions of the cab off and make it look really odd.


Got the cab mounts relocated

IMGP2954-vi.jpg


and set the new rear on to get an idea on what it looks like/what I need to do to make it one peice again.

IMGP2956-vi.jpg


IMGP2959-vi.jpg


IMGP2960-vi.jpg


Its currently just tacked at the top, but I need to remove the tacks and fine tune the roof cuts to line up better. The floor is going to take a little more wotk than I had origionally planned. I'll remove the entire floor from the front seat riser, back and redo the entire thing. It will be alot easier than trying to patch the two floors together.

IMGP2957-vi.jpg


Did you consider the rare Custom Cab conversion...?

Click on image for larger view.


The 2 have become one! Cab 1/2's are permanently attached to one another.

IMGP2984-vi.jpg


The roof seam is just tacked, but the rest has been welded solid.

IMGP2967-vi.jpg


IMGP2974-vi.jpg


Didn't realize how much bondo was on the roof of the blue truck.

IMGP2971-vi.jpg


IMGP2972-vi.jpg


Just means more work. :rolleyes:

Cut the floor out the rest of the way.

IMGP2962-vi.jpg


and built a new sub-floor to support the seats and replacement floor.

IMGP2975-vi.jpg


Used 1.5x1.5x.188 wall tubing. Slightly overkill, but its what we had on hand, so I can't complain about the price.


Join the Elite Explorers for $20 each year.
Elite Explorer members see no advertisements, no banner ads, no double underlined links,.
Add an avatar, upload photo attachments, and more!
.


Progress seems to be slow, but its getting there.

IMGP3007-vi.jpg


Passenger floor/ firewall tub finished.

IMGP3023-vi.jpg


Driver firewall tub finished.

IMGP3009-vi.jpg


New floor and driver seat mounts finished (still need to finish the tunnel). Floor is 11ga. (1/8") plate. Figured that should be solid enough to mount the seats/ belts to since I'm not running an interior cage.

IMGP3016-vi.jpg


New seats thanks to BTF.

IMGP3003-vi.jpg


IMGP3008-vi.jpg


Instead of trying to tie the mangled rockers together I cut them out and added a 2x6x.25 wall tube slider. This will be tied to the frame and serve as the base for the rear of the exo.


Back
Top