Installing aftermarket DVD headrests | Page 2 | Ford Explorer Forums - Serious Explorations

  • Register Today It's free!

Installing aftermarket DVD headrests

he said they were in the seat back, which makes sense

OK. So I am getting ready to install my headrest this weekend and decided to check. There are 2 sets of wires in the seat and both seem to be attached to something. Skinny ones on the left and thick ones on the right. It looks like they might be for the heated seats though.

I will see if I can get the service department to tell me which ones are which when I drop my car off on Friday for 2.7 to 2.8 update.


Join the Elite Explorers for $20 each year.
Elite Explorer members see no advertisements, no banner ads, no double underlined links,.
Add an avatar, upload photo attachments, and more!
.


Save yourself money and install and grab 2 ipads and the ringo mounting system from vogels. So many positives to ipad system over old dvd technology. You can also utilize the wifi technology in your new ex and take your ipad with you


Save yourself money and install and grab 2 ipads and the ringo mounting system from vogels. So many positives to ipad system over old dvd technology. You can also utilize the wifi technology in your new ex and take your ipad with you

I wish they had wireless headphones. I will have to do a search and see if there are some options out there. Maybe Bluetooth?


OK. So I am getting ready to install my headrest this weekend and decided to check. There are 2 sets of wires in the seat and both seem to be attached to something. Skinny ones on the left and thick ones on the right. It looks like they might be for the heated seats though.

I will see if I can get the service department to tell me which ones are which when I drop my car off on Friday for 2.7 to 2.8 update.

BECAREFUL!!! There are air bags and sensors in the seats. Don't cut into any of the wires if you are not sure what they are for.


I wish they had wireless headphones. I will have to do a search and see if there are some options out there. Maybe Bluetooth?

There is a thread from a month or two back where a poster found an iPad mount that had power and wireless headphones. Looked very good.

Maybe search topic


There is a thread from a month or two back where a poster found an iPad mount that had power and wireless headphones. Looked very good.

Maybe search topic

Thanks! I'll see if I can dig it up. If you come across it, post the link in this thread.


So I got the instructions on how to install the OEM DVD headrest from the dealer yesterday. But I can not attach the PDF to a post. Bummer:thumbdwn:

BTW there are No connections in the seat. The instructions state to use a jumper harness connected to the OE connector near fuse box.

http://i1143.photobucket.com/albums/n624/jdboom1877/5aedd5c4.jpg


2011 Ford Explorer Dealer Headrest Installing Instructions

By popular demand here are the instructions for installing the Factory DVD headrest. I tried to post them on this forum, but it looks like we are restricted to file type and size. So here is the link.


By popular demand here are the instructions for installing the Factory DVD headrest. I tried to post them on this forum, but it looks like we are restricted to file type and size. So here is the link.


Your link doesnt work, it asks you to join the Ford Forum to view the PDF file.

Cant download or save it either.


Thanks for the PDF!

Seems like Ford's procedure is a bit more complicated than what I did, based on the fact that they bury the control unit in the front center console. By hiding the unit under the driver seat, like I did, you cut down on the amount of work involved. But their solution is more stealth, I suppose.

They do have good pictures on removing the side molding and gaining access to the ground stud, so that's really good info. Also good to know where the factory power harness is located, although my tap into the fuse box works just fine, especially with my leased vehicle.

Dino


Got it

Thanks for posting.


OK, since I started this thread, I figure I'll show you the end result. Thanks to everyone's input.

I ordered the same set of DVD players another poster mentioned here, but went directly to the eonon ebay auction -- they offer the same price but a full 1 year warranty which On Fair doesn't offer unless you pay extra.

In this post, I'll outline my thoughts on the specific units I bought, and the following posts will be a pictorial guide to what I did.

I made sure I ordered the 9" with digital screen (higher resolution) -- if you want the exact same model, go to their shop on ebay:
http://myworld.ebay.com/eonon/
and search for the "C1037 2x9" HD LCD In Car Black Headrest DVD Player b6" -basically you want model C1037

I got mine in black to match my leather in the Limited -- it’s a very close match.

Pros to this model specifically:
1. The zippered cover makes the install look really clean when not using the screens.
2. The screen quality is quite good
3. Wireless headphones (2) included, remotes (2) and game controllers (2) included
4. You can link the outputs to each other so the kids can watch either their own DVDs or either can serve the video to the other unit so they can share an experience
5. It plays various media files (mp4, divx, avi, etc) --not tried yet
6. The pleather is q good grain, texture and color match for the black leather interior of my Limited.
7. At $260, this set is only a fraction of Ford's cost and provides a bigger screen (9")

Cons:
1. The headrest is considerably smaller than the factory headrests -- the Ford headrests jut out to meet your head and can tilt. These DVD rests are fixed, don't tilt and, although wider, don't have as much forward padding, so you have to extend your neck a little to meet the headrest. This is my least favorite aspect, but the headrest should still protect you from a major whiplash since the head can't hyperextend -- it's just less comfortable than the factory rests. I'm not sure if the Ford Invision rests are better designed in this aspect (anyone have side pictures of the Ford Invision headrests?)

2. The wire on the right which runs down the headrest pole and down the seatback should be at least 6" longer -- as it is shipped, the tip of the connector ends about 2 inches above the bottom opening of the seat cover, and it's a real pain to fit your hand up inside to connect the video output cable to the connector. My hands are medium in size so I managed, but others might have to slit the fabric at the bottom of the seat to make more room to reach up (this would remain TOTALLY hidden as the seat bottom material covers the openings.

3. The >2000 games included with the headrests are really terrible, so don't figure them in your buying decision.

Pictures of the install to follow...


Installation pictures

Materials:

1. Lamp cord: I bought 18 gauge cord, but you could go thinner.

P1020025.jpg


2. Add a fuse: you can use the Mini fuse taps -- the shop I went to said it won't work but trust me, they do. You do indeed still need to pick up another set of fuses (I picked up a set of ATM-10 amp fuses). In the pic below you can see the add a fuse plus an ATM-10 amp fuse in one of the slots plus another one (the empty slot is for the fuse that protects your DVD player). Pictured to the right is the existing Ford fuse (? I think they are called low profile/mini-ATM fuses?)

P1020027.jpg


Install steps:

1. I took the lamp cord and split it down the middle, leaving one side longer to reach the fuse box, and the other side cut down about 12" lower to reach the ground point. That way, the rest of the electrical cord is held together for the run to the back of the seats. Make sure you know which you chose to be ground and which is 12V (personally, I used the ridged side of the cord to indicate 12V and the smooth to indicate ground). I missed taking a picture, but the lamp cord looks like this near the fuse box:

===============___________
with the longer part going to 12V and the shorter part going to ground. Excess slack can be tucked into the trim.

2. Pinch-crimp your lamp wire 12V side to the add a fuse and insert into slot #38 - an elusive ignition-switched circuit to avoid draining your battery (thanks Dino). As mentioned, the fuse box is on the driver side, up & to the left of the brake pedal.

P1020023.jpg


P1020029.jpg


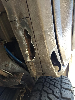
3. Access the ground point by pulling up on the driver's side step plate then pulling the vertical panel outward. Dino's post outlines this well (http://www.explorerforum.com/forums/showpost.php?p=2725796&postcount=14). Note this bolt is on REALLY tight -- I used a cheap socket screwdriver and actually cracked the plastic handle -- eventually I switched to a proper socket set and extension. To this ground screw, I attached the ground wire by crimping it to an O-ring and then screwed the existing screw back in.

P1020022.jpg


P1020026.jpg


4. Run the electrical cord to the back of the driver's seat, tucking it under the step plate as you go.

5. Unlatch the bottom of the seat covers to access the bottom of the seat. There are 3 hooks - you pull them away from you towards the front of the car and they eventually unlatch (they have a bit of a lip to them that holds them to the metal running along the bottom of the seat.

P1020030.jpg


6. Remove the factory headrests. I then prepared the new DVD headrest -- I needed to slip the 12mm post adapters over the existing posts. A tip at this point: wrap a little bit of electrical tape to the existing DVD headrest posts before slipping the 12mm adapters over -- this helps avoid any rattling sound you might get due to the different diameters of the posts.

7. Once the factory headrests are off, use a straightened coat hanger wire to aim straight down the hole to the bottom of the seat. Be sure to put tape over both ends of the coat hanger wire to avoid poking through the seatback or snagging the fabric of your roof! Once you fish the wire through the bottom, tape the top of the wire to the matching DVD player's wires and feed this down. The hole diameter is small so you'll need to butt-end tape the connector to the coat hanger

Here's a picture of the seatcover bottom unlatched and the DVD headrest wires coming out:

P1020031.jpg


As I mentioned, the right DVD headrest wire was just about 2" short of the bottom opening, so I had to scrunch my hand up the right bottom rectangle hole (stretching it a bit) then feed the video output cable connector up to my fingers inside the seat, then carefully connect them using just one hand (and avoid bending the pins). It might help to practice one-hand connecting the right sided wires before installing -- you can feel when the connectors properly mate before pushing them together.

Since the right cables were so hard to connect, I made sure I fed a ton of the AV out cable on the right side up into the seat so it isn't accidentally disconnected. There was no way for me to tape the right connectors together since they are connected inside the seat. There's still plenty of wire to reach the passenger side, and this makes it easier to manage the cabling anyway.

8. Tap into the power cable to connect the DVD headrest 12V power connector (red to 12V, black to ground). I used those crimp-on side taps but the gauge of the DVD player's power cables was way thinner than my lamp cable so I did some soldering to the connectors to ensure the skinny wires made a solid connection. You might find a better way to tap the power wires.

9. I then ran all of the driver's side wires over to the passenger side, and they all slip really easily under the center console. The existing slit in the carpet make the cable hide easy, and you can literally just push down on the carpet at the rear of the center console to pop the wires under.

P1020032.jpg


10. Repeat the process for the passenger side. Once the wires are fished down, connect the video and audio output from the drivers side seat to the video and audio input on the passenger seat, and vice versa. That way each can act as a video source to the other.

11. I made sure I left enough slack for both seats to move forward and backward before taping and tying down all the wires nice and neat.

There is actually quite a bit of space to tuck in all of the AV connectors and the 12V fuse boxes all into the space where the backseat cover latches to the frame -- I managed to fit BOTH sets of AV connectors plus both 12V fuses and black boxes in that little space, then re-strapped the bottom seat cover onto the frame, not much of a visible bulge!

P1020040.jpg


12. To maximize the FM transmission quality, I ran the green FM transmitter wires under the trim towards the third row since the FM antenna is at the top rear of the vehicle. Despite this, FM transmission audio quality is still pretty crappy.

P1020041.jpg


13. The final result: nice and neat, fully functional and no wires seen anywhere!

P1020035.jpg


P1020036.jpg


P1020034.jpg


14. My biggest gripe is these headrests don't support your head as well as the Ford factory rests, and you can see the difference in the front padding. When looking critically, the DVD headrests definitely lean quite a bit back vs. the Ford ones, but to all of my friends who looked, they couldn't believe these were not factory DVD players and were shocked by the price!

P1020038.jpg


P1020034.jpg


All in all, I'm really happy with the result. My kids tried them the first time this weekend and were ecstatic.

Good luck on your installs! Hope these images and tutorial help others.


Thanks Steve for all the pictures. I know I promised pictures of my own, but haven't had the chance. I'm glad my post helped you out a bit.

Your headrests looks great. As far as comfort, etc., the ones I got (albeit much more expensive) do ratchet forward, but still not as much as the originals. My wife is a little concerned about the safety, but I'm not sure.

Dino


Very nice write up!:thumbsup::thumbsup::thumbsup:


Very nice.... I am having mine installed this evening (I am not the do it yourself kinda guy). Going out to the lake this weekend so we will have a nice 4 hour drive to test them out.... Kids cannot wait!!!!


Very nice mod....well photographed.....now Im pissed I paid for the factory OEM Invision DVD package.


Join the Elite Explorers for $20 each year.
Elite Explorer members see no advertisements, no banner ads, no double underlined links,.
Add an avatar, upload photo attachments, and more!
.


Thanks for the comments.

@Sgt1411: can you post pics of the factory Invision headrests? How do they compare with the original Explorer headrest, and do they support your head the same?


Back
Top