Mad Max - Galaxie Tow Rig | Page 3 | Ford Explorer Forums - Serious Explorations

  • Register Today It's free!

Mad Max - Galaxie Tow Rig

This all finally leads into what took place yesterday and today - slapping the body back onto the frame!

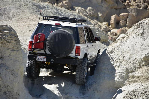
Now, before rolling it back under, we took a second to fit some SuperSwampers on and see how the backspacing looked:

001_zpso4udlk2z.jpg


Even better than the wheels that were on it! Plenty of clearance from the frame. As for the body I think this response would be appropriate:

sawzall.jpg


Once we were done goofing around we got the frame back under the body and started lowering the body as close as we could before removing the wood beams. After hovering the body just over the frame Tommy got to work unbolting the beams:

003_zpsnzdt1zne.jpg


This morning it was on to aligning the frame for the final drop

011_zps22zc6zpo.jpg


I can't emphasize just how much car this is. It was like trying to line the Titanic up for a mooring position at port!

018_zpsmnpqd7dx.jpg


And of course the body mounts needed checking and rechecking as the body came lower and lower.

016_zpsrlbf38s4.jpg


Finally after all was said and done we put her right where she needed to be and made a great mate! Here's how she sits this evening now awaiting a little love to the rear bumper and for a new power plant :D

030_zpsifqstlpa.jpg


Join the Elite Explorers for $20 each year.
Elite Explorer members see no advertisements, no banner ads, no double underlined links,.
Add an avatar, upload photo attachments, and more!
.


Just freaking awesome! Can't wait to see it in Moab. Well done, and keep up the great work!!

Paul
'91 Sport


Just freaking awesome! Can't wait to see it in Moab. Well done, and keep up the great work!!

Paul
'91 Sport

Thanks Paul!!!! I've got things in high gear to make the dead line! I hope it all works out :thumbsup:


I'm surprised you didn't apply more reinforcement to the tow hitch installed in the rear crossmember. I am not a structural engineer by any means but I have learned the hard way about pulling stuff and ending up with bent hitches, bumpers, etc.

All in all looks good. I have done a couple older Mopars and I recomend taking a good look at the wiring BEFORE buttoning it all up. Easy to add in the wiring for the trailer hit h/brake controller and redo some wires now than have to redo it later. I take it that 390 is going back in? Good stout motor, plenty of power.

Question: while you had the brakes diassembled why not do the simple upgrade to vacuum assist? I see you plan on adding discs, why make life hard on yourself? I did a hydraboost from a newer Duramax Silverado in my Jeep (350/700r4/231/8.8/D44/38.5") and it was stupid easy and provided amazing braking.

Just my $0.02.

Regardless, you are doing very well.


I just had to smile as I followed along with the unveiling of the rust. I've been through everything you described. It's fantastic that you've pushed through and are getting this done :chug:


I love this build!


I'm surprised you didn't apply more reinforcement to the tow hitch installed in the rear crossmember. I am not a structural engineer by any means but I have learned the hard way about pulling stuff and ending up with bent hitches, bumpers, etc.

All in all looks good. I have done a couple older Mopars and I recomend taking a good look at the wiring BEFORE buttoning it all up. Easy to add in the wiring for the trailer hit h/brake controller and redo some wires now than have to redo it later. I take it that 390 is going back in? Good stout motor, plenty of power.

Question: while you had the brakes diassembled why not do the simple upgrade to vacuum assist? I see you plan on adding discs, why make life hard on yourself? I did a hydraboost from a newer Duramax Silverado in my Jeep (350/700r4/231/8.8/D44/38.5") and it was stupid easy and provided amazing braking.

Just my $0.02.

Regardless, you are doing very well.


Hey BuckWild, good questions! Here is what I've got:

The rear crossmember is 5/8 C-channel that happens to have the same gap as the outer diameter of the hitch. My buddy not only welded the hitch around the outside, but also along all for edges inside the C-Channel. As for the rest of the rear half, it got 3/16 plating welded in that goes all the way down to the C-Channel where it is also welded to the rear crossmember. At this point I think the weak link is where the frame goes over the wheel wells, and with no need to support tongue weight the whole Frankenstein operation should hold up pretty good.

As for the wiring, not a bad idea! I'm kinda at a stand still till my Grandpa and I get the motor slapped together this weekend, so what better to do than to get some wires laid down?

Vacuum assist? I've never heard about that? Is that for disc brakes?

I love this build!

Glad you like it turboranger! Something this wrong never felt so right :D


Hey BuckWild, good questions! Here is what I've got:

The rear crossmember is 5/8 C-channel that happens to have the same gap as the outer diameter of the hitch. My buddy not only welded the hitch around the outside, but also along all for edges inside the C-Channel. As for the rest of the rear half, it got 3/16 plating welded in that goes all the way down to the C-Channel where it is also welded to the rear crossmember. At this point I think the weak link is where the frame goes over the wheel wells, and with no need to support tongue weight the whole Frankenstein operation should hold up pretty good.

As for the wiring, not a bad idea! I'm kinda at a stand still till my Grandpa and I get the motor slapped together this weekend, so what better to do than to get some wires laid down?

Vacuum assist? I've never heard about that? Is that for disc brakes?


Glad you like it turboranger! Something this wrong never felt so right :D


Vacuum assist is the big round thing that all modern brakes have, referred to as power brakes. For the most part its just the vacuum booster attached to the master cyl and a vacuum line to the engine. I ran hydraboost as it uses hydraulic pressure from the power steering pump to apply pressure to the brake system. The Jeep was an easy swap as most old school power steering pumps are already tapped for an accessory output. There are alot of 'how to' threads over on Pirate4x4.

Run the trailer wiring now. Get a good brake controller and install it now, this way you can wire in a 4pin and 7 pin combo plug in and be set to pull anything from a litle utility trailer to a full on car hauler with electric brakes. Be proactive with it! I grabbed the stick on LED strips for $4 on ebay and slap them on the hitch as add-on reverse lights.

The LED strips I got from eBAy were on sale: 10 strips for $22 shipped. I also put them under the hood on a mini toggle so I can see at night. He last set I put on my Subaru are still bright after 2 years.


REALLY looking forward to seeing this thing, really hope you make the deadline!


Me too Birdy!!! It seems like every move I make something is stacked against me, but come hell or high water I'm going to do my best to make it happen!

Here is how this weekend started:

001_zpsepto2shl.jpg


Loaded up the whole truck with motor parts! Probably the most weight I've had stacked in the back of the truck ever. The mission was to get the motor together with the help of my step Grandpa Dave! I know how to spell 'motor' and that is about it, but Dave has rebuilt more than most people in a couple lifetimes - it was great having him as a life line on this project!

008_zpsdnyic1vg.jpg


Once I made it down the highway to his house, we went ahead and unloaded/organized all the parts. Then came prep! We went ahead and taped up the block and heads and a few other parts then headed to the parts store for some paint.

003_zpsryvvquqf.jpg


After a little deliberation and himming/hawing finally decided a bright shade of Ford Blue with Grey and Black would make for a sharp looking motor! So we got to work

007_zps1j86k01z.jpg


I can't tell you how great it was to finally put paint on a block that has been sitting in the house for over a year! Still smiling as I type this :) That night, Friday night, I Dave let me borrow a little sump pump bin and degreaser so I could clean off the remaining grimy parts ei. timing cover and misc brackets/pullys.

015_zpszhq3ivxw.jpg


The next morning, yesterday, we got started assembling and checking clearances. Our first little snag was this good size dent the machine shop put in a piston on the oil ring groove, ugh!

018_zpsq8vjxlix.jpg


After carefully filing off the mushroomed out aluminum I was able to fully dress the first piston so we could get started checking ring gap clearances and piston skirt clearances. It's a really good looking piston :D

022_zpsp3dizvy7.jpg


After feeling good about the clearances and machine work on the block we went ahead and got the main bearings out of the package to throw onto the block and get the crank in.

020_zps03fgcmyu.jpg


Upon attempting to install one, it became evident the machine shop gave me the wrong bearings! The box was old and dilapidated but the bearings were still in packaging. I think at some point in its life on the shelf they must have fallen out of the box and someone loaded 460 bearings back in! :censored: Called everyone and their dog in the valley and could not locate a set in the state of Utah on Saturday. Finally gave in and called summit racing and got a set ordered from Nevada on rush. Should show up Tuesday.

64-37004.jpg


So now at a stand still we turned our attention to Dave's Jeep and started mounting a winch on his bumper and a bit later went ahead and cleaned any remaining hardware so we will have our ducks in a row on Tuesday night.

023_zps7ordwaxm.jpg


027_zps2rmihx2b.jpg


Well we'll see what happens and how it goes, but man we are so close!!! Stay tuned! :D


There is so much awesomeness in this build thread....I can't even.....no words...

Gosh I hope you get this thing done for Moab....heck if you needed a hand, I'd skip Moab and come out just to help on this project!!

Well, not really..... :D


There is so much awesomeness in this build thread....I can't even.....no words...

Gosh I hope you get this thing done for Moab....heck if you needed a hand, I'd skip Moab and come out just to help on this project!!

Well, not really..... :D

Hahaha! You're the man 5spdman, I wouldn't miss Moab either!


I do what I can lol...

How's the engine comin along?


I do what I can lol...

How's the engine comin along?

Quick update, the Main Bearings finally arrived! And they were the correct ones *whew* After work I headed over to Dave's and we went to town checking the clearances on the crank.

001_zpscpm0vijs.jpg


After everything checked out we slapped the cam in, dropped the crank in, bolted the mains down, and the crank spun like a top! Getting all the pistons oiled up and put in was way more of a PITA than I imagined, it took forever but we finally got them in.

012_zpslvh69gfc.jpg


We got all the pistons in and everything moved smoothly which was quite shocking considering how dang heavy everything is! I forgot to take a picture of the top side, that'll come tomorrow!


I'm too dang tired to type and photo bucket isn't cooperating this evening, but just got done working on the motor for the evening. So so close! Can't wait to update yall tomorrow when I get a break :D

13010636_10209647383566560_7707622952584670155_n.jpg


The whole project really looks good!

Nice to see someone bring "An Oldie" back from the dead.


Join the Elite Explorers for $20 each year.
Elite Explorer members see no advertisements, no banner ads, no double underlined links,.
Add an avatar, upload photo attachments, and more!
.


Alright, so to finally update last night's action here is what went down - I started by snagging a shot of those piston's I promised :)

002_zps8zoc1mvw.jpg


From there we got started with the heads and timing chain

005_zpso7mf6vz4.jpg


Then we went ahead and put the timing chain cover, a few pulleys, and got the intake gasket prepped.

006_zpskoaaamnf.jpg


Also put the oil pump on.

008_zpscci4noym.jpg


Then we went ahead and finally put that heavy intake manifold on! Think weighs at least 100 lbs... and a few more pulleys got added on as well.

015_zpsmeeawybr.jpg


Flipped the motor over (oh my good gravy it is SOOOO HEAVY!). Put on the oil pan, fuel pump, and oil filter adapter.

019_zpsp6geephn.jpg


Then added the valve covers and put the distributor on to hold the oil pump drive shaft in.

021_zps0onpekqy.jpg


At this point it was basically midnight, and we called it a night. Working on it day in and out is the only way to get this bad boy down to Moab

027_zpssokczamt.jpg


Now, what got done this night.....?

Well, got off work and went straight to working on the motor. Polished off the last of the accessories!

002_zpswol8fpcn.jpg


Then we wrestled the transmission on the back. Got very lucky, only took 5 min!

006_zpsdeuqtnes.jpg


Then BAM! We slugged that motor right into the chassis! Went on without any major heart aches, worked out well

011_zpsy9xov5w8.jpg


Hooked up the exhaust for the ride home. Boy is it a good feeling to have this coffee table of a motor finally back in the frame! Especially when it turned out so much better than I was expecting!

013_zpshws8di1d.jpg


And of course, had to get a shot just before the trip home. Captain America gave it all it had, but left quite a bit to be desired. Looking forward to having the vehicle positions switched :D

015_zpsebbgruoz.jpg


Back
Top