LD50 Full-size axle thread `93 Ex | Page 27 | Ford Explorer Forums - Serious Explorations

  • Register Today It's free!

LD50 Full-size axle thread `93 Ex

LD50 Full-size axle thread `93 Ex SAS

Hey fellow Explorer enthusiasts!

Well I never thought I`d do it, but it`s time.
I originally thought I would go to a smaller rig one day but I`m going to beef up the Explorer instead. Since I already have a huge thread on my previous work I decided to start fresh.

If you would like to see my previous mods, you can navigate from my signature link, or click here:
http://www.explorerforum.com/forums/showthread.php?p=523171#post523171

~

My plans are to install a D44 and 9-inch into the station wagon and run 35 inch tires. Hopefully she`ll still get in the garage, but if it don`t then oh well. During this I also have some body work to do.

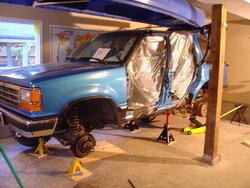
Right now I have the rear end out, I took off the spare tire hanger and removed the muffler and rear most heat shield. (doors are off for body work)Next the gas tank comes out so I can prep the underside for rust protection, from the t-case back. In the meantime I am trying to sell some parts for cash.

First big decision is what gear ratio. The 4.10`s on 33s was nice, but I think I`d like a bit more torque than that so I`m thinking 4.88 or 5.13s.
 

Attachments

  • prep.JPG
    prep.JPG
    62.9 KB · Views: 10,430


Join the Elite Explorers for $20 each year.
Elite Explorer members see no advertisements, no banner ads, no double underlined links,.
Add an avatar, upload photo attachments, and more!
.


Here`s why I`m not a fan of mud :rolleyes:

My friend got stuck and I did too when I tried pulling him out.
Had to break out the receiver winch to get us out.
 

Attachments

  • Herrling April 08 (3)explo.JPG
    Herrling April 08 (3)explo.JPG
    99.7 KB · Views: 2,812


Join the Elite Explorers for $20 each year.
Elite Explorer members see no advertisements, no banner ads, no double underlined links,.
Add an avatar, upload photo attachments, and more!
.


looks like the tires werent clearing the mud well.. does he have all terrains?


Yeah he does, the river mud just sticks. All four of my tires just spun and gravity slid me down the bank.


Just gathering up the loose ends, here is my rear hi-lift mount system. I drilled a hole in each side of the tire carrier assembly, cut the head off a couple of bolts, pounded them into the holes and welded them there. Then I cut some round pieces of rubber and drilled holes in them and slipped them over the bolts for isolation, and wing-nutted the jack on there.
 

Attachments

  • hi-lift1.JPG
    hi-lift1.JPG
    81.2 KB · Views: 901
  • hi-lift2.JPG
    hi-lift2.JPG
    37.2 KB · Views: 683


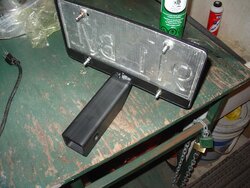
Okay, I had to figure out a place to hang my front plate, and since hard mounting it kind of interfered with putting my receiver hitch winch on, I just made up a receiver plate holder.
Here she be:
 

Attachments

  • front plate 3.JPG
    front plate 3.JPG
    56.6 KB · Views: 857
  • front plate 2.JPG
    front plate 2.JPG
    66.3 KB · Views: 656
  • front plate.JPG
    front plate.JPG
    27.5 KB · Views: 665


nice vid. you live in a beautiful place.


I know it.

So I just installed a new steering box (steering gear).
Mine had developed a slight leak which steadily got worse.
I may have not been vigilant enough in my build, lazy I guess, but I kept putting off adjustment of the stops on the D44 knuckles.

As you can see in the pic, the steering gear stopped almost 1/4 of an inch from the knuckles hitting the stops. I replaced the stock stops with a 1.5 inch grade 8 bolt. I wrenched it in until about 5 threads were visible and that should stop it now, instead of bottoming my steering out!
I used permanent threadlocker on them to secure.
 

Attachments

  • stops stock.JPG
    stops stock.JPG
    33.4 KB · Views: 597
  • longer stops.JPG
    longer stops.JPG
    23.9 KB · Views: 590


Another thing that bamboozled me today was the fact that my driver`s side rear brake on the 9 inch has been over-tightening since day one.
I've had to loosen the adjuster several times and could never get the drum off without doing so, whenever I have had too.
After going for a spin yesterday and coming back with a red-hot, stinky drum, I took it off and had a good look see to finally nail down the problem.

It seems that the top anchor pin is bent, which would have taken quite an amount of force to do. Although I can't believe I would not have noticed during the original assembly, I figure it must have always been bent, since that brake has been funny since I started driving it. It is possible that a slight bend has slowly created a larger one over time I guess.
The bend has actually bent the rearward shoe as well, so I`ll have to replace the whole rear backing plate.
 

Attachments

  • dr side drum.JPG
    dr side drum.JPG
    40.7 KB · Views: 595


I have been working on my on-board air lately. Finally! It`s gunna be pretty slick. I have the bracketry figured out, hope to show it soon.


Well, the curse of the antique 9 inch is working it`s magic again, very hard to find backing plates. I want to wheel a bit this weekend so I heated her up and bent it back for now.
I seen a few on E-bay that look like matches but pretty expensive. I might just shop around..


If worse comes to worse you can cut the center out of the backing plates you have and weld them into some others. I've done this before with good results.


That`s possible I guess. I think It bent back fairly well, still amazing that it bent in the first place, the backing on it is pretty hefty. Going for a quick burn tonight to see how it feels.


The yard where my 9" came from just has them layin on the ground. To bad it isnt local I'd pick you one up. I do want to get out to the local pic and pull and source some chevy springs in the next couple of weeks I'll keep my eye out.


That would be cool, if price was reasonable, shipping would be worth it.

I found a set on Ebay that matched, advertised as being from a 1975 F-150.
He would not ship to Canada, however. Someone won them for five dollars! I tried e-mailing him to allow me to bid, it`s just as easy to mail them across the border as it is to mail it within the states. He ignored me.
I find it unbelievably irritating when Ebay sellers won't ship to Canada, I would describe these persons with words I shouldn't use here, what can you do?

I didn't get a chance to get out last night after all, gunna see how it feels tonight.

Oh, I still don't know for sure where the axle came from, but it is the "big bearing" type, and are getting rare, That is the problem. I bet I could find them from a classic Ford parts supplier but I still have a couple of scrap yards I can check out.

They look like this:
 

Attachments

  • af0e_1.jpg
    af0e_1.jpg
    21.9 KB · Views: 564
  • 6fe1_1.jpg
    6fe1_1.jpg
    25.6 KB · Views: 567


Well that back brake feels pretty good now, so no hurries on the backing plate. I did find a place to buy some new aftermarket ones though, so I should be okay.

I started on my On board air. Nothing jaw-dropping about the install. I just made a place for it to sit with some 2 inch flatbar welded to the rear bottom of my rear hitch which is then bolted to the crossmemember where the rear shocks hook up. This lets it all be easily removable, and keeps with my goal of not welding anything to frame.
-The spare tire bracketry was removed during the full size axle swap.
 

Attachments

  • OBA.JPG
    OBA.JPG
    63.5 KB · Views: 546


Anyway, it`s a Kleinn air pump, 150psi, only a 15% cycle duty, with a 1 gallon reservoir, so I won`t be hosting any huge air ups, it`s just for me to air up, fill air matresses, etc.

It is water resistant, not water proof, so hopefully I don't ruin it.
I ran the external air intake into the Explorer`s rear cubbyhole.
 

Attachments

  • OBA4.JPG
    OBA4.JPG
    31.3 KB · Views: 530
  • OBA3.JPG
    OBA3.JPG
    43.6 KB · Views: 542
  • OBA6.JPG
    OBA6.JPG
    33.2 KB · Views: 1,149


For power I am running some 1 guage wire all the way to the rear. I`ll take the positive from there and run the ground up front and put a switch in.
I need good current flow to the rear so I can wire up my connection for using the receiver winch off the rear, that`s why I went with 1 guage specifically.

I still need some more parts to finish.
 

Attachments

  • OBA5.JPG
    OBA5.JPG
    39.3 KB · Views: 538


Join the Elite Explorers for $20 each year.
Elite Explorer members see no advertisements, no banner ads, no double underlined links,.
Add an avatar, upload photo attachments, and more!
.


It`s funny but this particular addition has been on the backburner for over three years. I`d rather re-build an axle than fiddle around with this stuff any day.

Anyway, it`s in, everything is air tight and working. I used some brass fittings and air-brake airline to plumb the air to the rear where I can plug in. I ran my 1 guage power all the way back along the pass. side, zap strapped it all down tight and on the drivers side I ran my negative switch wire from the compressor, (and ran another line for my rear camera that used to be wired to the reverse lights).

Just bought some cheapo switches and mounted them next to my cb under the front paneling, one being the switched negative line from the comp, which then goes to ground, and the other is a switched 12 volt to my rear camera.
I got the camera last christmas and had it wired up but I thought it would be cool to just be able to switch it on at will. It`s really cool when waiting for someone to catch up on the trail, or just seeing what is behind you at any time you want.

I spent about 140$ for all the extra stuff I needed to hook it all up the way I wanted, including the 25 foot coil hose, which will reach all 4 tires.
The compressor and tank came as a kit, along with the air intake line, tank drain, pressure switch and pressure relief. The pressure switch cuts out when the tank reaches 150psi, and is wired between the vehicle supply and the compressor.
 

Attachments

  • OBAE.JPG
    OBAE.JPG
    37.1 KB · Views: 525
  • OBAE2.JPG
    OBAE2.JPG
    42.8 KB · Views: 524
  • OBAE3.JPG
    OBAE3.JPG
    32.6 KB · Views: 534


Back
Top