Lower Ball Joint Replacement How To (lots of Pictures) | Page 16 | Ford Explorer Forums - Serious Explorations

  • Register Today It's free!

Lower Ball Joint Replacement How To (lots of Pictures)

I have a 95 2wd explorer. It was about 140k on it(odometer stopped working). I was going to order and replace the lower ball joints and the upper arms and joints. I will take a look at what you bought. But my question is on the process itself. Do you need to compress the torsion bar by jacking up under the lower arm to "compress" it. I say this done on a 94 2wd explorer with front springs. The Haynes manual says to "unspring"the torsion bar, but I do not plan on replacing the arm just the lower joint itself. Can you help out with who you did this job. I have never don this before. The ship I go to want $1000 to do this.


Join the Elite Explorers for $20 each year.
Elite Explorer members see no advertisements, no banner ads, no double underlined links,.
Add an avatar, upload photo attachments, and more!
.


Any instruction on this out there. Also, you used the raybestos brand?


Any instruction on this out there. Also, you used the raybestos brand?

umm.. this thread is on changing the balljoints. So yes, you are posting in the thread that has instructions on how to do this.

the process is the same between 4wd and 2wd.

and I recommend the Moog brand balljoints myself.


I have seem instructions, but I am not one to like to start something until I have checked and double checked. I did see pictures and instructions with a 4wd. Did not know the 2 and 4 would be the same. Thanks or this info. I cannot afford to not have the car, so if I start this I need to complete it over a weekend, so I want o be double sure about how to do this before I started.


hey I was looking on rock auto at control arms...what does "service grade" mean on the parts description? It's cheaper...but why?

I believe it means it meets the standard for quality required for service stations (i.e. Merchants, NTB, etc) to use. So basically, it's the lowest quality, cheapest, they are allowed to use.


Thanks for the write up it helped so much!!!


Going to replace LBJ on my 95 today, I do not have the ball joint press and Autozone's is out :mad: but I do have a 8" c clamp and big sockets, is that going to work on this one? I don't see why not. Just thought I'd throw this out there in case there's something I'm missing on the 2nd gen job. Thanks.


That was really easy, no press needed, just a 4 lb hammer! Thanks for this write up.


That was really easy, no press needed, just a 4 lb hammer! Thanks for this write up.

the problem with using a hammer to get the BJ in/out of the knuckle... if it goes in even slightly crooked, or you hit it off-center, and you keep hammering until it evens out, you have just slightly stretched the hole; there is always a good possibility that the hole can become stretched enough the BJ is no longer a press-fit into the LCA.
then it becomes necessary for a new LCA.


Yeah, I was I little worried about that after reading a lot of this thread but I'm pretty sure this was the first time it's been replaced and it sure did go in nice. It's really tight and perfectly straight. And I figure that if the day comes that it ever needs to be changed again, I figure I probably should replace the whole control arm because I'm sure the bushings will be shot by then too, and the whole thing can be had for around $110. So, not too worried, and the ailignment seems to be perfect again too. but that is a great point to keep in mind for someone who keeps bustin lbj for sure. My only problem now is to figure out why the brake pedal pulses and i can hear a servo whine just as I come to a stop :rolleyes: . Cant imagine that ABS sensor can go in any way but right. no warning light either. will unplug batt for a bit and see if it resets maybe. Oh, and I only used the hammer to get it out, I wasnt about to bang on that thing to get a new one in. The floor jack worked wonderfully.


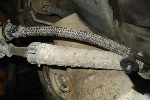
Did my LBJ's this weekend. The first wheel was a little bit of a disaster. Took about 6 hours. Several commenters have mentioned this, but on my 99 Explorer, there is a large collar on the bottom of the LBJ. It's so large that you can't get a socket/pipe around the LBJ without hitting the lip of the lower control arm.

On the first wheel, I actually mistook this collar for the lower control arm so I was tightening down the LBJ against itself. I ended up bending my press and mushrooming the LBJ. It took a good 30 minutes of smacking that thing with a 4lb hammer to get it out. By then, my press was mangled so I couldn't press the new one in. Had to make a trip to my dad's to straighten out my press and find a socket of the right size for pressing in the new LBJ.

Second wheel was much easier (took about 2 hours). I sprayed a little WD40 around the edge and gave it about 5 carefully placed smacks on the top with a 4lb hammer. It squeezed right out. I know some people have expressed concerns about this method, but with Ford's LBJ (and it's goofy collar), I'm not sure there's a much better option. As long as you hit the LBJ relatively square and flat, I think it's the way to go.

I used the jack-method to get the replacement LBJ's started and then used a press to squeeze them the rest of the way in. As some have mentioned, I could only get the replacement about halfway in before the jack started lifting my Explorer (which made me uneasy). Once they were started, the press worked well for pulling them the rest of the way through.

My Explorer is quiet again and the ride is noticeably better. I wasn't expecting the lowers to help with the ride, but it definitely did. Thanks for the guide. It helped a lot.


$300 bucks wouldn't be a bad price. The MOOG uppers go for around $120 per side most places I've looked. The Lowers are around $40 or $50. Both tools can be rented at AutoZone for free, so that's not a big deal, but at least you'd have the tools if you ever needed them again.

If I hadn't just done mine, I'd probably consider it.


Moog - K8695T - Lower balljoint - 2 Required
Amazon.com - $32.31/each
RockAuto.com - $31.79/each

Moog - K8710T - Upper Control Arm - Passenger side 2 piece design
Amazon.com - $89.96
RockAuto.com - $87.79

Moog - K8708T - Upper Control Arm - Drivers side
Amazon.com - $80.03
RockAuto.com - $87.79

RockAuto.com is a vendor on this website and does offer a discount code.
Look at this thread...
http://www.explorerforum.com/forums/showthread.php?t=221235


That's good to know.. I didn't know about the rockauto discount. Here's a link to the current discount code (had to dig a little to find it).


Tip

I've posted this tip before but it works so well
here it is again:

Place the ball joint in your freezer for
an hour or two before installation. The cold
contracts the part just enough to make installing it a breeze.....


Chaz
That is a great price. I am still on the fence if I should get the 1 piece or 2 piece drivers side. Installed lowers months ago.


Join the Elite Explorers for $20 each year.
Elite Explorer members see no advertisements, no banner ads, no double underlined links,.
Add an avatar, upload photo attachments, and more!
.


use a pry bar on the tops against knuckle & arm....check for any descernable slop..probably wont but if do replace arm....lowers are the wear point on these & fail 3x as often as uppers. just wash boot with brake cleaner & use screwdriver to put some new grease in then gently clean boot again & use Black silicone adheasive (or Ultra Black will do) to patch hole. Always works for me for many miles. good luck.


Back
Top