How to: 2002 Explorer rear wheel bearing replacement (pictures) | Page 6 | Ford Explorer Forums - Serious Explorations

  • Register Today It's free!

How to: 2002 Explorer rear wheel bearing replacement (pictures)

Taking this on today '04

If this is the same procedure with my '04 I will start today. Thanks Great photos and detail!


Join the Elite Explorers for $20 each year.
Elite Explorer members see no advertisements, no banner ads, no double underlined links,.
Add an avatar, upload photo attachments, and more!
.


I wasa thinking about the press and maybe I should have gone for the 6T floor model. It was just $99 vs the $85 I paid. It has a deeper working distance than the bench top unit and might be easier to get the knuckle in and out of in the positions needed. Haven't set up mine yet, so maybe I'll exchange it.

Any thoughts?

ScubaDave


Bench top vs Stand Press

I would prefer a floor stand press, for the very reason ScubaDave mentions-the clearance of the benchtop press and if it will accomodate the knuckle. Unfortunately, I do not have the space to store a floor stand press.

Please let us know how it goes, ScubaDave...


Slow progress

Well, I sent my son-in-law back to Harbor Freight and he found that the 6T Floor model is an Internet only item. So, I couldn't exchange/upgrade my 6T bench model for it. Instead, he bought me a 12T floor model they did have in the store. With the weekend specials and including their extended warrenty, it was only around $125! Not too bad.

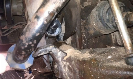
However, I didn't make a lot of progress. The weather here turned fairly cold for this area and while we made some progress, we didn't finish the job. Got stuck in a few spots. First, my knuckle was so damaged that the snap ring on the passenger side was chewed up and we couldn't get a purchase on it to remove it. finally had to break the ring by drilling through it and part of the knuckle to push it out. Still not easy, since the channel it sits in got crushed down a bit around it. But, we prevailed without too much additional damage. But then, the race had no purchase we could set the press onto since the bearing ate itself up before I stopped driving on it.

For the other side, the press worked fine getting the hub out. It was tight, for sure, but the 12T worked like a champ. Getting the bearing out of the knuckle was again a problem, even with the full bearing being there to lean on with the press. You can't set the bearing pusher right on the outer race. It is buried in the knuckle. You have only the middleparts to push on and even with all 12T pushing full, I couldn't dislodge it! I'm figuring I'll need to put some heat on the knuckle to get it free, or find an even bigger press.

Wish someone would put up pictures of how to use the press for this job. I don't know if I'm approaching it properly, or not. I think so from what I recall of my Shop Classes, but they were a lo-o-ong time ago. But, I'll keep at it when I get a torch to use for heat. It's 28 degrees this morning and the bearing will stay cold for a while if I can heat the rest up to to expand the knuckle seat for it - I hope!

More later. Don't think the 6T would have really worked. There is a 12T bench model, though.

ScubaDave


Talked to a guy at my construction outfit this morning and he says that the heat should do the trick. Just hit the knuckle around the bearing with the flame while the bearing is under pressure. I'll pick up some gas and a Bernz-O-matic torch to try it out and let all know. Not the hottest torch, but I don't have welding equipment that could be hotter, either.

ScubaDave


hi, I need to do this, do I need to replace the entire knukcle or just the bearing?


Hi I need to do this but don't know if I need to replace just the bearing or the entire assembly! can someone help?


Read the thread, its all in there.

Rears are pressed into the knuckle. It has been suggested to replace both the hub (part with the studs that holds the wheel) and the bearing to ensure that any minute damage to the hub won't shorten the life of the new bearing.

The assembly consists of a bearing, hub and snap ring or you can just buy the bearing.

got it!! it is done!!!


Thanks, great post, I am doing it by myself, and so far so good. Having some difficulty with the lower control arm bolt out, as I don't have the correct length chisel to get the right angle. Frustrated, quit for the night, will go back to it in the am.


14th picture down

Hey, what is the name of that part in the 14th picture down that is all the way to the right that looks like a long rod with about an inch of it going left at the very end? My gf wrecked out explorer and that is bent and no parts place knows what to call it. Can you help me out? Thanks.


Did it!

I'd first like to again express my gratitude for everyone who has shared their experience; it really helped prepare me to complete the project.

I didn't have to replace a spring, only the driver's side bearing. The total time was four hours; a good portion of which was spent struggling with the emergency brake shoe springs. Aside from that, everything went very smoothly.

I decided against buying a press as I convinced a shop owner to do the press work at his shop; he charged $60.

Now to track down a coolant leak......


Had to do the drivers side rear on my 03 Explorer. This thread was a great help, Thank You. Actually my brother in law did all the work. I just handed tools, held light (recovering form back surgery) He put new pads & rotors plus the drivers rear bearing, hub, & snap ring. It took him 4 hours. He's a mechanic by trade. Had to use the blue wrench a few times but everything went fairly smooth.


5 month update - DO an ALIGNMENT after this job!

Just wanted to add one more IMPERATIVE thing to this thread - doing an alignment after messing with the rear suspension is really important!!

I learned this the hard way.... put new tires ($800 worth) on shortly after replacing both rear wheel bearings. Everything was fine, until it started snowing and the car behaved terribly. I thought they were just crappy tires, but no... just out of alignment. The rear wheels were so out of alignment that the car couldn't drive in a straight line on slippery stuff. Oh, and far enough out of alignment that the new tires are completely ruined after 6000 miles. Insert swear word here. Another $400+ for two new rear tires down the drain...

Hope this saves someone else the hassle! (still, was cheaper than having dealer replace the bearings, just not by much).


Excellent post my right rear went out over the past summer and it costed me 620.00 at Dexters to get it fix. Plan on doing the other side and the fronts over the summer. Thanks a ton


I just replaced my RR wheel bearing and we used an air hammer to remove the old bearing and to pound the new one on, I know kinda crude but it was new years day and I had to get it going. My question, is there a seal between the axle and the backing plate? If there is does anybody have a part number. I looked at Tousley and I cant find it in the diagrams they have. TIA


Join the Elite Explorers for $20 each year.
Elite Explorer members see no advertisements, no banner ads, no double underlined links,.
Add an avatar, upload photo attachments, and more!
.


Like clock work the rear wheel bearing went on my '02 @85k miles. I don't have the energy, will nor time to do it, plus its cold out and I just finished with other car work. I threw up my hands and had Pepboys do the job for me. The were able to replace just the bearings and not the flange/hub assembly. They pressed the old flange/shaft into the new bearings. Only my left rear one was grinding, but they replaced both. It wasn't loud on the road, but you could hear it.

Here is what they look like. I had my mechanic give me the old bearing.

IMG_0048-2.jpg


Back
Top