How To: Replacing Front Hub / Bearing 1995+ Ford Explorer IFS | Page 15 | Ford Explorer Forums - Serious Explorations

  • Register Today It's free!

How To: Replacing Front Hub / Bearing 1995+ Ford Explorer IFS


Join the Elite Explorers for $20 each year.
Elite Explorer members see no advertisements, no banner ads, no double underlined links,.
Add an avatar, upload photo attachments, and more!
.


LOL Big #@$#@ Hammer

Edit...oops...I didn't see i was beat to the answer.


Yes, but you take your chances on it being good or not.


can you use a used hub from a junk yard or do I need to buy a new one?

I wouldn't, if money is the issue, consider buying one from ebay, happened to me I bought one from ebay and it lasted 2 yrs.


I wouldn't, if money is the issue, consider buying one from ebay, happened to me I bought one from ebay and it lasted 2 yrs.

I agree if money isn't an issue go new :)


do I need to grease it up if I buy it from the junk yard,the bearings that is? Take it out and grease it up? I heard you can't take it out not sure if it's true though.


do I need to grease it up if I buy it from the junk yard,the bearings that is? Take it out and grease it up? I heard you can't take it out not sure if it's true though.

Its a sealed unit, they cant be taken apart or greased, i have to go with Glen4x4 on this, Im a fan of Junk yard parts and yes they can get you by. But if you have the funds check online like Glen was saying, I just picked one up free shipping from 1aauto.com for $66.95. The junk yard ones are always good as a spare.


Just a note: reading along, 250 ft-lbs for the spindle nut seemed high for threads that size, compared to other non-car machinery I've worked with. I called the local dealer up and asked what the torque on the spindle nut was, and they told me that for a 1996 4wd it is 180 ft lbs.

The other torques (brake bracket) of ~75 lbs seems about right, so I didn't ask about them.

-------

I would expect that a junkyard bearing on any vehicle more than 3-4 years old has probably got significant wear already.

Regarding just replacing the bearings: it is probably possible but looks like more money and hassle than just buying a new ~$100 hub.


When you call a dealer, who are you talking with? I don't put any faith in a service writer or people I don't know. I've known dozens of service writers, and service managers, and techs. Don't believe everything you hear, or read. Take everything as possible truth, not always right, or wrong. Look at all evidence, and you yourself weigh it and choose the most logical truth.

I don't use a torque wrench for those spindle nuts. The recommendation is over the 150ftlbs. limit of my TW, which is a bunch. I put enough pressure on those that they aren't coming loose, but I don't try to break them. There's no need to waste time calling a dealer.


When you call a dealer, who are you talking with? I don't put any faith in a service writer or people I don't know. I've known dozens of service writers, and service managers, and techs. Don't believe everything you hear, or read. Take everything as possible truth, not always right, or wrong. Look at all evidence, and you yourself weigh it and choose the most logical truth.
I spoke with whoever answered the phone at the service department. I did not ask him for identification. He also mentioned that the spindle nut was supposed to not be re-used.

I would expect that the dealer's tech info would be the most accurate, at least for an unmodified vehicle.

I don't use a torque wrench for those spindle nuts. The recommendation is over the 150ftlbs. limit of my TW, which is a bunch. I put enough pressure on those that they aren't coming loose, but I don't try to break them. ...
Well that's the thing.... The 250 ft-lbs figure mentioned in the first post is nearly 50% OVER the dealer's spec for torque (for a 1996...).

My torque wrench is only a 150 too, and no local tool stores had a higher-lb one on hand. I plan on making a torque-doubler when I get a bit of time, so my 150 will then go to 300.

Also I re-used the nut. :p
But I just need to get around town for a couple days until I can find some place that can get me a new one... hopefully for less than the dealer wants.


Edit added: also I had no deep socket in 32mm or 1.25", and nobody in town had one on hand either. The Craftsman 1/2-drive sockets in 1-1/4" aren't deep enough, but the 3/4"-drive sockets in 1-1/4" are (at least on the vehicle I have).


Helpful how-to. I couldn't get my rotor off, though, so it came off with the hub. My slide hammer knocked it loose while yanking off the hub anyway.


After literally "standing" on My 1" drive ratchet to get the axle nut off.....the rest was cake....LOL
Monro Muffler and Brake replaced the left front due to an emergency.....friggin' thing squeked...(National Bearing)at a 52% mark-up)...I replaced the right front (Timken Bearing)from a Motorcraft Distributor...no issues


Front Hub/Bearing Replacements

Just an FYI.....FoMoCo/Motorcraft Service Replacement Hub/Bearing Assembly :rangergreen:Replacement Parts are supplied by Timken Bearings Inc. as a licensed replacement service parts supplier.


thanks for the thread

just finished mine, no more noise. thanks , great thread.:thumbsup:


Okay, I can now say beyond any doubt that it is not really practical to replace the bearings alone.

First off: I will call the whole part the "hub assembly". The part that spins is the actual hub, and the part that bolts to the truck's suspension with 3 bolts is the bearing carrier.

To remove the hub from the bearing carrier (as well as get them back together) you need an H-frame hydraulic press and a few other bits--some chain big enough to fit the bolt through, and I also used a quick-link but if the bolts were long enough you might not need that. I also bought three m12x1.75x35 bolts to screw into the bearing carrier mount holes, to hang it by. Smaller bolts would work (with nuts + washers on the ends) but might have chewed up the hole threads, and at this point I was still being careful not to totally ruin the hub itself.

The reason you need to hang it is because the hub is the same diameter as the mount flanges on the bearing carrier. There's no way to just prop up the bearing carrier and push the hub out. I thought about cutting a triangle-shaped hole in a sheet of 1/2"-thick steel and using that, but this way (with the chain) is a lot cheaper and faster.

Once you get it apart, pushing the thing back together is easy.

Pic #1 below should show how the hub was hung around the press:
1996_explorer_front_hub_01.jpg


Pic #2 below is me trying to better show how I had the chain rigged up. Since there's only three mounting holes on the bearing carrier to hang it by, using a quick-link allows getting both chain lengts the same. If you ever use this method to get anything apart, you REALLY want to try to get your piece hanging as level as you can, since when you start cranking the ram down on it the part it will try to pop out from under the ram.
1996_explorer_front_hub_02.jpg


Pic #3 below: I used a 32mm socket to push the hub out, as the end of the ram was too big. Also you see here, the piece tried to pop out, like I warned above (I started with it lined up perfectly straight & level...). It didn't take a huge amount of force, about 1000 lbs to crack it loose and then 150-200 lbs every time I cranked the pump handle after that. When it's pushed about halfway out, the hub falls completely free.
1996_explorer_front_hub_03.jpg


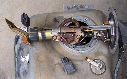
Pic #4 below: at last, the mysteries are revealed!!!!! Well, okay, maybe not a lot of mystery... I kinda expected tapered roller bearings since that's what all the rear wheels use, but its axial-load ball bearings instead. The hub has a separate bearing race pressed onto it, though I didn't bother to take that off (the gold ring is the bearing race). The other, bearing inner race (on the right side of the photo) is the inside one. I also popped one of the balls out for the pic (green arrow). The notched ring is the ABS sensor thingy (?) an aluminum ring pressed on to the inner race.
1996_explorer_front_hub_04.jpg


Pic #5 below shows why you cannot simply buy separate bearings and replace them yourself. The bearing carrier is rotated around and a bit of the crusty grease is wiped off, and here we can see that the bearing races inside the bearing carrier are cut directly into the carrier. There is no separate race there you could replace, so you'd need to buy a whole new bearing carrier anyway. (you can go buy new ball bearings in every size there is, but if the bearing races are still munched up, the new balls aren't going to last long anyway----so you must replace both the bearings and the races)
1996_explorer_front_hub_05.jpg


ALL RIGHT EVERYBODY, CALM DOWN NOW.
This is pretty exciting stuff I know, but control yourselves. :p


I will probably wipe this out and push it back together.
It still rolls easily, just a touch of grittiness--so it may find use in some other odd thing I build, but it won't be going back on to any vehicles.


Also--if you care at all about these photos, save them. They will not be posted on my web-page forever.......

[EDIT ADDED]

Below: while wiping the thing out and discarding a few unneeded parts (the wasted grease seals) I noticed that a couple of the bearings looked odd-
1996_explorer_front_hub_06.jpg


These are .405" or 10.4mm diameter, and the chipped ones were on the outside of the hub. The others may look like they have little holes, but they don't, that's just junk on them. All the others looked fine except these two that had chipped heavily.

Also,,,, I don't know what brand this hub is. I already had the front left hub assembly replaced once at an independent shop, maybe 3-4 years ago.


I changed the front hub on my 2002 Sport with the help of this thread and it turned out great. Some observations:
1. A 32mm hub socket was way too loose for my axle hub nut. A 31mm fit perfectly.

2. I read a suggestion (either in this forum or elsewhere, can't remember) that you don't have to take the caliper and brake pads off the caliper bracket, just remove the bracket with the caliper and pads as one unit. I did this and it saved some time and effort.

3. The caliper bracket and hub bolts looked like they were welded on with rust, so I soaked them in Liquid Wrench several times for a day. Still needed to add a pipe for leverage with my breaker bar.

4. Also, after removing the bolts, it was hard to separate the hub from the knuckle (again it looked like it was welded) and I needed to use a lump hammer to get it off. After that, the new hub went on easily

5. Hub units ranged in price from $60-200. I did not want Chinese so I opted for one from Wheel Bearings Inc. which are made in USA. Their sales manager Mike was very helpful in determining the part number I needed. They do not sell direct but their units can be ordered on the internet from Pace Performance, Summit Racing or MI Bearings. I paid $125 including shipping from Pace.

So Ford wanted $856 (includes tax) for the job.
I paid: 79 Ford to diagnose the problem
125 Hub w/ABS sensor
20 Axle hub nut from Ford
15 31mm axle nut socket from Advance Auto
3 Liquid Wrench

242 Total

A savings of $614 plus the satisfaction of completing the work myself and learning more about my Explorer. Not bad for a few hours labor.


What a great "feel good" story. Congratulations.


Okay, I can now say beyond any doubt that it is not really practical to replace the bearings alone.

First off: I will call the whole part the "hub assembly". The part that spins is the actual hub, and the part that bolts to the truck's suspension with 3 bolts is the bearing carrier.

To remove the hub from the bearing carrier (as well as get them back together) you need an H-frame hydraulic press and a few other bits--some chain big enough to fit the bolt through, and I also used a quick-link but if the bolts were long enough you might not need that. I also bought three m12x1.75x35 bolts to screw into the bearing carrier mount holes, to hang it by. Smaller bolts would work (with nuts + washers on the ends) but might have chewed up the hole threads, and at this point I was still being careful not to totally ruin the hub itself.

.

Good to see someone else did this too. The only things I did and saw differently were:
1. I used a 20ton press like you but rigged 1in steel "V" plates between the hub pieces and pressed them apart.
2. The ones I had were not ball bearing type. They were roller bearings like the old types that could be cleaned and re-packed.

With the prices of hubs coming down as they have been it's not likely I'd do the procedure again but ... who knows so I have kept the last two hubs I replaced.

So in summary, the hubs are rebuildable.
Scott
95 Explorer
02 Explorer
90 Corvette


Join the Elite Explorers for $20 each year.
Elite Explorer members see no advertisements, no banner ads, no double underlined links,.
Add an avatar, upload photo attachments, and more!
.


I took the past 3 days to read this entire thread.
I've seen some gross bad advice (according to me) and
feel compelled to say something.
Fist there are a few posts which seem to imply that driving
without the half shafts is ok because the hub is a sealed and pressed together unit.
This is not only false but dangerous. The hub can and will come apart on you
(as one poster found out). DON'T DO IT. Who ever is moderating this thread should either remove the posts that say it's ok or modify them to include a disclaimer about same.
Second the hubs on a 95 explorer 4x4 are a sealed unit and were not intended to be rebuilt but can be.
Third, I see a lot of pride from those willing to do their own repair work as well there should be. I don't fault those not willing to get dirty and hire others to do their work. I do applaud those willing to investigate what it takes (read these posts) and take it on. As someone else posted the sense of pride alone is worth the price of admission :)
Scott
95 Explorer
02 Explorer
90 Corvette


Back
Top