xplorerguru
Well-Known Member
- Joined
- March 20, 2009
- Messages
- 386
- Reaction score
- 3
- Year, Model & Trim Level
- 2005 explorer
So to get started some background information is that Ford used a 2 piece seal design and it had flaws, so they re-designed a new one piece seal. This write up was helped by members Pontisteve and Ronin8002.
Tools
-Lisle Seal Installer 17850
-10mm socket
-18mm socket
-3/4in socket
-35mm socket
-1/2 to 3/4 socket adapter
-1/2 drive ratchet
-3/8 drive ratchet
-1/2 drive breaker bar
-bungee cord (something to hold caliper up)
-block of wood
-Mini sledge
-Hub Press (Some need it I didnt)
-Slide hammer and three jaw puller
-Thread tape
Parts
-1.55-1.75 quarts synth 75w140
-Ford Seal (from dealer)
Step 1: Draining the differential:
Use the 3/8in Ratchet and remove the fill plug, then use your 1/2in to 3/4in adapter and breaker bar to remove the drain plug

Step 2: Removing the rear axles:
-Chock the front wheels, and jack up the rear of the truck and remove both rear wheels

Use your 35mm socket to remove the hub retainer nuts. Since I was only replacing the one side the other tire was on ground and I was able to use a ratchet without having it spin on me.


Use 10mm socket, remove the brake calipers, taking care to not let them hang by the brake lines. I used a bungee cord to hang mine up.

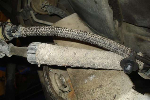
Remove the nuts on the pinch bolts for the upper control arm and the lower toe link with the 18mm socket


Use a hammer to tap the pinch bolts out of their holes and remove. These were very rusty so I had to use penetrating spray to help get them out.

Once the bolts are out, put your cold chisel in the slots and hammer it into the slot.


This will open that slot up enough so that you can tap the upper control arms and toe links out of their holes.These will also tend to be very rusted in and stubborn.
Attach your hub press tool to the lugs and press the knuckle off the axleshaft.

Once you’ve pressed the axle out of the hub then you can pivot the knuckle over and rest it on a support object

After that’s done on then you can work on getting the axle popped out of the diff.
Use your wooden stick and mini-sledge. You just need to position the wooden stick against the axle shaft as shown. Try to get it as in-line with the axis of the axle shaft as possible. A few good hits with the mini sledge on your wooden stick will pop the axle shafts out.

Then use your three jaw puller and slide hammer to pull out the bad seal, I do not have pictures for this and thankfully Ronin8002 supplied them. The seal takes a few good pulls to remove.
Next wipe down the bore clean and proceed to line up the new seal so it looks as straight to the bore as straight can get. Then use the Lisle tool and a rubber mallet to hammer in the seal making sure it is straight!
Next slide the Axle back in and give it a pull to lock into place, you can feel it pop and you know its in. Then attach the upper ball joint and toe link and tighten them back up. Next go ahead and install tire and lower the car. install the drain plug with some thread tape to prevent leakage.
RONIN8002 Supplied the pictures and I went off his thread on how to install a locker. Thanks Ronin8002, and Ponitsteve for all the help and tips!
Tools
-Lisle Seal Installer 17850
-10mm socket
-18mm socket
-3/4in socket
-35mm socket
-1/2 to 3/4 socket adapter
-1/2 drive ratchet
-3/8 drive ratchet
-1/2 drive breaker bar
-bungee cord (something to hold caliper up)
-block of wood
-Mini sledge
-Hub Press (Some need it I didnt)
-Slide hammer and three jaw puller
-Thread tape
Parts
-1.55-1.75 quarts synth 75w140
-Ford Seal (from dealer)
Step 1: Draining the differential:
Use the 3/8in Ratchet and remove the fill plug, then use your 1/2in to 3/4in adapter and breaker bar to remove the drain plug
Step 2: Removing the rear axles:
-Chock the front wheels, and jack up the rear of the truck and remove both rear wheels
Use your 35mm socket to remove the hub retainer nuts. Since I was only replacing the one side the other tire was on ground and I was able to use a ratchet without having it spin on me.
Use 10mm socket, remove the brake calipers, taking care to not let them hang by the brake lines. I used a bungee cord to hang mine up.
Remove the nuts on the pinch bolts for the upper control arm and the lower toe link with the 18mm socket
Use a hammer to tap the pinch bolts out of their holes and remove. These were very rusty so I had to use penetrating spray to help get them out.
Once the bolts are out, put your cold chisel in the slots and hammer it into the slot.
This will open that slot up enough so that you can tap the upper control arms and toe links out of their holes.These will also tend to be very rusted in and stubborn.
Attach your hub press tool to the lugs and press the knuckle off the axleshaft.
Once you’ve pressed the axle out of the hub then you can pivot the knuckle over and rest it on a support object
After that’s done on then you can work on getting the axle popped out of the diff.
Use your wooden stick and mini-sledge. You just need to position the wooden stick against the axle shaft as shown. Try to get it as in-line with the axis of the axle shaft as possible. A few good hits with the mini sledge on your wooden stick will pop the axle shafts out.
Then use your three jaw puller and slide hammer to pull out the bad seal, I do not have pictures for this and thankfully Ronin8002 supplied them. The seal takes a few good pulls to remove.
Next wipe down the bore clean and proceed to line up the new seal so it looks as straight to the bore as straight can get. Then use the Lisle tool and a rubber mallet to hammer in the seal making sure it is straight!
Next slide the Axle back in and give it a pull to lock into place, you can feel it pop and you know its in. Then attach the upper ball joint and toe link and tighten them back up. Next go ahead and install tire and lower the car. install the drain plug with some thread tape to prevent leakage.
RONIN8002 Supplied the pictures and I went off his thread on how to install a locker. Thanks Ronin8002, and Ponitsteve for all the help and tips!
")