pickupman
Well-Known Member
- Joined
- September 1, 2004
- Messages
- 198
- Reaction score
- 0
- City, State
- Cedar Rapids, IA
- Year, Model & Trim Level
- 2002 XLT
Well, like many others, I had cracked springs... or at least one... so I decided to replace them.
here's the basic instructions I used:
i decided it needed pictures.
https://picasaweb.google.com/lh/photo/UszCCHk7zzbGm4gwl7oX09XTgo3doEoFOgAP3IZ1Ldc?feat=directlink

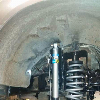
First - there are SEVEN bolts (or nuts) that need to be removed:
3 - top of the strut
1 - bottom of the strut
1 - control arm to knuckle
1 - sway bar
1 - toe link
https://picasaweb.google.com/lh/photo/YCGndEcxNcJEPMxv8p7jmtXTgo3doEoFOgAP3IZ1Ldc?feat=directlink

the strut bolts are obvious (what and why)
The control arm to knuckle bolt is REQUIRED to be removed - this allows for the control arm to drop enough to get the strut out... the moron typing this wasn't sure what the control arm was - "control" didn't really seem like a smaller part than what it was - it's the large frame that the strut seats into...
the bolt in question is in the center of this photo
https://picasaweb.google.com/lh/photo/FsynUbh_LfCbBh45a_-YG9XTgo3doEoFOgAP3IZ1Ldc?feat=directlink

sway bar bolt: note that this is a LONG bolt with a rubber boot over it... the bolt head is on the bottom of the control arm - need a wrench on the top nut while loosening the bolt
https://picasaweb.google.com/lh/photo/n32HvLpylC85SKy6mXhYfdXTgo3doEoFOgAP3IZ1Ldc?feat=directlink

the toe link... may not be necessary, but it makes life A LOT easier - gives a convenient spot to put a pipe to wrench the control arm down down
https://picasaweb.google.com/lh/photo/XnEeJs3w8KBMDMQW05PM49XTgo3doEoFOgAP3IZ1Ldc?feat=directlink

https://picasaweb.google.com/lh/photo/I6pweCXpc2OZRyLeD84LxdXTgo3doEoFOgAP3IZ1Ldc?feat=directlink

All in all, it took 2 hours because we couldn't figure out what parts were what... two guys and a lift could have had it done in half an hour with the appropriate sockets, air ratchet, a couple crescent wrenches, a pipe (breaker bar and to wrench the control arm down), and a prybar....
here's the basic instructions I used:
natedoggaz said:1 - remove tire
2 - disconnect the stabilizer bar link at the lower control arm
3 - remove the bolt from the lower control arm to the knuckle
4 - remove the 3 nuts at the top of the strut (not a lot of room but not bad)
5 - remove the bolt at the bottom of the strut
6 - push the lower control arm down as far as it will go
7 - remove the strut
i decided it needed pictures.
https://picasaweb.google.com/lh/photo/UszCCHk7zzbGm4gwl7oX09XTgo3doEoFOgAP3IZ1Ldc?feat=directlink
First - there are SEVEN bolts (or nuts) that need to be removed:
3 - top of the strut
1 - bottom of the strut
1 - control arm to knuckle
1 - sway bar
1 - toe link
https://picasaweb.google.com/lh/photo/YCGndEcxNcJEPMxv8p7jmtXTgo3doEoFOgAP3IZ1Ldc?feat=directlink
the strut bolts are obvious (what and why)
The control arm to knuckle bolt is REQUIRED to be removed - this allows for the control arm to drop enough to get the strut out... the moron typing this wasn't sure what the control arm was - "control" didn't really seem like a smaller part than what it was - it's the large frame that the strut seats into...
the bolt in question is in the center of this photo
https://picasaweb.google.com/lh/photo/FsynUbh_LfCbBh45a_-YG9XTgo3doEoFOgAP3IZ1Ldc?feat=directlink
sway bar bolt: note that this is a LONG bolt with a rubber boot over it... the bolt head is on the bottom of the control arm - need a wrench on the top nut while loosening the bolt
https://picasaweb.google.com/lh/photo/n32HvLpylC85SKy6mXhYfdXTgo3doEoFOgAP3IZ1Ldc?feat=directlink
the toe link... may not be necessary, but it makes life A LOT easier - gives a convenient spot to put a pipe to wrench the control arm down down
https://picasaweb.google.com/lh/photo/XnEeJs3w8KBMDMQW05PM49XTgo3doEoFOgAP3IZ1Ldc?feat=directlink
https://picasaweb.google.com/lh/photo/I6pweCXpc2OZRyLeD84LxdXTgo3doEoFOgAP3IZ1Ldc?feat=directlink
All in all, it took 2 hours because we couldn't figure out what parts were what... two guys and a lift could have had it done in half an hour with the appropriate sockets, air ratchet, a couple crescent wrenches, a pipe (breaker bar and to wrench the control arm down), and a prybar....