Ricks Bronco: 1and 1/2 | Page 183 | Ford Explorer Forums - Serious Explorations

  • Register Today It's free!

Ricks Bronco: 1and 1/2

I think samson owns the bdos just about everywhere, those obstacles didnt even look like you should have put samson in 4wd haha. Thats cool your daughter wants to wheel, most chicks turn their nose up at getting out in the woods.


Join the Elite Explorers for $20 each year.
Elite Explorer members see no advertisements, no banner ads, no double underlined links,.
Add an avatar, upload photo attachments, and more!
.


I think samson owns the bdos just about everywhere, those obstacles didnt even look like you should have put samson in 4wd haha. Thats cool your daughter wants to wheel, most chicks turn their nose up at getting out in the woods.
DSC03148.jpg


Winning a lot of shows is fun but my hearts in wheeling. Here was a another first place award a week before Carlisle. It's a large show held at a local church each year and about 400 cars and trucks come from the 4 state region. in fact it took back to back wins there also. But you know what? The girls at Dunkin still make me pay full price, Oh wait, I mean they do give me a senior discount ha ha. Yep, I'm so glad my daughter likes to wheel with me.
Ya, I think Samson owns Carlisle. At least in the 4x4 classes. I guess 10s on thousands of hours had something to do with it.
Your exactly right, I really was not even going out there but a guy from Roush Creek who put on the kiddy park ride said, "put it on the rocks" and I declined at first cause there was a chance of breaking something that far from home with my daughter and no trailer. But when Jennifer said "Dad your going to look bad" I let her out and went over the rocks, just wish she did leave the camera running ha ha. As far as the dirt part, hell ya it was simple, my hunting property has more difficult trail roads then that.

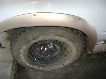
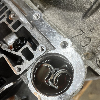
Lot of pics for documentation

DSC03327.jpg


DSC03320.jpg


With the rotor resting on the ground, I found no Rear Steer, hallelujah!

DSC03319.jpg


This is going to be one *****in flexing machine. Just hope don't need a dang track bar. With the angles I got I really don't think I'll need one.
Be so nice with all this flex not to have that sideway shove and no rear steer with the wristed rear. Then no chirping of the tires with the welded spiders. But this is still a ways off. I'm thinking seriously of just leaving the rear axle in there regardless of the front gears and bolt pattern. Just two wheels for awhile. Give me a little inspiration to Get R Done. But we'll see. Don't know if I could go that long without some 4 wheeling.


DSC03341.jpg


Need to order some stainless steel spacers on either side of those heims.
I also will most likely have to raise the batt box which will be a PITA due to I'll have to reroute some wires. On an articulated bounce I'll probably be alright, it's on a vertical bounce that I'll will definitely need more clearance.

DSC03338.jpg


I have room to drill another lower mounting point on the axle tube, but I like the way it located now near the top of the tube. Since my truck is a little high anyway this will be good location pertaining to roll center point. Not mentioning more ground clearance. Hoping the roll axis between front and rear axles is Ok, but some spring work will cure most of that anyway.
Of course we'll have to see with hands on wheeling how it works with the front 4 link.

DSC03337.jpg


Initially I'll have about 4" separation at the X member and 8 at the diff. This will give me an instant center near the front of the transfer. But I'll be able to change all that later if need be. What I'm shooting for is a low anti-squat or 100% squat to keep wheel spin down when going up on the rocks.
Also if you look directly above the j-stand you can see where I removed the stock cross over brace. Needed to do this so I can run a double tri link and have longer links. Been a piece of cake to run the lowers parallel with the frame and then only have a single tri. But would have lost out on the lateral axle locating qualities of the Dbl tri along with the other attributes as in little or no rear steer which means i can dice the track bar.

DSC03334.jpg


There getting to know me well up at the local DS shop. Need to shorten just a little.


DSC03346-1.jpg


Not much clearance from batt box to upper link.

DSC03348.jpg


Now that's a lot better. Just raised box and welded to the steel frame that was bolted to it in the bed.


Looking good.

The only thing Im seeing is the rear truss. There will be a lot of stress on the upper links, especially when you have some wheel hop. I would try to gusset it more and also try to tie it to either the rear cover or the pinion snout. Other then that I dont think you will need a track bar. Looks like plenty of separation to stop the axle from moving sideways.

You be the man Zapper, consider it done. Especially after doing some research on trussing the D60/70 with high horse power mills and large tires.
Definitely needs more bracing.

After looking at several after market designs, i came up with my own spin on it. I don't like the ones that I saw where it was bolted to the rear diff which is Ok, but the piece that was attached to the truss went straight up from diff to the truss which did not do much for lateral bracing. The one from Ballistic had a bend in it that seemed much better.

DSC03353.jpg

Used gasket to sketch out a pattern on the steel.
DSC03356.jpg

Using a cut off wheel in conjunction with a jig saw, it took about as long to drink a medium coffee to cut out including drilling the holes ha ha. More on those two holes later.
DSC03358.jpg

DSC03361.jpg

Needs to be removable to take off diff cover
DSC03362.jpg

Just one of several areas that will be added. The angle that the brace goes to the truss is structurally better then just going straight up from the diff.
I'll add one more bolt where the two pieces bolt together. Plenty more to come then just adding the other side bracket.
The hole to the left of the bracket in the diff I did not want to use, there was just not enough meat between hole and the edge of the casting. But I'm still thinking about those two holes in the bracket.Hmmm


DSC03363.jpg


Driver side all bolted up and ready to burn some rod.
DSC03366.jpg

Think I found a nice place to fasten the limiting chain.
DSC03368.jpg

Had some solid 3/4" rod laying around and might as well make good use of it.
Not only will this strengthen the truss but also help keeping that axle good and straight when dropping off a rock or tree trunk ha ha. And hopefully making the bearings last longer. Bent tubes a bearing no like.
DSC03369.jpg

Still got more ideas coming on the truss. Not to mention no where near finished on Samson.

There's just somethin about large tubes.


DSC03379.jpg


First use a Pizza box to make a rough outline, then to a thin piece of sheet metal with any notes as to add or subtract. Then transfered that to a .250" piece of steel.
The round rod was Ok as far as up and down bracing but not much from east to west. Now had I just placed the steel plate 90 deg. from axle to round rod it still would not have done that much in the east west flexing of tube.
Note that I have it angled out starting from the top of the rod. you can see how it angles on the original 3/8" truss. Plus this lets me place the steel plate further out on th outside diameter of tube. Noting more then triangulation strengthening.
Truss me, a lot more to come. Plus as I speak the rear tires are being mounted on the 8 lug rims and the DS is being shortened with a 1330 joint at the D70 end. Front will be changed later.

I also stitched welded it letting it cool down between welds


DSC03386.jpg


On the driver side truss plate, I took a sledge hammer and bent the plate to fit the compound angles while it was in a vice. Later on I'll fix the work table where the bolts pulled through the table that did hold the vice.
On pass side the angle was a little more complicated so I did it in two separate pieces to form the angled gusset.
Still more work to be done in this area including one that I don't know if anyone else has done, kinda out of the box (imagine that) or maybe they just didn't want to lol.
Also rear tires are mounted on the new 8 lug rims and I also picked up today the shortened DS with 1330 joints.
Need to do some changing of the rear brake lines to fit the Chevy brakes.
This huge rear axle ought to put some needed weight on the tire patch. Think about it, there's hardly any weight above the rear axle.


DSC03390.jpg


Now to do something with those holes I mentioned earlier. Those cover bolts that are now supporting the upper truss need to be upgraded. They're not meant to withstand the pressures that are now going to be applied to them. A whole lot more stress then just clamping on a diff cover.
Going to upgrade to a 7/16 x 20 bolts and torqued to specs as all the other 3/8 bolts.

DSC03393.jpg

Plenty of metal to work with including that I'll use longer reaching bolts to insure a good clamp. They will thread in about twice as long as the stock bolts.
DSC03396.jpg

A noticeable difference then the stock bolt. Also as I mentioned earlier the top middle bolt was not going to be used cause of the closeness of the hole to the edge of the casting.
The ground casting above the bolts was due to getting a good angle on the brace.
DSC03400.jpg


DSC03407.jpg


Getting closer each day. Once the rear tires are bolted up, I'll remove the jack stands and adjust the ride height. I know it's going to sag in the rear due to the CO's being on more of an angle. But that's an easy fix due to the adjusting nut.
Ordered some brake line hoses which I'll pick up tomorrow. The chevy brakes take a different fitting at caliper.
DSC03405.jpg

The shortened drive shaft was installed, well almost, need the D70 U-bolts at rear. Larger diameter due to the 1330 caps. 1/16 larger in diameter then the 1310 series.


DSC03420.jpg


The rear U bolts for the drive shaft have just been installed. Pleased with the DS angle. Not to mention the pinion does not change angle when cycling.


DSC03428-1.jpg


The brake hoses I ordered came in today also. I'll strap them down and make a 3 way connection later. Remember these are K20 front calipers and hoses. Forgot that the calipers do not come with the brake hose bolt that clamps it to caliper, so had to order that :mad:

DSC03424-1.jpg


I like the looks of the 70 and no gas tank. Give all the jeeper guys something to look at. All and all most wave when they go buy and I also. Just in that order lol.
RTVed the diff, placed gasket onto the diff cover and snug up the six stock bolts to housing. Then to place the larger 7/16" bolts thru the truss adapters, only to take diff back off...Forgot to drill diff cover out for the four 7/16" bolts...insert another Mad smiley.

Samsons come a long way from a rear leaf spring 8.8 and a front ttb.
And no, I'm not cleaning up all those tools just to post a pic, they will be cleaned up minutes before I fire it up and back it out.


DSC03430.jpg


These old tabs that I cut off on the upper adjustable 4 link bracket will work just fine for mounting the brake lines.

DSC03436.jpg


Welded a 3/8" bolt to the CO bracket to secure the clamp and then the above bracket that I mentioned to the truss. Ditto on other side.
Need to pick up some brake line and fittings to finish the brakes.
Hopefully the hose bolts will come today.


DSC03437.jpg


Now to enlarge mounting holes in diff guard due to the truss bracket mod.

DSC03440.jpg


Diff guard is on and also steel brake lines are run to the center brake tee fitting located in center of diff. Remember the way I designed the diff guard the steel axle tubes will take the brunt of any trama. Also from Tee to Master cylinder is all complete now.


DSC03445.jpg


Now to fill the diff to the bottom of the fill hole, which Won't be the proper amount? Replace plug.
DSC03441.jpg


Now remember the oil passage that I enlarged by removing all that crap that was left over from casting the rear? Well now with the axle at an angle the fluid is now rushing through that opening and heading towards the outer bearings.
Next I'll turn the rotor by hand.
Repeat the process on other side. I really did not trust the height of the fill plug to insure that the fluid was reaching the far bearings and giving them a good soaking. I'd like to get one of those diff covers that have a higher mounted fill hole.
DSC03445.jpg

Now you'll see why it was not the correct level the first time when you have to add more when it's sitting level again. Remember this was a bone dry diff. And this is important if you did not pack the outer bearings and was hoping that just riding around will be suffiecint...BS. I don't care what the book says about not packing those bearings.


In the last big truck shop I worked that's pritty much how we lubed the hubs on drive axles after doing any hub work. Fill the pumpkin, jack up one side so you've got a pritty good angle going and leave it for a min or two. If I'm not mistaken there is a procedure that describes the specific angle and time left at that angle too. A select few would have oil fill plugs in the hubs but they prefered to spit the oil back out as you attempted to pump it in.


In the last big truck shop I worked that's pritty much how we lubed the hubs on drive axles after doing any hub work. Fill the pumpkin, jack up one side so you've got a pritty good angle going and leave it for a min or two. If I'm not mistaken there is a procedure that describes the specific angle and time left at that angle too. A select few would have oil fill plugs in the hubs but they prefered to spit the oil back out as you attempted to pump it in.

Interesting. This is something I've always done. And as far as the angle all I do is to put a level at the fill plug and then make sure the hub/bearings are below the level line.

Jon on my 70 it's not 1350 cause none of the caps are 1 and 3/16". But my DS man said he'll up grade to 1350 if need be. Then I'll also call Advance Adaptes and get a 1350 yoke upgrade. Hmm 1410.


Join the Elite Explorers for $20 each year.
Elite Explorer members see no advertisements, no banner ads, no double underlined links,.
Add an avatar, upload photo attachments, and more!
.


Back
Top