SyberTiger
Well-Known Member
- Joined
- May 18, 2007
- Messages
- 767
- Reaction score
- 52
- City, State
- Orlando
- Year, Model & Trim Level
- 2002 Limited 4x4 4.6L
I recently completed timing chain replacement on my 2002 Explorer with 4.6L V8 so I thought I'd chime in with some tips and answers for those considering this service.
My engine has 150K miles on it and I've always been a stickler for changing the oil every 3,000 miles using Motorcraft 5W20 synthetic blend oil and Motorcraft oil filter every time. I didn't specifically do the timing chain service because of any known problem or noise. I was actually in the process of changing out the intake manifold when I decided I might as well change the valve cover gaskets since the right side was starting to weep oil. With the right side valve cover removed I noted the timing chain on the ride side cam sprocket had a little play in it and was not as taught as I would have expected. Although I could have easily changed out the valve cover gasket and closed it up I decided what the hell...the engine is already partially torn down I might as well change the timing chains as with 150K miles I didn't want to find out 10K miles later the timing chains needed service.
So down that path I went and I relied heavily on THIS VIDEO which I found very helpful and took the mystery out of the potential problems. This post is meant to supplement the video with additional tips to assist and correct the process shown in the video...as good as the video is he could have made life easier with the following tips.
One of the first things he does in the video is to remove the fan in a very convoluted way. The proper way to get the fan out is: 1. Remove the upper fan shroud, 2. Using a fan clutch removal tool remove the fan/clutch assembly, 3. Loosen but not remove the fan pulley bolts, 4. Remove the belt by use of a 1/2 ratchet or breaker bar in the belt tensioner pulley, 5. Remove the fan pulley bolts all the way. The fan clutch removal tool can be rented free at many major auto parts stores such a O'Reillys. With the fan assembly be careful throughout the process of not damaging your radiator fins. I suggest placing a piece of cardboard over the radiator to protect is so you don't have to be careful throughout the repair.

Use of the 2x4 tool to hold the harmonic balancer while removing the crankshaft bolt works out great and it is used to hold the harmonic balancer when torquing the bolt back on. The difficulty you may have is marking the bolt positions. What I ended up doing, to make life easier, was to pick up a brand new harmonic balancer at the auto parts store in anticipation of installing the new one when done. By having the new one on hand I was able to easily mark the holes on the 2 x 4. In the end, when I got the harmonic balancer out I noted that mine was holding up just fine and therefore returned the part back to the auto parts store.
Since I was already working on the intake manifold I had previously drained the radiator which yields about 2.25 gallons of coolant. Because I had most of the coolant removed I decided to remove the water pump to get it out of the way and provide more room to work. Be warned though, you should expect about 1 quart of coolant to come out if the water pump is removed at this time given that the radiator was already drained. This is the perfect time to change out your water pump anyway. If you have high miles and have never changed the water pump it's so easy to do at this point and a water pump only costs $40. In addition, I had the alternator off which gives you even more room to work. Both the water pump and the alternator are VERY easy to remove and it really helps to have them out of the way. You'll note in the video he has difficultly clearing the water pump with protrudes outward.
The power steering pump is not all that hard to remove. You need to remove the driver side front wheel to have easy access to the power steering bolts. After that, it's easy to remove the two bolts from the wheel well. With regard to the front p/s pump bolt you can make life really easy by simply removing the p/s pump pulley. I rented a free loaner p/s/ pump pulley removal installer tool from O'Reillys. Once the pulley is off it is SO EASY to get that bolt out. The actual process of removing the pulley then reinstalling it is very easy with the tool. You'll thank me later that I gave you this tip.
Eventually you'll need to remove the valve covers. To make the job easier you should: 1. remove the three bolts holding the coolant reservoir to allow moving it slightly so you can get to one of the harder bolts on the right side valve cover, 2. Remove the EVAP canister vent value by simply pushing the metal retaining tab on it and pulling it off...in the video he unnecessarily removes a 13mm bolt but no bolt removal is needed, 3. The power steering bracket should have already been removed.


With the valve cover bolts removed (11 per cover) be careful when removing them. The gaskets are held on by rubber grommets but if you find the gasket separating from the bottom of the cover it means the grommet holder are loose and can fall out and into the engine if you tip the valve cover. You have want to collect the grommet holders if the gaskets start to peel away.
Eventually you'll get to this point where you will note the front portion of the oil pan is exposed and this is why you would want to remove the water pump before the timing chain cover if your desire is to remove the water pump.

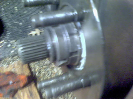
Before servicing the timing chains you'll want to take a close look and determine if there is anything catastrophic within the area and could include finding pieces of plastic or metal from the tensioner arms or guide arms. My first verification that I was long overdue timing chain service was this:

Note that the chain had worn right through the tensioner's plastic rail and the chain was riding right on top of the tensioner piston.


The right side was just as bad:


At this point it's clear that the tensioner arms, tensioners and guide rails need to be replaced on both the right and left side. But, do the timing chains and sprockets need to be replaced? Well, in my case it was not clear because I did not have any feedback from others on the topic and had already ordered a full chain/sprocket/tensioner kit for $75. Hindsight is that my factory sprockets and chains did not need to be replaced even though the chains were riding on top of the tensioner pistons. I only know this because I removed the chains and sprockets and inspected them for damage and stretching. I found no stretching or damage to the chains and the sprockets were in excellent condition. In the end I replaced the chains since I had them already but reused my factory sprockets. If I knew the chains and sprockets would be in excellent condition then I would have left them in place and replaced only the tensioners, tensioner arms and guide rails. I mention this because if your engine is similar to mine with no wear or damage to the chains and sprockets then why subject yourself to the process required to remove the chains?
I would recommend leaving the chains and sprockets alone and only changing the tensioner arms, tensioners and guide rails. You will not need a cam holding tool if you leave the chains and sprockets alone. However, be prepared to zip tie in several places the chains to the sprockets so they don't jump off otherwise you will have to go through an extra step of making sure the timing in put back in place. Anyhow, the call is yours to make on if you want to replace chains and sprockets...I say, don't bother.
If you are to remove the chains and sprockets it requires the use of at least one cam holding tool just like in the video. You can't rent them so I had to purchase one for $43. Two cam holding tools would be better than one but it's not necessary. Just as in the video my right side cam rotated counter-clockwise about 15 degrees. Just like the video it wasn't a big deal however, for grins, I suggest you mark the location of the cam sprockets in relation to the valve ladder caps that way if the cams rotate then you'll know how much and can easily move them back. The reason the cams may move is because some of the valve springs will be compressed and will decompress if allowed.

My engine has 150K miles on it and I've always been a stickler for changing the oil every 3,000 miles using Motorcraft 5W20 synthetic blend oil and Motorcraft oil filter every time. I didn't specifically do the timing chain service because of any known problem or noise. I was actually in the process of changing out the intake manifold when I decided I might as well change the valve cover gaskets since the right side was starting to weep oil. With the right side valve cover removed I noted the timing chain on the ride side cam sprocket had a little play in it and was not as taught as I would have expected. Although I could have easily changed out the valve cover gasket and closed it up I decided what the hell...the engine is already partially torn down I might as well change the timing chains as with 150K miles I didn't want to find out 10K miles later the timing chains needed service.
So down that path I went and I relied heavily on THIS VIDEO which I found very helpful and took the mystery out of the potential problems. This post is meant to supplement the video with additional tips to assist and correct the process shown in the video...as good as the video is he could have made life easier with the following tips.
One of the first things he does in the video is to remove the fan in a very convoluted way. The proper way to get the fan out is: 1. Remove the upper fan shroud, 2. Using a fan clutch removal tool remove the fan/clutch assembly, 3. Loosen but not remove the fan pulley bolts, 4. Remove the belt by use of a 1/2 ratchet or breaker bar in the belt tensioner pulley, 5. Remove the fan pulley bolts all the way. The fan clutch removal tool can be rented free at many major auto parts stores such a O'Reillys. With the fan assembly be careful throughout the process of not damaging your radiator fins. I suggest placing a piece of cardboard over the radiator to protect is so you don't have to be careful throughout the repair.
Use of the 2x4 tool to hold the harmonic balancer while removing the crankshaft bolt works out great and it is used to hold the harmonic balancer when torquing the bolt back on. The difficulty you may have is marking the bolt positions. What I ended up doing, to make life easier, was to pick up a brand new harmonic balancer at the auto parts store in anticipation of installing the new one when done. By having the new one on hand I was able to easily mark the holes on the 2 x 4. In the end, when I got the harmonic balancer out I noted that mine was holding up just fine and therefore returned the part back to the auto parts store.
Since I was already working on the intake manifold I had previously drained the radiator which yields about 2.25 gallons of coolant. Because I had most of the coolant removed I decided to remove the water pump to get it out of the way and provide more room to work. Be warned though, you should expect about 1 quart of coolant to come out if the water pump is removed at this time given that the radiator was already drained. This is the perfect time to change out your water pump anyway. If you have high miles and have never changed the water pump it's so easy to do at this point and a water pump only costs $40. In addition, I had the alternator off which gives you even more room to work. Both the water pump and the alternator are VERY easy to remove and it really helps to have them out of the way. You'll note in the video he has difficultly clearing the water pump with protrudes outward.
The power steering pump is not all that hard to remove. You need to remove the driver side front wheel to have easy access to the power steering bolts. After that, it's easy to remove the two bolts from the wheel well. With regard to the front p/s pump bolt you can make life really easy by simply removing the p/s pump pulley. I rented a free loaner p/s/ pump pulley removal installer tool from O'Reillys. Once the pulley is off it is SO EASY to get that bolt out. The actual process of removing the pulley then reinstalling it is very easy with the tool. You'll thank me later that I gave you this tip.
Eventually you'll need to remove the valve covers. To make the job easier you should: 1. remove the three bolts holding the coolant reservoir to allow moving it slightly so you can get to one of the harder bolts on the right side valve cover, 2. Remove the EVAP canister vent value by simply pushing the metal retaining tab on it and pulling it off...in the video he unnecessarily removes a 13mm bolt but no bolt removal is needed, 3. The power steering bracket should have already been removed.
With the valve cover bolts removed (11 per cover) be careful when removing them. The gaskets are held on by rubber grommets but if you find the gasket separating from the bottom of the cover it means the grommet holder are loose and can fall out and into the engine if you tip the valve cover. You have want to collect the grommet holders if the gaskets start to peel away.
Eventually you'll get to this point where you will note the front portion of the oil pan is exposed and this is why you would want to remove the water pump before the timing chain cover if your desire is to remove the water pump.
Before servicing the timing chains you'll want to take a close look and determine if there is anything catastrophic within the area and could include finding pieces of plastic or metal from the tensioner arms or guide arms. My first verification that I was long overdue timing chain service was this:
Note that the chain had worn right through the tensioner's plastic rail and the chain was riding right on top of the tensioner piston.
The right side was just as bad:
At this point it's clear that the tensioner arms, tensioners and guide rails need to be replaced on both the right and left side. But, do the timing chains and sprockets need to be replaced? Well, in my case it was not clear because I did not have any feedback from others on the topic and had already ordered a full chain/sprocket/tensioner kit for $75. Hindsight is that my factory sprockets and chains did not need to be replaced even though the chains were riding on top of the tensioner pistons. I only know this because I removed the chains and sprockets and inspected them for damage and stretching. I found no stretching or damage to the chains and the sprockets were in excellent condition. In the end I replaced the chains since I had them already but reused my factory sprockets. If I knew the chains and sprockets would be in excellent condition then I would have left them in place and replaced only the tensioners, tensioner arms and guide rails. I mention this because if your engine is similar to mine with no wear or damage to the chains and sprockets then why subject yourself to the process required to remove the chains?
I would recommend leaving the chains and sprockets alone and only changing the tensioner arms, tensioners and guide rails. You will not need a cam holding tool if you leave the chains and sprockets alone. However, be prepared to zip tie in several places the chains to the sprockets so they don't jump off otherwise you will have to go through an extra step of making sure the timing in put back in place. Anyhow, the call is yours to make on if you want to replace chains and sprockets...I say, don't bother.
If you are to remove the chains and sprockets it requires the use of at least one cam holding tool just like in the video. You can't rent them so I had to purchase one for $43. Two cam holding tools would be better than one but it's not necessary. Just as in the video my right side cam rotated counter-clockwise about 15 degrees. Just like the video it wasn't a big deal however, for grins, I suggest you mark the location of the cam sprockets in relation to the valve ladder caps that way if the cams rotate then you'll know how much and can easily move them back. The reason the cams may move is because some of the valve springs will be compressed and will decompress if allowed.