LD50 Full-size axle thread `93 Ex | Page 31 | Ford Explorer Forums - Serious Explorations

  • Register Today It's free!

LD50 Full-size axle thread `93 Ex

LD50 Full-size axle thread `93 Ex SAS

Hey fellow Explorer enthusiasts!

Well I never thought I`d do it, but it`s time.
I originally thought I would go to a smaller rig one day but I`m going to beef up the Explorer instead. Since I already have a huge thread on my previous work I decided to start fresh.

If you would like to see my previous mods, you can navigate from my signature link, or click here:
http://www.explorerforum.com/forums/showthread.php?p=523171#post523171

~

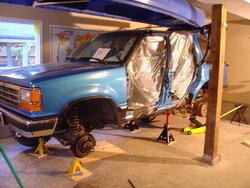
My plans are to install a D44 and 9-inch into the station wagon and run 35 inch tires. Hopefully she`ll still get in the garage, but if it don`t then oh well. During this I also have some body work to do.

Right now I have the rear end out, I took off the spare tire hanger and removed the muffler and rear most heat shield. (doors are off for body work)Next the gas tank comes out so I can prep the underside for rust protection, from the t-case back. In the meantime I am trying to sell some parts for cash.

First big decision is what gear ratio. The 4.10`s on 33s was nice, but I think I`d like a bit more torque than that so I`m thinking 4.88 or 5.13s.
 

Attachments

  • prep.JPG
    prep.JPG
    62.9 KB · Views: 10,423


Join the Elite Explorers for $20 each year.
Elite Explorer members see no advertisements, no banner ads, no double underlined links,.
Add an avatar, upload photo attachments, and more!
.


I am doing a Ranger SAS and I think the stock Ranger Sway bar might work in the end. I think it needs to be reversed and then it will connect up to the fronts of the radius arms. Not 100% as I haven't tried but I think it will work.

Please keep us posted on that, if you don't mind.I start my build next spring and I'd like to add it into my planning.Mine is an 01 Ranger 4x2 with arm front suspension and coil springs.If I can keep the front spring bucket's, that are made into the frame,I am.If not, I will cut that section out and weld in rectangular tubing.Then do it the way ld50 did his.


Join the Elite Explorers for $20 each year.
Elite Explorer members see no advertisements, no banner ads, no double underlined links,.
Add an avatar, upload photo attachments, and more!
.


Please keep us posted on that, if you don't mind.I start my build next spring and I'd like to add it into my planning.Mine is an 01 Ranger 4x2 with arm front suspension and coil springs.If I can keep the front spring bucket's, that are made into the frame,I am.If not, I will cut that section out and weld in rectangular tubing.Then do it the way ld50 did his.

No worries. My Build is on BC4x4.com.
http://bb.bc4x4.com/showthread.php?165994-It-s-About-Time!!!-My-SAS-1989-Ford-Ranger-Project!

I will also keep following here.


Still on the Brake hoses thing.
Does anyone know if the banjo nut aetc is the same for the 78 Bronco Disc Calipers and the 77 F250 Calipers? I found a part number for 24" long F250 hoses. Will they work?


I can't say 100 percent, but I recall being worried that the one I got would fit. I was told at the time that the banjo nut is a fairly standard size. Do you have the old hoses? you could bring one with you when you get the new hoses and compare.
I still don't understand why the Lordco part numbers didn't cross reference, I`ll grab my receipts and double check...


Wow, haven't looked through those receipts in a while, expensive.
Anyway this has to be the receipt, I don't recall the hoses being different prices but the part coming off the banjo bolt is angled for left and right so that explains two different part #s
 

Attachments

  • brake lines.jpg
    brake lines.jpg
    34 KB · Views: 671


Wow, haven't looked through those receipts in a while, expensive.
Anyway this has to be the receipt, I don't recall the hoses being different prices but the part coming off the banjo bolt is angled for left and right so that explains two different part #s

Thanks ld50. I ended up getting the F-250 Lines today. More expensive than yours...(Ouch) Just under $30 each. They have 1/4" fittings, so I need to get down to the 3/16" of the ranger. I found a straight union, but the rangers actually attach at a 90 degree angle so I need to find a 90 degree union for the passanger side.

Out of curiosity, what did you use for the rear brake hose?

And, more importantly, how is your truck running?


The rear brake hose is only hose from the frame to the T on my axle (as you must know). I used the stock length hose but chaged the bracketry from the frame so that it is held lower than stock before heading towards the axle. I just used some flat bar and it bolts to the bump stop attachment bolt.
 

Attachments

  • rear brake hose drop 1.jpg
    rear brake hose drop 1.jpg
    63.3 KB · Views: 626
  • rear brake hose drop 2.jpg
    rear brake hose drop 2.jpg
    56.5 KB · Views: 625


The truck is running and feeling great, I have only been insuring it during the summer and parking it in the garage through winter and making sure I start it for a while every couple of weeks. Last week I went to Hale creeek at Harrison for some camping with my son and a friend of his. I have to let him bring a friend now because otherwise he is "bored"
 

Attachments

  • hale 1 red.jpg
    hale 1 red.jpg
    98.4 KB · Views: 632
  • hale camp pan copy red.jpg
    hale camp pan copy red.jpg
    80.1 KB · Views: 608


Last week I went to Hale creeek at Harrison for some camping with my son and a friend of his. I have to let him bring a friend now because otherwise he is "bored"

You were supposed to let me know when you were down this way...

Picked up some new tires yesterday Dick Cepek Mud Country's 33X12.50X15 :)
 

Attachments

  • tires.JPG
    tires.JPG
    140 KB · Views: 641


Hey, you never PM`d me after my post in the Canadian backroads thread Carson, I thought you were dodging me :)
I`m on holidays too and went during the week, I figured you would be working anyways...

Lots of meat still on those tires, nice.


You can always send me those tires. :D


Some changes

Well, I still haven't designed and built a cargo area storage box thing as I mentioned but I adressed some other items.

I had been keeping my hitch mount winch strapped down inside the back, and had thought I would add a mount location on my cargo area to hold it, but I`ve decided I would rather leave it out front, and free up more cargo space. I can still move it to my rear hitch for winching backwards.

Another issue that has been bothering me is the law here says you must have a front bumper that covers your tire track width. I assume this has something to do with pedestrian safety, and sooner or later I know I will get pulled over for this bumper issue. Anyway, I have been trying to maintain the stock look as much as I can so I have kept the bumpers intact.

I had this interesting idea about a "moustache bumper" I don't know if I just made up the term but if you want to credit me, go right ahead. The idea was if I built each side with the ability to be un-pinned, pulled forward and swung up in front of the bumper, it would turn into this cool bush bumper. Alas, during my mock up, it actually looked really goofy when they were swung up. I maintained the original pin mount idea for each side simply because I had already scrounged up the materials.

Alright, so I used 22" long 3.5 inch shedule 40 pipe with end caps for the outside, and plate to cap the inner end. I used some two inch OD pipe I found that fit into some 2 inch ID Pipe for the mounting system. The mount pipe is at an angle so that when in place the bumpers are swept back, following the contour of the stock bumpers.
Here is one side, painted in the same manner of my sliders (painted and rock guarded)
 

Attachments

  • exbumper3.jpg
    exbumper3.jpg
    50.7 KB · Views: 527


Previously I built this reinforcement on the front frame rails to reduce twisting and create a hitch mount point. I used some plate welded to this previous work to work off of.
Here are some pictures of how it looks right now.
 

Attachments

  • exbumper1.jpg
    exbumper1.jpg
    64.2 KB · Views: 562
  • exbumper2.jpg
    exbumper2.jpg
    46.7 KB · Views: 757
  • exbumper4.jpg
    exbumper4.jpg
    55.1 KB · Views: 519
  • exbumper5.JPG
    exbumper5.JPG
    27.2 KB · Views: 528


I just read through this whole thing start to finish for at least the 3rd time. I am getting ready to do my full width sas soon "this year". Anyway i just wanted to say how great this writeup is and i hope you dont mind me borrowing some ideas and maybe even picking your brain when i get to doing mine.


Thanks, I don't spend as much time here as I used to, but I still get my notification emails. You might be able to pick my brain on some things. I actually find myself sometimes coming to this thread to remember how I did things, lol.


Thanks, I don't spend as much time here as I used to, but I still get my notification emails. You might be able to pick my brain on some things. I actually find myself sometimes coming to this thread to remember how I did things, lol.

Well I appreciate it....your thread was very inspiring......fyi I read it again a few days ago.hahaha.


10 years since axle swap?
Whaaat?
Pretty sure it's ten years this summer.
Was out on weekend and my driver's side bearing on the 9 inch rear end came apart and the axle started to walk out of the housing.
So I will have to replace those BEFORE they go. I reckon ten years was a good run on them tho.
I have pics but not elite anymore, so you'll have to use your imagination.
She still runs great, had some fuel issues last year that I think I posted about, put in new fuel pump and fuel pressure regulator. When the regulator goes it forces tons of fuel into your intake manifold so check that if your ex suddenly starts blowing white smoke and reeks of gas.

Cheers!


Hello fellow Explorer enthusiasts!
I’m still wheeling.
No breakdowns since the 9 inch bearing went..

I really got my eye on this new Bronco coming out, it may be time for something new, but this thing is family now...
 

Attachments

  • 60A0AD95-6546-4921-97DC-E54C7B124193.jpeg
    60A0AD95-6546-4921-97DC-E54C7B124193.jpeg
    262.5 KB · Views: 110
  • 42209576-D8E0-4069-A80A-9E67B15CB4B3.jpeg
    42209576-D8E0-4069-A80A-9E67B15CB4B3.jpeg
    272.4 KB · Views: 103
  • 4F5844A4-349C-4F05-A9CE-D391C027C4EE.jpeg
    4F5844A4-349C-4F05-A9CE-D391C027C4EE.jpeg
    426 KB · Views: 106


Join the Elite Explorers for $20 each year.
Elite Explorer members see no advertisements, no banner ads, no double underlined links,.
Add an avatar, upload photo attachments, and more!
.


Good to have you back, always enjoyed your rig and write-up. . .


Back
Top