1997 Ford Explorer - V8 - 5.0 - AWD | Page 5 | Ford Explorer Forums - Serious Explorations

  • Register Today It's free!

1997 Ford Explorer - V8 - 5.0 - AWD

Hello Explorer Fans.

I have been on the forums for some time and have extensively read many threads. I have enjoyed the forums so far. Now I have a question of opinion for you all.

I currently own 97' V6 SOHC Sport and I love it. I was going to SAS it, but Id rather do it to a V8 Explorer, plus, manual TC's are readily available for the swap.

To get to the point, I'm looking at a 97' 5.0 AWD Explorer (166,000 miles) (for a few hundred bucks). It's a solid vehicle, straight but its flashing a few codes. I looked up the codes here on the forums and it appears to be a "simple" fix. It idles well, but has an obvious 'lumpiness' to it. When you accelerate under load, you can sort of hear and feel it. The codes I got were P1132 - Lack of Oxygen Sensor indicates Rich and P1131 - Lack of Heater Oxygen Sensor indicates Lean. Both appear to be O2 sensor issues which may not be that big a deal. The trans seems to shift well with no obvious issues.

I'm very mechanical in nature (I work on my own cars/trucks) and fabrication of all I want to do...is what I do.

I just wanted a few opinions on the success of fixing this issue and any potential things I should look for before i pull the trigger and pick this thing up.

Thanks everyone.


Join the Elite Explorers for $20 each year.
Elite Explorer members see no advertisements, no banner ads, no double underlined links,.
Add an avatar, upload photo attachments, and more!
.


This should be close
Interior fuse panel (mini fuses)

1=7.5A Power mirror switch
2=7.5A Blower motor relay,PAD module,Air Bag diagnostic monitor
3=7.5A Trailer tow connector
4=10A Left headlamp
5=10A Data link connector (DLC)
6=7.5A Air bag diagnostic monitor, Blower motor relay, Passive deactivation Module (PAD)
7=7.5A Trailer Tow connector
8=10A Right headlamp, Daytime running lamps (DRL) module, Foglight relay
9=7.5A Stop Lamp switch
10= 7.5A Speed control-amplifier assembly,Brake pressure switch, Generic electronoc Module (GEM)
Shift lock actuator, Blend door actuator, Main light switch, RABS resistor, A/C heater assembly
Flasher
11= 7.5A Instrument cluster, Main light switch, RABS resistor
12= 10A Power window relay, Washer pump relay
13= 20A Stop lamp switch, Brake pressure switch
14= 20A Rear Anti Lock Brake system (RABS) module
**10A 4WABS module**

15=7.5A Instrument cluster
16= 30A Windshield wiper Motor, Wiper Hi-lo relay, wiper run/park relay
17=7.5A Cig lighter
18=15A Drivers unlock relay-All unlock relay
19=25A PCM power diode
20=7.5A RAP module GEM module, Radio
21=15A Flasher (hazard)
22=20A Aux power socket
23=15A Turn signals
24===not used
25= 7.5A GEM module, Instrument cluster
26= 10A Battery saver relay, Electronic Shift relay, Interior lamp relay
Power window relay,Electronic shift control module, transmission control
27=15A Switch,DRL, Backup lamp switch, DTR sensor,Instrument illumination dimming control module
Dome/map lamp, GEM,electronic shift,Interior lights,Glove box lamp and switch
28=7.5A GEM module-Radio
29= 15A Radio
30=15A Park lamps, trailer Tow relay
31===not used
32=10A rear blower
33=15A Headlamps, DRL module, Instrument cluster
34=7.5A Rear integrated control panel, CD
35=10A RABS test connector
36=7.5A CD, rear integrated control panel, memory seat, Message center


Join the Elite Explorers for $20 each year.
Elite Explorer members see no advertisements, no banner ads, no double underlined links,.
Add an avatar, upload photo attachments, and more!
.


So I thought I would swap out the temp gauge to see if that might be the culprit. I checked my fuses and they were all in good order.

I went to the local JY to pick a couple gauges from a few of the Ex's available and it would give me an idea what to expect when I remove and disassembly my own for the swap.

Removing the cluster was very simple; I don't think I need to get into that. The only one thing that I would mention is to be careful of the shift indicator cable. Carefully remove the indicator by releasing the 2 plastic spring tabs holding it in and slide it out.

Here is a picture of the original cluster on my welding bench:
OriginalGauge.jpg


index.php


To access the inside of the clear cover, you have to remove the gold screws. The clear plastic cover will remove easily. Note the shift indicator has been removed and is still in the Explorer attached to shift indicator cable.

I did find a 2001-2003 Sport at the JY, and it had a grey silver insert that I liked. Since my interior was grey and 'custom' is what I like - It was cheap...what the heck right?
OriginalGaugeCoverOp.jpg


index.php


Here is a quick shot of the back side of the gauge cluster. I noted a few important things about it. The black bulb holders are for the overall illumination. The small Tan bulb holders are for system indicators like your check engine light or turn signal devices. Interestingly, the back side is completely labeled 'for dummies'. I like it.

index.php


I will also note the metal tabs that 'grip' the gauge prongs to keep it in place. Note the Temp and Fuel gauge locations.
OriginalGaugebacksid.jpg


The front of gauge cluster with clear cover removed. To remove gauge clusters, you can see the 3 parts. Temp/Fuel - Speedometer - Oil/Voltage. Pull up on the corner of each cluster and they pop right out.
OriginalGaugeminusco.jpg


index.php


Here is a shot of the inside of the cluster with the Temp/Fuel removed. Note the pin holes for each gauge. I'm using small LED bulbs for my cluster illumination. Night and bright and works well with dimmer. I picked these up cheap from Geek.com...I paid $1 i believe.

index.php

OriginalGaugewithTem.jpg


With the Temp/Fuel removed, here is the backside - Note pins again. These hold the complete unit in place.
TempClusterBackside.jpg


index.php


NewgaugeNeedles.jpg


NewgaugeNeedles.jpg


I removed the needle and temp gauge from the panel -

index.php

TempGaugeCloseUp.jpg


Here is a picture of the 'new' panel and original from my Explorer. I dated each one. You can see the indicator differences. I did not know this until I put a flashlight behind to look at the indicators...Lesson learned. Also, note the part numbers from Ford for the gauges required. They are different. I hope they are not year specific.

index.php

TempClusterDifferenc.jpg


I liked the orange needles - so I grabbed a few to swap them in. My 1997 had white indicators.

index.php


Here is the finished product - 'New' temp gauge installed and I swapped a few of the needles in.
NewClusterInstalled.jpg


index.php


On a scale from 1-10 for removal and installation difficulty - Id give it a 2-3.

Just take your time and be careful. Watch out for the shift indicator cable...very fragile.

The needles were on tight, I just lightly tugged straight up from each gauge. The needle is very small, don't want to bend them.

Lastly - I was going to swap this white faced shift indicator in, but it illuminated GREEN. If anyone needs one - Ill be happy to send it to them. Note the 2 small plastic spring tabs on the bottom.

index.php

WhiteShiftIndicatorw.jpg


WhiteShiftIndicatorw.jpg


I didn't see it, but I take it the gauge now works after swapping the internals?


I didn't see it, but I take it the gauge now works after swapping the internals?

I dont know yet. I pulled the intake plenum off to clean out the acorns that were packed around the fuel injectors. As soon as I get the new PCV hose kit and plenum installed, Ill be able to fire it up and check it.

I did turn on the system and all the gauges seem to function in the 'on' position. The temp gauge did power up...that's all I know at this point. I will keep everyone posted.

...(FIX) - I replaced the thermostat in this vehicle. The unit in the Explorer came apart in pieces, there are photos of it removed. The gauge has started working since swapping in a new thermostat.


Good work, the internal differences make swapping some parts interesting, like the movement of indicator labeling. I swapped around some 96/96 parts into my 98, to fix my speedometer, and change to blue. It didn't light up quite as I wanted, so it needs another try.


@CDW6212R - mine was dim as well. As soon as I put the LED’s in...a world of difference. A nice bright blue


I noticed the 20 ohm resistor is missing from the circuit board and integrated into your 97 oil pressure gauge.

Has anyone swapped a pre-97 oil gauge to a 97+ panel (along with the analog sender) to get a real pressure reading?


I noticed the 20 ohm resistor is missing from the circuit board and integrated into your 97 oil pressure gauge.

Has anyone swapped a pre-97 oil gauge to a 97+ panel (along with the analog sender) to get a real pressure reading?
I have read that here someone has done it. They didn't specify what all they changed, besides the older large pressure sensor.

Please post exactly how that works if you do it. That's also something I plan to do for my trucks.

I like the later sensor to trigger my headlights. I did that with my 99 work truck in 2006, ran that same oil pressure wire to my automatic headlight circuit. My lights come on when the engine is running, in any light. I want to alter that some, I want to separate the interior lights dimming from that trigger circuit, use the light sensor for that, plus use a real oil pressure sensor too.


nice ride, I'm a big fan of the 5.0 Explorers, I have a 98 myself and i just picked up a 97 for 900 bucks and i'm going through it as we speak.


My 98 has a been a pretty reliable rig but as more of the body is getting rusty and falling off I'd like to have another one thats decent to drive around.


Sounds like you've got a laundry list as do I, but when you get done you should have a pretty sweet running ride.


@Ford_Racing_Guy - Thanks.

Having owned a Hot Rod Shop for 15 yrs, It's in my blood to ensure everything is in top working order. I enjoy troubleshooting - even though it can be frustrating at times.

If I can add a personal 'custom' twist and help/show others in the process; makes me happy. I hope the things I'm doing encourages others to dig in and do things to enjoy their vehicles even more...and save a few bucks.

I'd say overall, this rig is pretty solid. I will be doing a spring over the axle and straight axle swap as well (this will be a long thread eventually).

This Forum has been very good in the information it has in its 'memory banks' and I hope my efforts give back the same.

You don't see custom Ex's on the road...I cant wait to take it out and show up a Jeep or two. :)


A quick update on progress:

I pulled the plenum because there was a huge squirrels nest on top of all the injectors. Acorns and dirt. I could not get a vacuum in to clean it up.

I decided to also replace the PCV hoses and valve since it was the best time to do this. I could not find a factory kit local so I opt'ed to replace the hoses the best way I could .

Cleaned up around the injectors, checked wires....wow...lots of room to do things.

Got it all together, Fired it up.

One minor issue. (its been doing this since I got it) It takes a little bit to get it started/running. it 'sucks & stumbles' a little until it 'catches on'. Once its running, it idles just fine. After its running a bit, it starts up good. I have been guessing that I need to change the ICV valve. I did clean it, but no changes since. (I'll post a YT of it starting)

I did get a CEL on the dash - P1049 code flashed. EGR Vacuum regulator failure. It was very odd considering all I did was unplug it from the harness. I checked the forums and found some fixes, but nothing worked. Fuses were good, vacuum lines were good and there was adequate vacuum. Later in the day, I disconnected the battery for a few min, fired it up...CEL went away.

Update on Temp Gauge issue: This is still not working. UGH! I may just put a mechanical gauge in, but Im not giving up the fight. However, when I was checking my CEL - I did get a P0118 - Engine Coolant Temperature Circuit High Input code, only when doing a 'continuous test' from my OBD2 reader, but it was not logged with the one mentioned above when checking CEL codes. Odd. I'm looking into this. Anyone have any feedback on this code/fix?


That new code is probably related to the gauge issue. It sounds like time to start tracing wires, check continuity etc, with the PCM disconnected(don't test probe the PCM pins at all).


As always - Thanks @CDW6212R !!

Anyone use the OBDLinks MX Bluetooth Device for OBD2 readings?

I have an Innova hand held - but its been with me many years and is a great tool...but having something a little updated would be nice to have.


There's another active thread talking about the Forscan software and device to read and do more than simple scanners. I'm watching it, but I don't know anything about the new devices available.


I am using the wired OBDlink SX with Forscan and it works just fine.


Quick update - still working on this beast!

I went to local JY and picked up power window regulator for the passenger front side. I'm happy to report, all original issues have now been fixed :cool: - (except the temp guage...)

I picked up a BAFX Bluetooth OBDII adapter and downloaded ForeScan. Great App. No major DTC's. Looks like the reader is picking up good engine temp numbers in the PCM, but not registering on gauge. Showing P0118 - Engine Coolant Temperature Circuit High Input code as well. Its great to see all the PIP's in action, including everything associated with the trans. No misfires and no reoccurring DTC's.

Placed an order for all the parts needed for SAS [springs, brackets and heims - Big thanks to @Bigred89 for the help] and SOA today. 33x12.5x15 tires and wheels to be ordered in weeks to come...

May start on 4406 swap to get that out of the way till the suspension parts get to my house.

Stay Tuned!


Sounds like fun, good progress. Spring will be coming truly in a few weeks. BTW, most of us gain an hour of daylight starting this Sunday. I love daylight savings time, and hate the Winter "let's make it get dark early" time schedule.


Join the Elite Explorers for $20 each year.
Elite Explorer members see no advertisements, no banner ads, no double underlined links,.
Add an avatar, upload photo attachments, and more!
.


I'm very happy with the Ex's current 'running' state so I decided its time to start upgrading the suspension. Everything I ordered for the modifications shipped to my place - time to get busy!

First thing first - Spring above the axle. After laying under it to get a plan together, I noticed some of the components on it could use attention. Being that I can be so **** about things, it figured it would be better to pull it and I can work all I need to much easier. I was very surprised, considering all the rust, clay and dirt stuck to the undercarriage, all the nuts & bolts came off very easily. There are no leaks. The hard brake line is pretty roachy, so I'm going to pull it off and bend a new one.

:bounce:
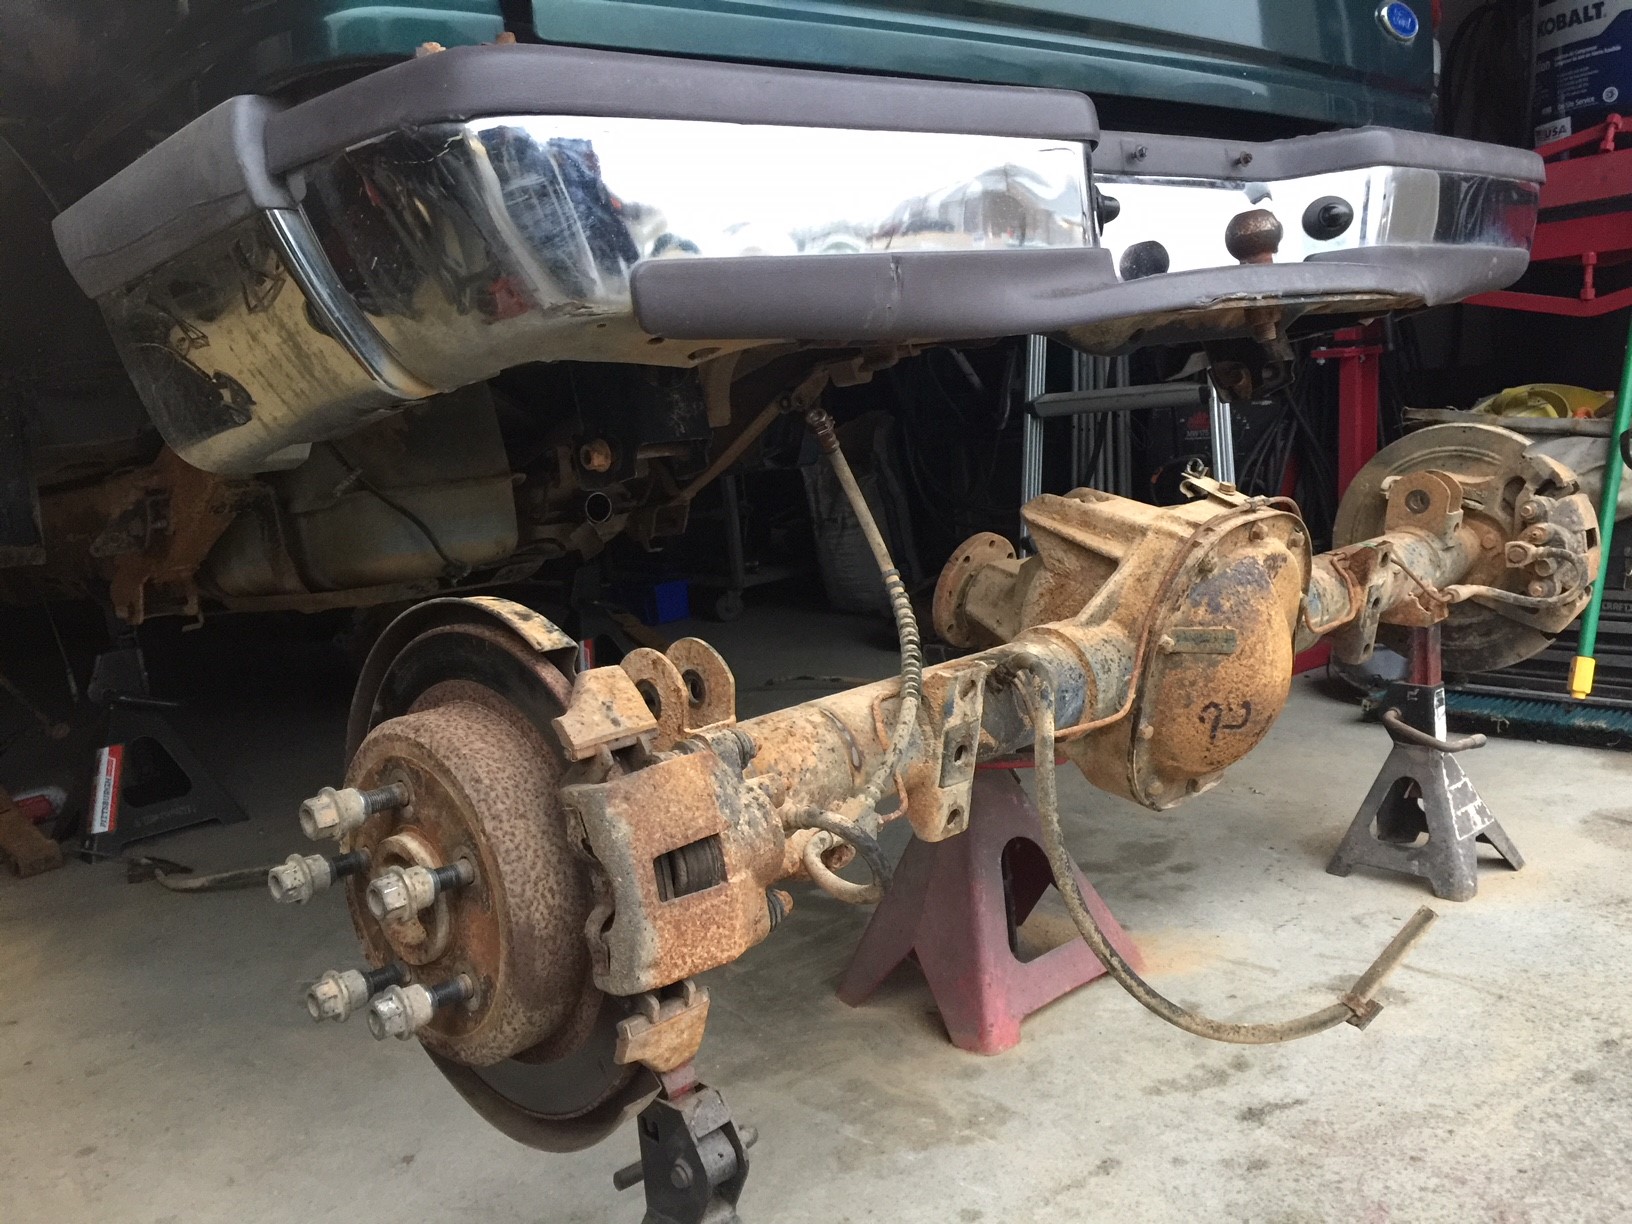
Speaking of brake line - since the Ex will be lifted, are there any suggestions on replacing or modifying the flex line to a longer one from the frame to axle assembly?

I will be keeping the sway bar so new custom links will be in order. All the unused brackets will be cut off clean and Ill probably put a clean coat of paint on it before I re-install.

Oddly for me, I never noticed the small track bars that connected to the frame. They will be removed unless someone tells me otherwise of their importance.

The leaf springs looked great. I am thinking of pulling the packs apart and cleaning and painting them. Has anyone had any issues cutting the strap off and pulling theirs apart. I'm hoping the centering bolt will come off "cleanly" when I do this.

:bounce:I'm debating on throwing on a set of Warrior Shackles - any thought to these?


RearEnd.jpg


:bounce:This rear also had the '5th shock' in place. I pulled it out and noticed this large 'balancer' mounted to the front of the axle as well. Can this be completely removed? What is it used for? Harmonics or balancing?

index.php


RearEnd1.jpg


Back
Top