kmack
Well-Known Member
- Joined
- December 28, 2000
- Messages
- 197
- Reaction score
- 119
- City, State
- San Antonio, TX
- Year, Model & Trim Level
- 1993 Ford Explorer
I needed something to create smoke so that I could see if there was a vacuum leak on my throttle body or intake. I also didn't want to spend upwards of $400+ for a professional smoke system. Even $40 for one of those party smoke machines was a bit too rich for my blood.
I'm thrifty, but the wife says I'm just a "cheap b*st*ard!" What can I say!

So, I ran across a couple U-tube videos for ideas and then decided to put something together based on different variations. I wasn't actually sure it would work, but for what I planned to spend (less than $20), I figured it was worth the try.
Here is my (ghetto) smoke machine build:
- pickle jar (free after wife finished the pickles)
- 30W soldering iron ($5.77 @ Walmart)
- air pump ($4.96 in fishing dept. @ Walmart - Baby Bubbles brand)
- bottle of Baby Oil ($2.47 @ Walmart - detecting a theme here?
 )
)
- old sock (doesn't have to be clean, mine wasn't)
- some JB-Weld (I already had this as most of us usually do)
- misc. vacuum line fittings/connectors (again, already had a stash of these)
- 2 AA batteries for air pump (stolen from an old flashlight)
- roll of tape (to hold it together temporarily)
My total outlay of cash = $14.28 after taxes! Well within budget!

The size of the pickle jar mattered to me. Going bigger on size allows for more smoke to build up inside the jar, but it also hampers the ability of the soldering iron to get inside the wick (sock). As mine sits now, the soldering iron is half-way down into the jar which I felt was a decent spot to be in (no full penetration jokes, guys...
 ).
).
Pickle jars work well because the lid will help hold a seal to the glass. The heat from the lid also won't transfer into the glass (much) so it will be easier to hold or move around. I thought about a metal paint can, but a gallon can seemed too big and I was concerned about the heat transfer. Just my thinking process...
Here's what ya do...
Drill a 1/2" (at least, but not too big) hole in the center of the pickle jar lid. You'll want some clearance around the metal of the soldering iron to keep the lid from getting too hot to touch. But don't go too big as you still need a surface for the iron to glue on to. Then drill two smaller holes off to the side of where the soldering iron will sit. These need to be the same size as your connector fittings (size based on what you have to use - mine were no bigger than 1/4").
Now mix up some JB-Weld (or other epoxy, glue, gum... whatever you decide to use...). Glue the soldering iron to the lid making sure that the iron is centered in the hole you drilled. I used a vise to hold the soldering iron point up. I spread some JB-Weld around the flat surface of the handle, then set the lid down on it. I let it set up for about an hour before I started messing with gluing the fittings in. Now glue your air line fittings in place.
If using JB-Weld, you'd best just finish drinking and go to bed as that stuff won't be good and hard until tomorrow!
 If you used a 5-minute epoxy, grab another drink, relax for a bit, and then continue on with this build! I used the JB-Weld over epoxy not just because it was what I had on hand (as I have both), but I know that JB-Weld deals with heat a lot better than 5-minute epoxy does, and I really wanted my cheap-a$$ build to last!

Now that everything has dried on the lid, mount up your air pump. I used a roll of blue painters tape and wrapped it two-three times. Not the best, not the worst, but it holds.
Connect the output side of the pump to one of the air fittings on the lid using a small section of the air line that came with the air pump. Connect up another section of line to the other fitting and this becomes your smoke machine output.
Roll up an old sock you pulled from your undies drawer. Place it inside the jar standing up on it's side so that the soldering iron will fit inside of the "roll." Now put some of the baby oil into the jar and let the sock soak it up. You want the sock completely soaked and about 1/2" of baby oil sitting in the bottom of the jar. This way the sock won't run dry and catch on fire. It'll char a bit on the inside, but that's fine.
This is along the lines of how a candle works. The wick won't burn as long as there is enough oil flowing up thru it.
Anyway, mount your lid onto the jar, plug it in, and wait.... It takes about 2-3 minutes to start building up smoke. Turn the air pump on make sure you see white stuff! When you do, plug the line into your vehicle and test away!
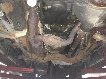
Here is mine working and finding my throttle body shaft leak...
I was initially concerned that the air pump might not put out enough air pressure for this to work. I plugged the air line into an EVAP port on the side of my throttle body and placed a rubber glove over the intake. During my test, the glove never moved but then I noticed I had smoke coming out of the breather line that connects to the resonator box. I plugged that line and immediately the glove puffed up with air and then smoke came out of the throttle shaft area identifying my leak.
Problems/issues:
One thing I did notice after my first trial run at making smoke - the soldering iron I bought will allow smoke to escape thru the handle of the iron. I had smoke coming up thru where the cord goes in the handle.
Using some E6000 Craft Adhesive, I filled in the cord area and a small hole in the side of the handle. This did the trick!
I also noticed that after running this setup for over 10 minutes, the lid still gets quite warm, so be careful with it.
Overall, I was rather impressed and quite amazed that this thing actually worked! Are there better ways to build this type of setup? Yes, but you'd be hard-pressed to build one cheaper unless you just happen to already have all the parts on hand.

I'm thrifty, but the wife says I'm just a "cheap b*st*ard!" What can I say!
So, I ran across a couple U-tube videos for ideas and then decided to put something together based on different variations. I wasn't actually sure it would work, but for what I planned to spend (less than $20), I figured it was worth the try.
Here is my (ghetto) smoke machine build:
- pickle jar (free after wife finished the pickles)
- 30W soldering iron ($5.77 @ Walmart)
- air pump ($4.96 in fishing dept. @ Walmart - Baby Bubbles brand)
- bottle of Baby Oil ($2.47 @ Walmart - detecting a theme here?
- old sock (doesn't have to be clean, mine wasn't)
- some JB-Weld (I already had this as most of us usually do)
- misc. vacuum line fittings/connectors (again, already had a stash of these)
- 2 AA batteries for air pump (stolen from an old flashlight)
- roll of tape (to hold it together temporarily)
My total outlay of cash = $14.28 after taxes! Well within budget!
The size of the pickle jar mattered to me. Going bigger on size allows for more smoke to build up inside the jar, but it also hampers the ability of the soldering iron to get inside the wick (sock). As mine sits now, the soldering iron is half-way down into the jar which I felt was a decent spot to be in (no full penetration jokes, guys...
Pickle jars work well because the lid will help hold a seal to the glass. The heat from the lid also won't transfer into the glass (much) so it will be easier to hold or move around. I thought about a metal paint can, but a gallon can seemed too big and I was concerned about the heat transfer. Just my thinking process...
Here's what ya do...
Drill a 1/2" (at least, but not too big) hole in the center of the pickle jar lid. You'll want some clearance around the metal of the soldering iron to keep the lid from getting too hot to touch. But don't go too big as you still need a surface for the iron to glue on to. Then drill two smaller holes off to the side of where the soldering iron will sit. These need to be the same size as your connector fittings (size based on what you have to use - mine were no bigger than 1/4").
Now mix up some JB-Weld (or other epoxy, glue, gum... whatever you decide to use...). Glue the soldering iron to the lid making sure that the iron is centered in the hole you drilled. I used a vise to hold the soldering iron point up. I spread some JB-Weld around the flat surface of the handle, then set the lid down on it. I let it set up for about an hour before I started messing with gluing the fittings in. Now glue your air line fittings in place.
If using JB-Weld, you'd best just finish drinking and go to bed as that stuff won't be good and hard until tomorrow!
Now that everything has dried on the lid, mount up your air pump. I used a roll of blue painters tape and wrapped it two-three times. Not the best, not the worst, but it holds.
Connect the output side of the pump to one of the air fittings on the lid using a small section of the air line that came with the air pump. Connect up another section of line to the other fitting and this becomes your smoke machine output.
Roll up an old sock you pulled from your undies drawer. Place it inside the jar standing up on it's side so that the soldering iron will fit inside of the "roll." Now put some of the baby oil into the jar and let the sock soak it up. You want the sock completely soaked and about 1/2" of baby oil sitting in the bottom of the jar. This way the sock won't run dry and catch on fire. It'll char a bit on the inside, but that's fine.
This is along the lines of how a candle works. The wick won't burn as long as there is enough oil flowing up thru it.
Anyway, mount your lid onto the jar, plug it in, and wait.... It takes about 2-3 minutes to start building up smoke. Turn the air pump on make sure you see white stuff! When you do, plug the line into your vehicle and test away!
Here is mine working and finding my throttle body shaft leak...
I was initially concerned that the air pump might not put out enough air pressure for this to work. I plugged the air line into an EVAP port on the side of my throttle body and placed a rubber glove over the intake. During my test, the glove never moved but then I noticed I had smoke coming out of the breather line that connects to the resonator box. I plugged that line and immediately the glove puffed up with air and then smoke came out of the throttle shaft area identifying my leak.
Problems/issues:
One thing I did notice after my first trial run at making smoke - the soldering iron I bought will allow smoke to escape thru the handle of the iron. I had smoke coming up thru where the cord goes in the handle.
Using some E6000 Craft Adhesive, I filled in the cord area and a small hole in the side of the handle. This did the trick!
I also noticed that after running this setup for over 10 minutes, the lid still gets quite warm, so be careful with it.
Overall, I was rather impressed and quite amazed that this thing actually worked! Are there better ways to build this type of setup? Yes, but you'd be hard-pressed to build one cheaper unless you just happen to already have all the parts on hand.