Explorer23
Well-Known Member
- Joined
- December 25, 2010
- Messages
- 381
- Reaction score
- 21
- City, State
- Columbus, Ohio
- Year, Model & Trim Level
- 92 Explorer
I had to change a few things with the mount but I will get to that. Also during this time I wanted to get the bumpers and body work finished up. My buddy sold our tough truck since we no longer had a use for it but I told him “Even if I don’t see a penny from the sale get me back my DOM from the roll bar”
Yup, I used the roll bar to make my rear bumper. The only part that isn’t “Toyota roll bar” is the reciver and the 1.5 V brace in the middle.


I left the right tube long in this picture because I was planning a swing out tire carrier. The bumper is not attached in this picture. I was really just trying to get an idea of how far back and down it would have to go to clear the hatch with a tire carrier.

Yup, I used the roll bar to make my rear bumper. The only part that isn’t “Toyota roll bar” is the reciver and the 1.5 V brace in the middle.
I left the right tube long in this picture because I was planning a swing out tire carrier. The bumper is not attached in this picture. I was really just trying to get an idea of how far back and down it would have to go to clear the hatch with a tire carrier.


 Tomorrow’s update should bring this thread back up to speed!
 )
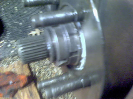
) It wasn’t until after it was in that I realized that won’t work without an open center diff. I kept it because it’ll work in 2wd or short pulls on ice. Other casses are an option (Jeep makes one with 2wd, AWD, 4 high and low) but for now I’ll probably stick with the BW1354. I haven’t got my hands on one yet but I want to stick my cable shifter for the Tcase somewhere between the brake and shifter. I even have a knob to match the shift knob.