Completed Project - TTB Terror build | Page 9 | Ford Explorer Forums - Serious Explorations

  • Register Today It's free!

Completed Project TTB Terror build

Use this prefix for completed projects that are not "How to" articles or threads asking for help.
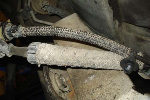
In that photo the axle is either 2 or 3 inches off the frame. I haven’t set the rear bump stops in place yet due to the sway bar mount. I feel like 2” off the frame is a little tight because that leaves about 1” between the tires and wheel wells, but at the same time I need all the rear bump travel I can get. I’m running the rear shocks at 40/60 bump/droop.

I haven’t weighed the rear yet but I’m thinking it’ll be in the 500/600 range for the springs.

The brackets were bought through a member. It wasn’t until way after I got the giant ones installed that I realized I wasn’t measuring my axle at ride height which is why my modified ones were still wrong. The lift height was also different and that messed up my rear shock travel also because when I first measured the shaft was sitting 50/50 at ride height.

Ah okay, I will be bumping all the way to the frame, would actually love to bump even higher than that but I don't want to notch the frame. But up travel is your friend when going fast. How close is the upper link's heim to the floor at full bump?

And 500 lb springs sound way too heavy to me with the shocks directly on the axle. I've heard in the 200-300 lb range is common, but I really don't know so I'll be interested to see what works for you.


Join the Elite Explorers for $20 each year.
Elite Explorer members see no advertisements, no banner ads, no double underlined links,.
Add an avatar, upload photo attachments, and more!
.


Ah okay, I will be bumping all the way to the frame, would actually love to bump even higher than that but I don't want to notch the frame. How close is the upper link's heim to the floor at full bump?

And 500 lb springs sound way too heavy to me with the shocks directly on the axle. I've heard in the 200-300 lb range is common, but I really don't know so I'll be interested to see what works for you.

Glad you brought that up. My upper link is starting to hit the floor right around there. I don’t have the driveline installed but it may also hit on my link cross member and may need attention down the road.

As far as the springs go you may be right I got told 5/600 as a guess but I found a calculator on crawlpedia that confirmed around 1000 lbs/corner over 2 springs was in that 4-500 range. I recommend checking there. FOA also has one that’s less in-depth and I can’t get it to work from my phone.

On a side note it’s cool you found this build since yours was one of the ones that got me hooked on the forum/prerunner explorers. I’ve been away for many years but I’ll have to check your build out when I get done here.


I wanted to get the sway bar installed before a shop got it but it didn’t happen. I did start on it though. I wasn’t sure how in the heck this was going to work but realized there was just enough room between the body and frame to stick the 2” DOM in there.
ABF67E4C-A9EB-419B-B8C3-6C133D686CF1.jpeg


With the torsion spring places there I could use the entire wheel well to place my arms. Still may need some adjusting though, it’s still stuck in the planning stages.
ACD86137-C3F5-4D0A-94DB-806403F5900D.jpeg

Just a little comparrison between the stock sway bar and this beast.
05386868-2BB4-4060-A68B-9021858946B6.jpeg


1.5” solid is insane but if it’s too thick I can tune it as needed.
46C7B470-7087-4B51-B6F8-6E0C560BAA15.jpeg


For anyone wondering these are all RuffStuff parts. Their bar was pretty expensive but it was nice knowing they could make it to fit my exact dimensions AND tune it for the length of the bar/arms. I had to give a vague estimated weight but like I said if it’s too stiff it just takes a lathe to soften it up a bit.


One of the last things I got around to was door skins, just the basics. Instead of rivets I used rivnuts and hex head cap screws. The idea is to keep these skins easily removable for speaker wiring and door popper installation. I flubed some of the holes so now I have the task of covering my aluminum door panels in... you guessed it, brushed aluminum vinyl wrap haha.
38CD88F6-710C-42CF-9B3B-CC16A010E1B0.jpeg
DEE9CD08-CAFC-40B3-A1FA-6B5A71560DC9.jpeg


Here you can see my tach installed, and if you squint there is a digital cluster sitting where the orginal was. It’s just sitting there for now but it will get installed eventually. I didn’t get a picture but I also have 2 trans temp gauges installed just to the right of the radio. One gauge for pre trans cooler one for post.
025C658A-57EE-4050-B89C-076A18844667.jpeg


7F39218C-4BA8-4AEF-884D-CD5E814D2C44.jpeg

PS I totally forgot to post a pic of the trans cooler so... here it is. Thing is a beast!


Here it is in all its glory, fenders are more attached than ever. The hood still isn’t attached and I was more worried about sticking as many lights on as possible so the shop would know what’s going where.
D8B4714F-7CBB-4BED-BA1B-E3D021713B92.jpeg
9B661FF2-2BBD-45F7-90DB-1359495BA609.jpeg
967646B6-1120-4ECB-9FCE-0EA5AB1E254D.jpeg
1DAA7250-F6FF-431B-91EB-C0EECCFDB44F.jpeg


I normally HATE LEDs but since they draw so little and are easy to come by they found their way on the bumper. It’s not the cleanest or the prettiest but I do t want to get hassled by law enforcement for something like no visible 3rd brake light.
5EC6AF39-82D7-4293-AFB1-1DF9EB25A706.jpeg


These front lights are the $10 harbor freight KC knock offs. They fit with the classic look but I may need to upgrade down the road.
B5E4D94D-77AA-4136-8167-CED943663EDD.jpeg


Things are looking pretty good at this point. That last group of pictures was from late November so we’re moving right along. I got as much done as I could before sending it off to “the shop” as I’ve been calling it.

Well, I got in contact with Nice59FordF100 and Kris Guilbeaux of Bandit Customs fame and it sounded like they could do everything I needed in their sleep. I’ve seen a lot of the work they do on Facebook and they have helped me with wiring questions along the way so there’s no reason I wouldn’t want it to go to them.

There was only 1 tiny problem with this plan. They are in Texas I’m in Ohio, and my 3/4 ton is a 5 year project itself :hammer:.

I decided to ship it down via enclosed trailer and labeled it as non running. Surprising my the broker found a carrier a few days after I contacted them and we set up a pick up time.

A few “before” pictures. I set the front about 1” away from full bump just Incase there would be clearance issues in an enclosed trailer.
8EB2EB94-721A-496B-86E3-FE79BA8A7862.jpeg
8F666952-8773-4847-B3DB-3CDCEED2A250.jpeg


I got a phone call from the driver as I was leaving work, he was on his way and gave me 45min notice. Thankfully I work 30min from the garage. Without going too in depth there was a lot that had to happen in that 45min for me to be ready but thankfully everything fell in place.
CEA7F9E7-03C5-4DE3-8575-0CE448C2F7F5.jpeg
B5373BB7-3DA6-4E3A-B4EB-C8EC5B82CA66.jpeg


We had to drag it up the 500ft driveway with no brakes and limited steering. Being at full bump I had some fender rub when I got past 3/4 of steering wheel travel.
5C16ADBA-35E7-4A2D-A36B-09EAF87899B1.jpeg


But it made it to the carrier.


36784CA2-86F1-4856-972A-FA0D858985CE.jpeg


Here you see the rare picture of me with it. Saying my goodbyes. :(
EBDCE8F5-A44D-42A1-8763-C9C325350393.jpeg


It was a sight to see that’s for sure. This was loaded on a 2 lane road and these guys had to pull 4 cars out of their double decker trailer just to get it loaded. The whole ordeal took 2.5 hours from arrival until they left.
9FF692E7-A8A7-4AE3-8C62-06F8F0A53AC2.jpeg
7C58A3EC-50BF-4109-9030-5CF7FD3A9EB7.jpeg


This is where my story ends for now. My explorer is now safe and sound in the hands of some of the most experienced explorer mechanics I know of and... I’m here on the couch, updating a post I started 5.5 years ago. I mean I can’t work on it and my girlfriend is tired of hearing about it so why not share it with fellow explorer fanatics right. :wave::salute:


Mike, I'm glad we can be of assistance with you and your build, and as we tear into it and complete the necessary repairs you want, I will update this thread (with your permission of course) :)


That works for me! Heck finish my truck and my build thread, who’d a thunk it haha. :dpchug:


@Explorer23, right on! I'm excited to get started on it very very soon! Quick question (as I'm not in front of the truck at the moment) what is the bolt pattern of the wheels?


Ok perfect. Was gonna put some roller wheels on it for easy movement is all


Here we are a little over a year and a half later and it will be on it's way home soon. I know forums are a dying breed but its nice to have someplace off F***Book to show progress. While it was away it was discovered that my running issues were due to the wrong fuel pump being used and possibly wrong injectors as well. After this was sorted out it was discovered the heater core was leaking... one of those "it was fine when I sent it" deals, oops. Then it was discovered the engine was getting blow by and the rear main seal was leaking. Again... I thought it was fine when I sent it out but never had it running long enough to really say for sure. I would've got these issues fixed for sure before I sent it had I known about them.

After those issues got sorted out the real fun could begin. It got the wiring gone through so thankfully everything should work properly now. I got a lot of little nick nacks and doo dads I wanted to add but didn't have the know how. "Custom" gauge cluster, dual trans temp gauges, tach, switch panel, rock lights, interior lights, and door poppers. All easier said than done and they helped get it there. It is supposed to be shipping out soon and I cant wait to see the work for myself.

I have a wedding coming up in October, the original plan was to get it ready for that but I don't see that happening now. Slow and steady wins the race and that's the current plan. I think the first plan is to measure for springs, get shocks ordered, get drive line measured and ordered, then get it back under the knife for the engine work required to fix the blow by and rear main seal leaks. Then... paint? maybe?... Sounds too easy.

Word of advice never put "terror" in the name of your project. This thing has fought me and now bandit customs every step of the way haha.


Back
Top