BTF Upper Control Arm Installation | Ford Explorer Forums - Serious Explorations

  • Register Today It's free!

BTF Upper Control Arm Installation

Jacob Linder

"Roadhouse" - Peter Griffin
Joined
February 4, 2016
Messages
254
Reaction score
33
City, State
Chickamauga, GA
Year, Model & Trim Level
06' Explorer EB 4x4
Good Morning to ALL!

I took a small leave of absence from the forum. I'm one of the admin on the large Explorer Club on facebook and it had pulled me away. However! I still believe forums to be the NUMBER ONE sites for information regarding fixes.

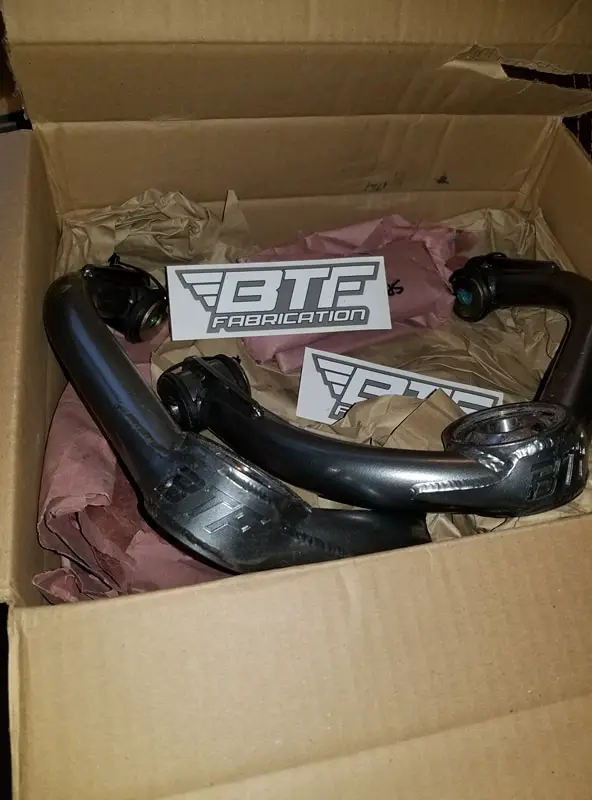
The Winter was a long and nasty one, but it gave me a chance to do a few things that I desperately needed to do to the Explorer. I FINALLY GOT MY BTF ARMS. Installation is a breeze with these things because Ford made it insanely simple to replace control arms.


WHAT YOU WILL NEED:
1. Remove wheels and get truck up on stands.
2. 1/2 inch ratchet
3. 13mm socket
4. 18mm socket

Optional:
1.Ball joint separaters (Doubt you'll need them because youre replacing the arm anyway)
2.Cut off wheel (I needed it because I couldn't get the driver side ball joint to stop spinning, so we cut off the joint)
3.PB Blaster


STEP ONE:Remove the 13m nut connecting the balljoint to the knuckle


STEP TWO: Remove both 18mm bolts holding the upper control arm in (has stopper on other end so you wont need grippers to keep from spinning


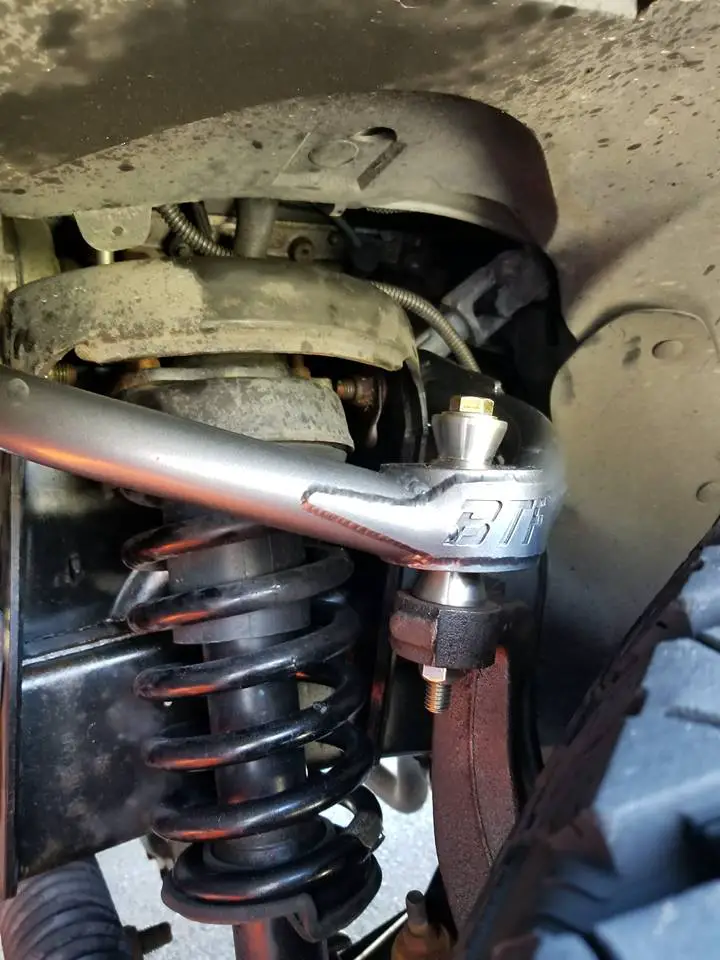
STEP THREE: Reinstall both 18mm bolts to BTF arms (Comes with 2 washers to create tight fit DO NOT USE HAMMER TO PUNCH IN)

STEP FOUR: It's a uniball rather than joint so insert both pins into ball and tighten 13mm nut back to the knuckle.

STEP FIVE: They are adjustable, so you will have to play with the camber to get them where you like, and get an alignment.

I understand I suck at explaining things, so if there is additional information that i missed please chime in. Thanks!


Join the Elite Explorers for $20 each year.
Elite Explorer members see no advertisements, no banner ads, no double underlined links,.
Add an avatar, upload photo attachments, and more!
.


This thread has great photos. ive beeen looking to do a full lift on my truck and couldnt find anybody who had done this with these control arms. i keep seeking people throwing spacer blocks on their coilovers and over stressing the UCAs. Im glad someone else has the where with all to properly do it.

what were some issues that you came in contact with other than the spinning ball joint. also how long did it take you and do you feel a ride difference?


Was the taper on the uniball spacer piece right for your spindle? I tried to install these on my '10 Sport trac today and had to back out because the spacer did not fit the spindle correctly. Like it was over-milled.

20190427_194842.jpg


Was the taper on the uniball spacer piece right for your spindle? I tried to install these on my '10 Sport trac today and had to back out because the spacer did not fit the spindle correctly. Like it was over-milled.

View attachment 169936
It should sit in the middle i believe. it's been a minute lol but after the uniball is inserted into the arm it shouldn't sit that far up.


Yes, the uniball portion is correct. I'm talking about the bottom of that spacer where my finger is pointing; the part that inserts into the knuckle, and then the 13 millimeter bolt goes through to attach the knuckle to the arm.
Turns out that BTF has been using the wrong dimensions for that taper piece.


Was the taper on the uniball spacer piece right for your spindle? I tried to install these on my '10 Sport trac today and had to back out because the spacer did not fit the spindle correctly. Like it was over-milled.

View attachment 169936


are you saying that the BTF uppers dont fit on the ST? ive seen a TON of other members use them with 0 issues. curious as i just bought some 6 weeks ago.... still waiting on them FFS


Before you get too far into installing them, separate just one of your upper ball joints and test the fit of the piece my finger is pointing to in the picture above. make sure it fits into your knuckle snuggly. BTF had been making these wrong and were unaware of it. If that part is NOT snug in your knuckle, contact them. If they haven't sent yours out yet, chances are that they built yours to the new (correct) specs and you will be fine. But all the one's built prior are machined incorrectly and don't fit properly. Apparently many have been installed anyway and people are not aware of the problem.


Before you get too far into installing them, separate just one of your upper ball joints and test the fit of the piece my finger is pointing to in the picture above. make sure it fits into your knuckle snugly. BTF had been making these wrong and were unaware of it. If that part is NOT snug in your knuckle, contact them. If they haven't sent yours out yet, chances are that they built yours to the new (correct) specs and you will be fine. But all the one's built prior are machined incorrectly and don't fit properly. Apparently many have been installed anyway and people are not aware of the problem.

ahh! im sorry! i miss interrupted what you were saying. the taper is over milled as in: its to skinny relative to the knuckles taper. so unless you really snug the bottles which still isnt a great solution - there is going to be vibration and movement.

the ole hot dog down a hallway analogy came to mind.


"Hot dog down a hallway" analogy... HAHA! Perfect. Yes.
I have talked to at least one other guy who has seen others install them and just tighten the bejeesus out of them... Yikes!
The guy at BTF was more than accommodating when I brought the problem to his attention. Any made after 4-29-19 should be correct. I would assume that any made, but not yet shipped, by that date would also be remedied prior to shipping...BUT CHECK!

absolutely right, gave brandon a call (super nice btw) and they are having the machinists manufacture new ball joints so any UCAs ordered or on back order are receiving them, thus my delay. - Rather have a good product tho!

inspection due at the end of the month. looks like i am going to be out some money for new UCAs in the mean time....:banghead:


Yep. I agree. Seems like a great guy. Thanked me several times for bringing this to his attention and didn't try to hide behind some BS like so many people do when a mistake is pointed out. I will highly recommend his products based on his ethical attitude. AND great products.:)


BTF UCAs should be here by thursday:cool:
if i install these on my stock ST without the lift will i need an alignment? -- not having the truxx lift means the suspension angles wont be change?
- have the truxx sitting here with me but i want to wait until i have new struts that i have on order before adding the lift.

have inspection in 7 days and dont think my current (original mind you) UCA will pass because the bushings are pushing out.


Yes. Your upper control arm is where most of the alignment takes place, the tower they bolt to is slotted. And, I'm not completely sure it will come into alignment at all with stock height with these. They are longer to accommodate the angle of the lift. Without that angle, you may not be able tuck them in far enough for correct camber.


Yes. Your upper control arm is where most of the alignment takes place, the tower they bolt to is slotted. And, I'm not completely sure it will come into alignment at all with stock height with these. They are longer to accommodate the angle of the lift. Without that angle, you may not be able tuck them in far enough for correct camber.

have everything apart right now. i notice they sent me a bunch of washers too. did you use any?


Yes. Use them to take up any space between the frame mount and the control arm bushings. If I remember right, I think I ended up needing two per side.


Yes. Use them to take up any space between the frame mount and the control arm bushings. If I remember right, I think I ended up needing two per side.
i installed everything... what a PITA for the rear. snapped a bolt on one strut that was rusted but just the tip luckily.
anyway.... alignment is bad. positive camber and toe issue.. how are these UCAs adjusted? do you need camber bolts? or does the flag nut on the back act the same way?
stopped at 2 shops who said they wouldn't touch it. and dropping it off at another shop tn. who said they can actually do it. reason i ask is that the shop mentioned adjustable bolts but they shouldn't be needed?


Camber and caster is all done with the mount bolts. If you looked, the holes they go through on the frame tower piece are slotted. can't imagine why any alignment shop wouldn't be able to do it. Toe is just adjustment sleeves on the tie rod ends I believe.
get a good shop and you'll be fine. No special camber bolts or offset washers required.

yeah you were right, i knew the flag nuts were flag nuts for a reason. but OH boy was it out of alignment, rear and front were BAD. was super sketchy driving it the 2 miles to the shop. under 25mph.

couldn't get the front to the recommend camber from TRUXX tho. .3 drive and .4 passenger. was able to get caster and toe into recommended spec.
either way truck drives and great and has no pull. and the UCAs feel great

will post picture to the photo thread once i clean it up!

** side note i would use a paint market to mark where the flag nuts and bolts were on the stock before removing so the alignment isnt crazy off like mine was...


I don't think paint marking the old arms would have helped you. These arms are longer so would have still placed your spindle differently. I am surprised they couldn't get the proper camber, though?? Was your TRUXX lift not enough to take up the added control arm length? .3 and .4 Positive, or negative? Has to be positive, right?


Join the Elite Explorers for $20 each year.
Elite Explorer members see no advertisements, no banner ads, no double underlined links,.
Add an avatar, upload photo attachments, and more!
.


Back
Top