Bkennedy's SAS and Rebuild Thread | Page 115 | Ford Explorer Forums - Serious Explorations

  • Register Today It's free!

Bkennedy's SAS and Rebuild Thread

As some of you know, I am working on building a parts list for a shortened Dana 44, long radius arm with coil overs SAS. 5:13 gears to match my rear axle and an ARB, maybe an electric locker. I have a pretty good list so far. At the same time, I am going to swap out the rear drum brakes for discs off of a 99 Explorer.

Please note: The plan is to keep this project as simple as possible with mostly off the shelf parts. I am not a fabricator, just a decent welder with a what I would consider the minimum required tools (chop saw, cut off wheels, air tools, welder, etc.), who likes doing his own work. Your opinions are welcome, but what I really need is technical advice. I have been thinking about this for several years and now have the time and cash to make it happen. Please keep on topic with your advice and don't go off on a side track about how you would do it as a four-link, or caged arms, or leave the axle full-width because that is not what I want. I want a simple-ish set up that works.


Join the Elite Explorers for $20 each year.
Elite Explorer members see no advertisements, no banner ads, no double underlined links,.
Add an avatar, upload photo attachments, and more!
.


I wanted to be of some help for you, but I don't think I can be. Our set ups are just too different to cross reference.

I took a picture anyways. The Atlas is clocked at 30*, and the 3" Body lift really shows here. There is about a 4.5" gap at the top, but my high point, is not your high point. Sorry, I tried to be of help. If your wondering what is on the tunnel, I have a rubber floor mat on the tunnel to help seal it up from underneath.

Atlas tunnel gap 1.jpg


Join the Elite Explorers for $20 each year.
Elite Explorer members see no advertisements, no banner ads, no double underlined links,.
Add an avatar, upload photo attachments, and more!
.


Nope, no help at all...:D

I am returning the early Bronco mounts since they will not work.
This time, I did a little research on Energy Suspensions website and found these:
Energy Suspension 9.9530 Polyurethane Pad Set - Round | Energy Suspension Parts

They are 1.5" wide, 3/4" tall and have a 7/16" bolt hole. Bolt hole is same size as the transmission mount and they are about the perfect height. I did a chat session and they are primarily used for engine mounts or isolators, so I think they will be just what I need for what I have in my head. If they don't work, I will go back to using the GM universal style mount with a torque arm.

I also purchased a set of their frame side leaf spring bushings as mine are OEM and they were only $15.

My buddy Ken texted me and says he has a piece of 1.5x3", 1/4" wall for me. Its a little more beef than I need for the cross member, but it should work fine. Sarah has a horse show this weekend and I am working Monday/Tuesday, so I won't have any real down time waiting for parts.


Autofab makes some nice transmission mounts, he may have one that can work with your new crossmember and 700r4? I had his 4.0 / A4LD / 5r55e mount before my 5.0 conversion so I modded it slightly to fit the 4r70w.

Autofab


T case install is looking awesome so far


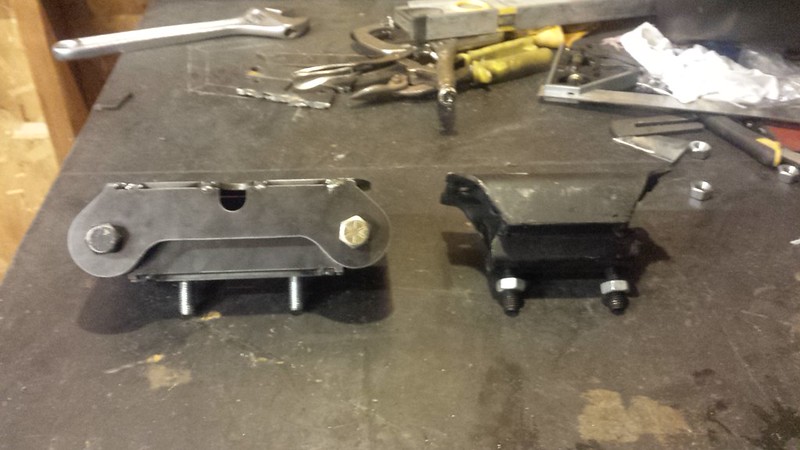
@RockRanger had made some custom trans mounts to replace the factory one that use leaf spring bushings. I have one I never installed. I was going to use it for the Navajo probably when I do axles. Maybe his would work for you. I'm sure he still has the file to cut some more out. If needed, I can send you my set and Matt can just cut me another when he has time.
15890102937_53c8b0b94b_c.jpg

qd9W12


Thanks everyone, but I want to do my own thing with this so I can use the cross member as a transmission / skid plate mount. I also want the transmission mounts to be about 10" apart so they will prevent torque twist.

Not too long after I did the 700R4/NP231 combo, the adaptor to transmission bolts pulled out of the transmission housing. Had to get towed back to camp by Maniac and it was at least 10 miles. I repaired the threads with coil inserts, and rebuilt the cross member adding a torque arm. After the SAS, I modified the cross member once again, this time to mount bigger skid plates. I never really liked the way it was set up, so this is my chance for a redo.


All this work on the Atlas and I stopped getting updates. I am still running the mount Steve posted. It has been great.


All this work on the Atlas and I stopped getting updates. I am still running the mount Steve posted. It has been great.

Your welcome:D


While I have the front half of the interior out, would anyone suggest laying down some sound deadener / heat shield? Most of my OEM stuff has fallen off, or been scraped off for one reason or another. I was thinking it would help with tire and road noise and I have heard the Atlas whines on the highway, and might be easier to seal the floor than filling all the holes with sealant.

If so, what do you suggest (remember I am cheap)..


I see dudes use the metal tape made for roof repairs, you know that aluminum stuff that is about 6" wide with tar on the back? Often used to fix RV roofs?
You lay it down then hit it with a torch real quick, it gets gooey and sticks to your floor and molds to the floorboards. A cheap version of dynamat.
Then put the carpet down over that
the bonus is the tar side will seal up small holes and keep water out. So if you prep your floor properly its almost like a sound deaden-er and a water proof coating at once.

When we did the NP205 case, I heard all sorts of stories from many forums as I was researching the t case. You cant run a gear drive case in a daily driver, they are noisy, they are no good over 60 mph, You have to run gear lube, you have to run ATF yadd yadd yadda etc etc> peoples misconceptions are funny. GM used the NP205 from like 1969 until like 2001 or some crap and it had everything from gear lube to ATF inside it from the factory.
The NP205 is no noisier then a stock 5.0 t case, it works just fine at 70 or 90 mph, no weird or strange noises, and we run mercon V in ours.....its working just fine.


Yeah, the board is back up!!

I finally got the cross member finished, except for the skid plate weld nuts. Those will go in when I drill through the skid plate and into the cross member to line up the bolts. It came out great. Six bolts to install and remove, angled brackets so even if the bolts fall out it will stay in place, nice flat surface to mount skid plates. It was an interesting day; All of my larger drill bits decided to suck, my auto-darkening welding helmet decided to quit working in the middle of a bead (I am still seeing spots), and one weld required me to lay directly underneath it and you all know how that goes (raining spatter). But, I got it done:
20190816_180936.jpg

20190816_180949.jpg


20190816_181043.jpg

The goal for the day was to have the transfer case sitting on the work bench.
20190816_180747.jpg


Are you going to do some bracing on the frame mounts? Maybe a triangle front back? Other than that looks great


Are you going to do some bracing on the frame mounts? Maybe a triangle front back? Other than that looks great

I am still thinking on that. The other cross member was bolted to the bottom of the frame instead of welded and was angled about the same. It was there for years and held up fine. The reason I welded this one to the frame is because the bolt heads would on occasion contact the radius arms. If I do gusset it, and I probably will, they will have to be small triangles in the corners to make sure I clear the radius arms.


nice looking work!
I have my "through wrench" hanging on the peg board front and center also...I LOVE that tool. Did you know the head of the through wrench socket itself is 18mm and it works perfectly for getting motor mount bolts under the exhaust manifolds. Funny looking at the pegboard and tools hanging, I have similar tools hanging up front of the work bench area, plastic scrapers, triangle,

I agree with some sort of gusset, even just an additional piece of angle welded on top? Like double thick at the corner? No triangle hanging down for radius arm clearance Clarance

Does the clock ring / rear mount come with the Atlas? Or did you have to buy separate?


I am going to take everyone's advice and add some gussets. Can't weld gussets on top because I don't want to possibly interfere with the front output on driver side and the passenger side has the exhaust running through against the frame rail. I will have to weld some small gussets on each end on the inside of the triangle. I can curve the leading edge to make sure they stay away from the radius arms. The plate on the frame is welded on the top at the inside edge of the frame, and all around the sides, and I even plug welded it through some old bolt holes in the frame. Having the cross member bolted to it, and having skid plates bolted to that and the frame, should keep it from falling apart.

I noticed a while ago that the transmission seems to not be square at the output. Its turned slightly so that the adaptor transmission/transfer case cross member mount is a little crooked and it puts more pressure on the passenger side bushing than the driver side. The transmission is slightly down on the passenger side so its not the adaptor. Its easily corrected with one more washer on top of the high side bushing, but I would like it to be square. I think if I loosen the engine mounts and shift everything around it might straighten out. If that doesn't work, then I could fab up a shim plate to go under the passenger side engine mount.

410, I didn't know that thought socket itself was a 18MM, that will come in handy.

I spent some time this morning messing with the cable shifter assembly. The instructions are very detailed. On the included instructions, I couldn't see the pictures so I printed a color set off AA's web site. It seems to shift fairly easy and very smooth. There is some play in the cable which I tried to get out and ended up having to start over. I guess the play must be normal since my NP231 cable shifter had more play than this one.

Shifter assembled for bench test:
20190817_120242.jpg

With the cables twisted as shown in the picture, the transfer case still shifted smoothly. It shouldn't be that extreme under the Explorer.

Transfer case side:
20190817_112746.jpg

Shifter side:
20190817_120256.jpg

20190817_120306.jpg

Rear in Hi, front in N
20190817_120356.jpg

Both in Low
20190817_120603.jpg


The shifter side will need to be disassembled, and the transfer case installed with the cables attached. I can push the cables ends through the hole I need to cut into the floor for the shifter install, mount them to the shifter and then mount the shifter to the floor.

The clocking ring is more of a 1" spacer with a few options. The Atlas has numerous clocking options.


I added three small gussets to each side of the cross member mounts. Someday, I might remove the radius arms and clean up the booger welds.
20190819_184112.jpg

I spent a few hours messing with the engine and transmission mounts trying to get the lean out of the transmission mount. After loosening, shifting everything around and tightening a few times, I realized that was not going to work. I fab'd up a 1/4" thick shim and knocked it in between the upper passenger side engine mount and the engine plate. The transmission output is near perfect level. After I tightened the mount bolt, I welded a bead on the shim to keep it in place. Its no surprise that something is out of alignment after all the repeated beatings, repairs, welds, modifications...
20190819_162207.jpg

20190819_184026.jpg


I also painted the cross member and mounts, and got the Atlas ready for final install (removed shifter side cable hardware, filled it with fluid, installed sight tube). I pulled a bonehead move by removing all of the mounting studs before marking which holes they went into. I was going to clean them up and reinstall with thread locker, but now I am not sure which clocking hole they came out of. Need to wait until I get it up and clocked again, then pull it one more time to install the studs and sealant.

New crossmember next to old;
20190819_185452.jpg

I didn't put in the weld nuts for the skid plate yet. I am going to wait until the skid plates have been modified, then drill through them into the cross member to line up the holes. That might be after I drive it for a while. Supposed to put 500 miles on it before flat towing.

I plan on settling on a location for the shifter and cutting a big hole in the floor tomorrow. Maybe get the Atlas installed. I would like to get it installed so I can take my drive shafts to be modified. I ordered some "Killmat" sound deadener/heat barrier. I thought it would be an fairly easy way to seal up the floor, and quiet the interior up a little at the same time. That should come in tomorrow or Wednesday and I will need to get that installed before I install the shifters and the rest of the interior.


I'm stuck for today. The shifter cables are too long and will be right up next to the exhaust pipes where they run along side the transmission. Also, the transfer case side of the cable mount is touching the shifter side, so I need to see if I can twist the output slightly and have it still function. I have a call into AA to see if there are shorter cables, or if I should just order the solid mount shifter for the Explorer and see how that fits with my center console.

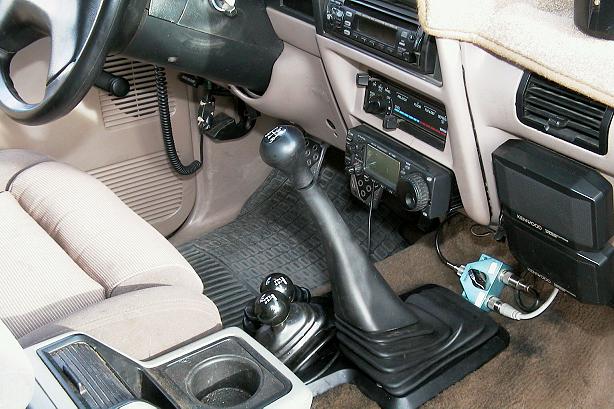
@Rick, I have a shot of the underside of your shifter, but not one straight on from the top. If the sticks are to the left of about a straight line from the driver side of your center console, then they should clear my console. Its no wider than the stock console, just longer.


Join the Elite Explorers for $20 each year.
Elite Explorer members see no advertisements, no banner ads, no double underlined links,.
Add an avatar, upload photo attachments, and more!
.


Thanks Rick. I think that will clear, hope it will clear. I just got off the phone with Vic at AA. He recommended I get the Explorer shifter kit so I ordered it. He went out and measured out the tube that all the shifters attach, to see if it would be where I wanted it. My transmission is about 5 inches shorter than OEM, but there is an adaptor that takes up a few inches, so it will be a few inches forward of where yours sits. Did you install the linkage to the transfer case, then install the case?

Know anybody who wants a complete, partially installed cable shifter?

Well, I guess I should get back out in the garage and pull the transfer case again.


Back
Top