1997 "white" 4.0 SOHC Upper Intake Removal & primary and D side secondary chain guide repair | Page 2 | Ford Explorer Forums - Serious Explorations

  • Register Today It's free!

1997 "white" 4.0 SOHC Upper Intake Removal & primary and D side secondary chain guide repair

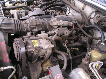
Brrr. I just opened the hood and looked and I was able to get every timing cover in to the block bolt(s) out with the bracket disconnected from the head. I'm considering moving the truck out of the shade. I'm not getting any winter sun shining on it.


Join the Elite Explorers for $20 each year.
Elite Explorer members see no advertisements, no banner ads, no double underlined links,.
Add an avatar, upload photo attachments, and more!
.


Yes sir, I have that thread bookmarked.

Also I believe I am going to go ahead and pull the radiator.

Thanks again for sharing your posts.

Doc


Glad I pulled the radiator, following you on that. I am thinking the PS pump & reservoir I should have left on, and abandoned loosening the AC compressor. Where I am now is all cover bolts removed, HB bolt removed with impact, waiting until later to borrow a harmonic balancer puller.

Doc


I'm at the point where I'm sliding the HB/Damper off of the crank. I have an inch longer smaller bolt in the threaded end of the crank. You could use a 6" long bolt and cut the head off of it so that the 1/2" head wont get crammed in to the hole in the middle of the damper by the puller tool.The 5 ear tool is working using the two slots across from each other. Jaw pullers will pull the rubber infused damper apart. I've decided to rotate the crank to TDC while I can still use the sensor timing mark ,
However, I'm halfway around the revolution on the crank away from the marks and the squared off cam sensor part made on the cam is pointing up which if I read correctly is TDC for the cam and I am either feeling compression lock or valves touching the pistons. I'll have to read again and if this is the case, Question?? Is there a position that the cam can be rotated to so none of the valves are open? Of course I would have to remove the left side gear and chain?
Also when @tdc is the damper keyway at the 12 O'clock position?


The only way I know to close all valves simultaneously is to remove the followers.

When at TDC the keyway is at 12 o'clock. I believe what you want is TDC of the compression stroke on cylinder #1.


Cover is off. Primary Chain tensioner is broke. The Balance Shaft Chain is loose and tensioner damaged as well as the Drivers side Secondary Chain is loose and broken plastic cassette/guide.:(


I still don't have the timing cover off, but I do know from looking in past the camshaft sprocket that the guides on the secondary chain are destroyed, and I would imagine that the jackshaft chain guides disintegrated long ago.


The Sun went down before I could get the RH valve cover loose and off. I will not be surprised if the RH tensioner guides are bad too. Even though the mileage is lower than some other 4.0 SOHCs still running, I suspect extreme engine heat as the culprit causing the guides to breakdown. This truck is clean enough on the inside that makes me think that the AC was used all of its life causing more engine heat. I thought about removing the camshafts to make all of the valves closed to do a cylinder pressure test if there is a device that is like a compression or air pressure gauge and some fittings to pressurize each cylinder to see if the valves are bent or not and if each cylinder will individually hold without leaking down.
If I have to pull the whole engine to do the RH chain assy, I am going to close everything up and shift back to my garage project and get my forms built so that I can get a slab of concrete poured to have a place to use a jack, stands and an engine hoist. I'm about out of work to it that I can do in the grass/yard.
TOOL:Cylinder Leak tester-OTC 5609 Leakage Tester - Compression / Press Test
TOOL IN USE


From the loaner tool program I picked up the master harmonic balancer removal/install kit. It comes with M8x1.25x80mm bolts...way too short. I will have to get longer ones (100mm) before I continue.


I used 120 mm but 100 mm should be fine to


Once I procured the longer bolts, the balancer pulled off with ease. Primary and balance shaft components are still in excellent shape. I have the secondary chain tensioner loose, and using the flexible claw retrieval tool have managed to recover nearly all fragments of the traction side guide. The tension side is still intact. Now I need to study Streetrod2000's article a bit more to see if I can manage a cassette replacement. I have a Ford camshaft holding tool that I use on the modular V8s, and if I loosen the oil rail it will fit, but it will need a plywood shim under it. So maybe it will be useful but still I will have to do a lot of improvising.

One thing that did happen was when pulling the timing cover away from the engine block, a bunch of coolant poured into the crankcase.


I found pieces of the primary tensioner down in the RH front corner of the oil pan almost jammed in the balance shaft tensioner area. Has anyone discovered this on theirs that the broke primary tensioner parts damaged the tensioner for the balance shaft chain?


During lunch break I finished the quite lengthy disassembly process, finally removing the failed tensioning/guide assembly. What I did was immobilize the the jackshaft sprocket in both directions using techniques gleaned from Streetrod2000's guide. Then I removed the oil rail and fitted my Ford camshaft holding tool to the camshaft, adding a sturdy wooden spacer 1.5" wide 7" long by ~14mm thick across the cylinder head to make up the difference. I tightened it down and removed the camshaft sprocket, thus allowing removal of the guide assembly. Now I need to find a guide assembly of reasonable quality and start putting everything back together.


I'm looking at parts with the assumption that I will be doing something to all 4 chains. This RA parts kit by Cloyes 90398SB looks to have everything related to the chains, however, I will need a few gaskets. I guess if one is that deep into the engine then the chains should be replaced too...
9-0398SB__ra_p.jpg

Here is a link to the RockAuto page
https://www.rockauto.com/en/catalog/ford,1997,explorer,4.0l+v6+sohc,1119675,engine,timing+set,5756
Would the tensioners in the picture be the improved design?
And What is this? Melling 3398S


Donalds, What brand of parts did you use?


I bought a new engine lol


drdoom….do you have an update?


Not yet, I had a couple other vehicles come in for repairs and have not been working on the Explorer.

The chain guides came in on Monday, so I should be putting things back in place soon. I will post an update when I do.


Join the Elite Explorers for $20 each year.
Elite Explorer members see no advertisements, no banner ads, no double underlined links,.
Add an avatar, upload photo attachments, and more!
.


Late Saturday afternoon, I finally was able to put my hands on the white '97 again. I am working on this at home so I am unable to work on it any days in a row unless the weather cooperates on Saturday and Sunday.
I was pleasantly surprised when I removed the passenger side valve cover (this will require a 1/4" drive 8mm socket, swivel, 6" extension and 1/4" ratchet to remove the bolts) to find the rear chain tight and all of the guide and tensioners in place. My first thought and words were "Hot Damn!" which is not a phrase that I recall using recently. I was prepared to see the same kind of destruction that I saw on the front of this 4.0 SOHC under the "D" side valve cover and behind the timing cover.
Finding the right hand timing components intact supports my theory that one plastic guide/tensioner failure on the front of the engine may have led to another on the front getting damaged and failing when plastic pieces from the first failed/broke and got jammed in the others between the chains and guides. Just a theory... any positive input?
One of the chains has jumped/slipped. When my crank/damper keyway is at the 12'oclock position, the cam sensor "nub" is not perpendicular to the VC mounting plane of the head. Nor is the 6mm allen wrench plugged in to the notches of the camshaft parallel to the plane of the head. I didn't look at the cam alignment on the passenger side head with cover off. I was also happy that I will not be pulling the engine and by this time it was 4:20 p.m. Central time and was time to "fire up" the grill. Today after the rain passes I will lift that cover and look.
Questions & thoughts: Can I purchase just the guides and tensioners? I am finding a few pieces available but not every front piece. The chains and gears appear to be in great shape. The big question is , Are 3 or more valves bent? I am going to buy a tool like this to pressure test the cylinders/valves...
OTC 5609 Leakage Tester - Compression / Press Test
I will be renting the OTC cam alignment kit if I end up needing it. I will not purchase it for now, that is a one car garage concrete slab for me...


Back
Top