How to: - 2013 Explorer 3.5L Ti-VCT V6 Water Pump and Timing Set Replacement | Ford Explorer Forums - Serious Explorations

  • Register Today It's free!

How to: 2013 Explorer 3.5L Ti-VCT V6 Water Pump and Timing Set Replacement

Prefix for threads which are instructional.

mkennedy100

Member
Joined
October 4, 2002
Messages
11
Reaction score
5
City, State
Maryland
Year, Model & Trim Level
2013 Explorer Limited
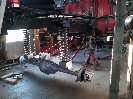
Hi All. Recently changed out the water pump on my 2013 Limited and replaced all timing components while I was at it. Watched the YouTube videos by fordtechmakuloco and the tips posted here by mcpcartier (Thanks to both!). Happy to say that it was a success and I think I caught the failing WP before any coolant contaminated the oil (at least based on visual examination). I wanted to pass along a few tidbits that might be helpful to others contemplating this job.
  • It’s a big job but more tedious than physical. I followed the FSM but for one key difference: Like mcpcartier suggested, I did not evacuate and disconnect the indicated AC line. The AC line is in an inconvenient location but you can work around it. I used a zip tie to hold it out of the way as much as possible without damaging the line.
  • It took me roughly 20 hours split over 3 days in total but I’m slow. I could do it faster now that I’ve done it once but it would still be a 2 day job.
  • I was alerted to the problem by a smell of coolant when the engine was hot and the undeniable coolant dribbles on my driveway. Coolant level was also low in the degas tank. Lastly an inspection of the area near the water pump weep hole showed an obvious stream of coolant leaking right after driving when the system was under pressure.
  • Get the special tools: the cam shaft holders to keep the cams from rotating and especially the Torx Plus bit. These are different than regular torx. You’ll need the TP-55 size for the cam phaser bolts. All were cheap and available online. I can share links to the products i chose if anyone is interested. I did not find need to use the locating pins as noted in the FSM.
  • Honestly for me the worst parts of the job were: 1) reaching and disconnecting all the harness clips from the firewall side valve cover without destroying the clips; 2) maneuvering the front cover back into position without bumping something and messing up the bead of sealant; and 3) the absolutely obscene torque sequence and quantity of bolts involved in snugging down the front cover. If you’ve seen the procedure you know what I mean.
  • Practice maneuvering the front cover back into position as many times as you need to get comfortable with your process before applying the sealant and going at it for real
  • The crank bolt did not want to budge initially but after a couple mins of heat from a propane torch it came off easily
  • The smallest 3 jaw puller in the set from HF worked just fine to remove the crank pulley
  • Use a paint pen and mark the bolts as you torque them to final spec. You really don’t want to lose track and have to check them all again especially if you spread the job over a couple of days.
  • As indicated in the FSM, I did have to raise and lower the engine slightly to install/remove some of the front cover bolts that were obscured by the frame rail.
  • Finally, when tightening the crank bolt or phaser bolts, the camshafts will want to spin. This kept causing the cam holder tool to lift out of position and in one case it popped clean off the camshaft. Doh! To address this, I found that a deep socket (craftsman 9/16” in my case) fit perfectly in the vct solenoid bore and could be used with a wooden shim to wedge the camshaft holder in place. I’ll try to post or attach a pic below.
I hope this is helpful to someone!

0E231050-9484-4322-AFF9-CBBF96C9CF12.jpeg


Join the Elite Explorers for $20 each year.
Elite Explorer members see no advertisements, no banner ads, no double underlined links,.
Add an avatar, upload photo attachments, and more!
.


Great write up for those who want to do this repair, but not a job I would attempt. My question is how many miles did you have on your 2013 when the water pump began to fail? TIA


Hi Sixonemale! I had approximately 141500 miles on the odometer when I noticed the problem. It seemed to go from a-okay to a very pronounced leak quite quickly. That said, it is my wife’s daily driver and it had been awhile since I had inspected or driven it. It is possible the leak was present to a lesser extent for some time. You’ll notice I mention in another post that both catalytic converters have also gone belly-up. I suppose, if the engine was burning coolant due to the WP leak, that could have been a contributing factor to the cat failures. However I saw no sign of coolant in the oil nor any chocolate milk or milkshake sludge/residue in the engine when I did the water pump replacement. Seems to be mixed feedback on the internet as to whether it is unusual or not for a catcon to tire out by 140k miles. Never had any codes related to misfires or other DTCs for that matter. Anyhoo, back to the water pump, the WP weep hole is hidden behind the alternator and ac compressor and is really hard to see directly. I needed one of those little inspection mirrors and a flashlight to finally get a visual on it. By then the coolant was already dripping down the side of the block and off the bottom of the engine. A very small leak might evaporate before producing any drips or puddles to observe.


Thanks for the response. Being it was your wife's daily driver, I'm assuming it was not driven in a very aggressive manner, etc. Lastly, how often did you change or flush the coolant? At 100,000 miles per the maintenance manual or did you change it more often. TIA


Did the coolant flush at roughly 100k miles as recommended.


I think this pic is the most specific, helpful tidbit of info I've seen on this forum yet. Nice stuff. How did you deal with water/coolant incursion into the oil pan when removing the pump? Towels and then heat gun, and then flush? Did you replace everything possible on this job? I've seen that cam phasers, chains, 2nd chains, tensioners, guides, H balancer?, handtool picks, vct solenoids, et cetera. can/should all be acquired for replacement cause its days of work to get in there and back. What brand of parts or kit did you use and what is the complete list of things to get to do this job? I've seen theres a Mehle timing kit on rockauto, but it maybe wasn't the whole set of replacement parts for the complete job. When I cross this bridge I'd like to do it with Ford parts, but its been seemingly tough to figure out where to get the whole kit and kaboodle without dealing with the dude at the parts desk that's like "oh, you want THAT part? well, that's just a reference number so..." . Any info helps and is appreciated! Many thanks.


Agreed on the above questions. I’m about to have to do this more for the timing components.


I am tackling the timing chains and such as well. Question, there are two tubes that I believe are oil feed lines to the turbos. They run parallel to the cam covers as shown in the bottom pic. They are connected to a oil line adapter, shown in top pic, but I cannot figure out if the adapter is supposed to split or the entire piece unscrew from the block/head??? The entire piece will thread out, but being a fine threaded fitting I would rather not try to re-align to re-thread it. Especially on the firewall side. What a PITA....
.
IMG954271.jpg


IMG954268.jpg


What timing chain set did you use? Looking for a parts list of everything to do the water pump
And timing set in one go. I am pulling motor to do this as well.


Question on the Water Pump gasket. I know it may sound a baby question, but better to ask now rather than cry later...
I am replacing the water pump on my 2013 explorer 3.5 v6 regular aspirated. Got the water pump out already.
When looking at the old water pump, I see there is a dark brown substance around the exterior of the water pump seal. Not sure if that is oil or remains of a RTV silicone put around the water pump gasket. To me would a novelty to put RTV sealant around the rubber water pump gasket, but, like I said, better ask. Personally, I vote for no RTV sealant, but I am not the authority to comment here.
I do have the Haynes manual, and the Haynes Manual does not mention anything about extra RTV sealant on the WP gasket, but Haynes is not very precise either.
What did you do?


Where did you find the cam phaser bolts? I am in the process of doing this repair on my 2013 XLT 3.5L (Non-turbo) and see that the bolts must be replaced. I have everything else except those. Thanks in advanced


Where did you find the cam phaser bolts? I am in the process of doing this repair on my 2013 XLT 3.5L (Non-turbo) and see that the bolts must be replaced. I have everything else except those. Thanks in advanced
Get the bolts from ford. Go on parts.ford.com and enter your car and zip code. I made a free account as a "private business" and i get free shipping. I just did these on my car and don't worry if you cant follow the crazy torque sequence just get them torque tight and it will be fine. I could barely turn the bolts 30 degrees past torque and ford says go 90... No way it was happening

Bolt
Part #: 7T4Z6279BA
Qty: 4


Thank you both!!! I could not find the part number to save my life. Going to see if my local Dealer has them before ordering.


  • Finally, when tightening the crank bolt or phaser bolts, the camshafts will want to spin. This kept causing the cam holder tool to lift out of position and in one case it popped clean off the camshaft. Doh! To address this, I found that a deep socket (craftsman 9/16” in my case) fit perfectly in the vct solenoid bore and could be used with a wooden shim to wedge the camshaft holder in place. I’ll try to post or attach a pic below.
I hope this is helpful to someone!

View attachment 166136
I know this is a bit of an old thread, but I completed this job last week as well, and this tip was a lifesaver. I was able to hold the front camshafts still using a large wrench on the hex hold feature and the cam shaft tools, but on the firewall side of the engine I could not get the wrench in there. This method with the socket and a prybar rather than block of wood worked perfectly. (I did not have a block the right size but my pry bar fit in there perfect!)

In case anyone is interested, here was my shopping list including tools, supplies, and parts. Total cost for me was $1101 so I saved over $3500 on the dealer cost. Thank you so much for all of the help in this forum. You all really are the best!
 

Attachments

  • TimingWaterPumpMaterials.pdf
    316.3 KB · Views: 283


I'm about to do the same job and was wondering what the thoughts are on the low torque side of putting the front cover back on. I don't have a torque wrench that goes below 10 ft lbs and the initial sequence is 27 in-lbs to snug then 89 in lbs intermediate before going over 120 in lbs which I can do with the regular torque wrench.

Did you have one that small, bought one, or just snugged, snug some more, tighten to torque?


You will be fine. Go by hand in the pattern outlined and then use the torque wrench once all are snug.

Really the most caution should be used when removing that cover as they crack really easily. Also, don't over apply the RTV... Just fill the inside bead groove (about 3mm) and it's good to go. Getting the cover back on and aligned is the fun part..if you got more than two hands its a lot easier haha


Did you use the locating pins recommended or job something up to hold the cover in place while getting the bolts started? The only extra pair of hands that'll be handy (see what I did there) are my wife's and I'm not sure if that's actually going to make things easier. I was thinking to make up a couple of wooden dowels to use as locators to help me get started.


Did you use the locating pins recommended or job something up to hold the cover in place while getting the bolts started? The only extra pair of hands that'll be handy (see what I did there) are my wife's and I'm not sure if that's actually going to make things easier. I was thinking to make up a couple of wooden dowels to use as locators to help me get started.
I did not use the pins as they were stupid expensive anywhere I could find them. There were actually 2 locators built into the cover on my limited. IIRC one is in about the 5 oclock position and one around 8 oclock. Get close and once those pop in, between the bead and slight hand pressure you can put in the first 2 bolts of the sequence. Then it is just you vs. the clock.


Join the Elite Explorers for $20 each year.
Elite Explorer members see no advertisements, no banner ads, no double underlined links,.
Add an avatar, upload photo attachments, and more!
.


I'm about to do the same job and was wondering what the thoughts are on the low torque side of putting the front cover back on. I don't have a torque wrench that goes below 10 ft lbs and the initial sequence is 27 in-lbs to snug then 89 in lbs intermediate before going over 120 in lbs which I can do with the regular torque wrench.

Did you have one that small, bought one, or just snugged, snug some more, tighten to torque?
i would recommend to loan a 1/4 torque wrench. That's what I did . Some Autozone stores have it to loan - not all though. AdvanceAutoParts and Oreilly may have it too. They will refund the money when you return them the tool. I do it all the time. Also ask for how long they can loan the tool. Each store has its own policy

It is not the engine cover bolts you'll need a low torque tool most. The phasor oil feed lines, have very little banjo bolts -if i remember correctly- , and you will need the small torque wrench for those. Also the water pump bolts and the timing guides bolts also need a low torque initial setting.

Plus, it will be more handy as it is small.

If I were you, i would take the car to regular shop and ask them to evacuate the AC. Not to vacuum, but to atmospheric pressure. Some shops do the evacuation for free ( ihad it done at KwickShop free), and charge <100 $ to refill. And then you can disconnect the ac line, making sure you plug the pipes with with some rubber taps to prevent air and moisture to enter the AC.

yes, it can be done with ac pipe connected; but, me, if I would have to redo the work, I would evacuate and disconnect the pipe without thinking twice


Back
Top