410Fortune - 96 5.0L XLT refurbish (making 1 great Ex from 2) | Page 8 | Ford Explorer Forums - Serious Explorations

  • Register Today It's free!

410Fortune - 96 5.0L XLT refurbish (making 1 great Ex from 2)

Okay here we go 09/13/05

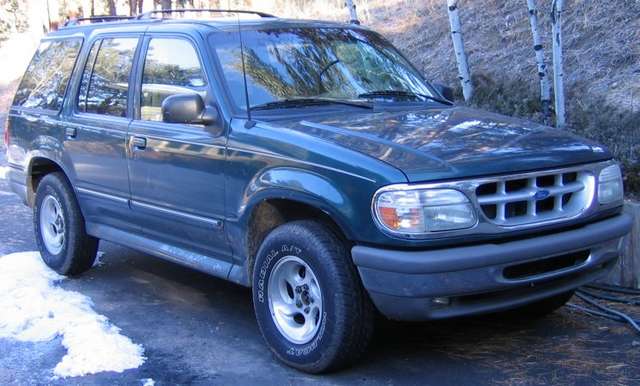
In march of 05 I rolled my new to me 96 5.0L AWD 86K miles, just after driving it back to CO from OR and putting $1000 into it. You see I bought this truck from my brother with 86K miles on the clock, it would not pass emissions for him and he drove it into the ground. This was the same explorer he bought new when I got the BII from him for $500 12 something years ago.
Well I payed him $500 for the green Explorer and $1000 later (shocks, tune up, 02 sensors, etc) it was in primo condition. Then I rolled it in an ice storm...
RIP 96 EB:
2893expldr-med.jpg

exafter.jpg


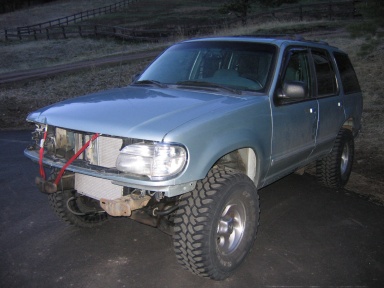
So in April my buddy Brett found this great deal here in town for a 96 XLT 5.0L AWD, $900 is what I paid, it has front end damage and air bags deployed, picked it up from a fellow board member:
2893drives.jpg


After the wreck the owner put in a new radiator and battery so it could be driven.
The truck has sat since April of this year, untouched, until this morning.
I have been preparing my new garage to accept my new project, and well she's ready, so today is the day I am driving this truck home.
To my disbelief this truck had no problem and started right up after sitting since April!

Here are some "before" shots:
Font end damage, sagging T bars, new rad:
beforework1.jpg

No airbags, interior is in great shape! (just needs TLC):
interiorbefore1.jpg

Rear:
rear.jpg

It has some "issues". Like steering extension is rubbing the manifold (3" body lift), no dipstick:
dipstickmissing.jpg

No fan, No ac condensor, and no trans cooler:
nofan.jpg


This is a 1996 5.0L AWD XLT with 151K miles on the clock.
Truck is loaded with sunroof, leather, tint, etc.
Previous owner installed 3" body lift and 33" tires.
Alot of things have been "rigged" but it runs and drives fine!

I will be completely removing the front clip, everything except the frame and inner fenders will be cut out. The entire drivetrain will be pulled (too many miles), the entire front end will be fixed, new bushings, bearings, new steering rack, torsio bar twist, shocks, brakes, etc.

the body lift will be fixed and or reduced to 1-2". the rear bumper will be re-located.

The drivetrain from my green 96 will be installed into this truck, along with alot of other "donor" parts.

The front clip will then be replaced using factory metal replacements, welding in new rad support, and then prepped for paint.

truck needs new windshield, airbags, and alot of TLC.


My long term plans for this truck include: "long travel" 4x4 IFS suspension lift (dixon bro's Camburg, etc). Stereo, tow package, SOA, low range T case, and custom everything else.
This is my "other" baby, and in keeping with tradition she will have the heart of my brothers old truck, just like the BII was his and run into the ground, so was "part" of this one.

Still no car payment after 12+ years.


Join the Elite Explorers for $20 each year.
Elite Explorer members see no advertisements, no banner ads, no double underlined links,.
Add an avatar, upload photo attachments, and more!
.


Looking forward to seeing this come together. I've thought about the change over to that style of mounty too. I also have a 96. Mine is a 4.0 ohv unfortunately though. I keep telling my wife (to get her used to the idea) that when the tranny of motor go out (it has over 170000 miles on it, but still running strong) a 5.0 is getting swapped in. Hopefully that waits until I finish college up here in Laramie, WY, so I can be in a place with a garage. :) I'm not too far from you down there in Littleton, maybe I'll see your BII or this new explorer/mounty with the long travel lift around when i am down there.


Join the Elite Explorers for $20 each year.
Elite Explorer members see no advertisements, no banner ads, no double underlined links,.
Add an avatar, upload photo attachments, and more!
.


Heck yeah, let me know when you are ready to go V8 in that sucker :)


Progress, hahahaha well not really.
Work on the Ex has been slow as of late, I need more $$$ for parts (this Friday.

But I am actually getting VERY close, just a couple days of work and fluids once I have the new E-303 cam, waterpump and timing set installed.
Also need some TM headers.

One of the things I needed to do and was dreading was replacing one of the relay boxes on my project 96 (blue truck). the relay box on the front pass side was damaged in the wreck. The previous owner just let it hang there for some time. The box itself was missing much plastic, the top and bottom covers, and also the bracket. So I pulled the parts off my wrecked 96.
I had two choices., I could swap this box, or I could swap the entire wire harness.

I planned to use the entire harness from my wrecked 96 because it has half the miles on it, however that harness received more damage from my wreck then the blue truck. So instead I just swapped the relay boxes. This info would be useful to anyone working with this or other similar power distribution boxes:

First the damaged box:
boxdamage.jpg

And the "new" donor box:
boxdonor.jpg


You can see how these boxes come apart. First You remove the rear access cover, it is held in place with 4 small plastic tabs, unplug the relays/fuses and remove the top lid.
Next the red "keeper" is removed by unlocking two lock tabs from the back side of the box.
Once the keeper is out you can remove each individual wire by unlocking it's locking tab.
You see each wire has a metal end, the metal end is held in place by a plastic tab that locks into it. The Red (or yellow) keeper then once locked down holds all the plastic keeper tabs in place, so wires cannot be pulled out or pushed in when you plug in relays/fuses.

Here is the box half way apart:
boxapart.jpg


Now I chose to do this with the two boxes next to each other, one wire at a time. Doing this ensures I get each wire swapped over from the old damaged box to the new one and I cannot really screw up the wires position. If I was to get it wrong it would be a HELL of a time to find the problem later. For larger projects I will take pictures and make diagrams. Not required for this small 4 relay box. During the swap:
boxswap.jpg


And finally the new box in place, all wires installed, keepers back in place, relays plugged in and access covers re-installed.
boxdone.jpg


Now the reason I kept putting this off is it is very time consuming. Tis swap took me about 2 hours total.
You need to have lots of light so you can see the little plastic tabs.
If you are not careful you can break them and then the wire will not lock in place.
The locking pins are very small and also down deep, so it takes some patience and the right tools. I have a small dental pick I use to get the tabs. You have to use one hand to tug on the wire while the other hand unlocks the tab. Some wires take 2 seconds, some you can fight for 15 minutes.
This kind of work makes my hands cramp up so I also have to take some breaks.

Anyways I know its not much but at least I got something done on the Ex this weekend! hahaha

TO DO:

BIG updates coming soon, should be running by March with cam and headers.
I will then swap the 8.8 out for the one from my rolled truck (half the miles).
install my Rancho RSX shocks from the other truck, install new/used airbags and sensors., etc.

She will be ready for paint and a widnshield before April is my goal.
Then the body lift comes off :)


Yeah I know how removing those old connectors can be. I went through hell trying to change out the ones on the t-case shift motor when I replaced it. This sounds much worse though. I ended up destroying the connector on the old motor in the process.


410Fortune said:
You can see how these boxes come apart.

Do the main fuse boxes come apart in the same way? I tried to get mine apart but couldn't figure out how to get the wires out apart I got the box apart.


yes every single wire connector under your hood comes apart, the main power boxes come apart just like this.
Your power box likely has yellow colored keepers.
If you flip the box over, remove the back access cover and use a flashlight you can see how the keepers are held in place, once they are out, then you can remove individual wires as described above.

My trucks harness has water proof plugs from all sorts of different years and makes of Fords.


Most of the plugs outside of the interior come apart, you just have to remove the red, or yellow, or whatever color keeper and carefully push the pins. A set of dental picks and forceps are very usefull. The best tool is a paperclip unfolded with a very small hook at the end.


Hmm, I'll have to look at it again. I had the back cover off and was trying to get them apart but couldn't figure out how the keepers worked.


I will take some pictures of a couple plugs and a box being taken apart..


briwayjones said:
Hmm, I'll have to look at it again. I had the back cover off and was trying to get them apart but couldn't figure out how the keepers worked.
The keepers arent on the back of the plug, when you seperate 2 plugs the keeper is the colored piece in the center, using a pick or a paper clip with a very small hook you pull it out. Then you can unclip the wires. Here is the manual for the transfer case:


Yeah thats what I was workin on...PITA


Many different plugs use different styles of keepers.
The power distribution box keepers are "unlocked" from the back side of the box.

Some of the male/female plugs under your hood the keeper is pushed out from a tab on the side of the plug. Some of the plugs it is pushed out from the back of the plug and some, like the one you pictured you dig the keeper out. I use a O ring pick and a pair of forcepts.


so any updates 410?


Allright I know it has been a while and I have no updates right now ($$$$$) but I will have some VERY soon.
I may now be installing a Sport fuel tank and F-150 MANUAL transfer case into this truck. HEHEHE

Camshaft install is coming VERY soon.
Should be running within a month with everything done and then prepped for paint.

If I go with a low range manual t case (I want I want, have found one) then this truck will NOT get lowered, but instead the future would hold a long travel A arm 4x4 suspension)


sounds like a plan ;)


You just said LT, A arm and 4x4 in the same sentence...= $$$$$$$$$$$$$$$$$$$$$$$$$$$$$$$$$$$$

Would love to see it!


yes so the t case will fit.

And yes the suspension kits I am talking about run $2500+


hahaha in March I said it would be running in a month, well I am getting closer...

Engine in, ready to pull the balancer and timing cover so I can install the E-303 cam:
ready4cam.jpg


Under the truck I was ready to install the T case:
ready4tcase.jpg

T case and exhaust pipes are in place, trans x member back in place, driveshafts installed, shift linkage hooked up, trans wired, and 02 sensors wired. Waiting on my TM headers so I can button up the exhaust.

mercury fenders, grill, bumper & cover, running boards, header panel, lights, etc:
fenders.jpg

grillboards.jpg

Who needs a hood? I have 3:
hoods.jpg


New radiator support:
newcore.jpg


Cam and timing set:
parts.jpg

FMS 1" intake spacer:
spacer.jpg


Only parts I still need:
water pump and fan/clutch

Windshield and airbags will come directly after that, then I will park it next to my rolled 96 and swap over the 8.8 and leaf springs (half the miles) and my rancho RSX shocks. Finally it will be off to the exhaust shop for a dual inlet single 3" outlet exhaust.

Then I can prime up the parts, fix dents, install hitch and get her ready for paint and body lift removal.


Join the Elite Explorers for $20 each year.
Elite Explorer members see no advertisements, no banner ads, no double underlined links,.
Add an avatar, upload photo attachments, and more!
.


Back
Top