4R44E band anchor is missing. The 'Phantom Menace'. | Ford Explorer Forums - Serious Explorations

  • Register Today It's free!

4R44E band anchor is missing. The 'Phantom Menace'.

HiSpeedDirt

Member
Joined
November 29, 2015
Messages
47
Reaction score
0
Location
Russia
City, State
Kursk
Year, Model & Trim Level
Ford Ranger 2000 XLT,2.5L
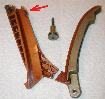
Hello. When i removed valve body on my Ford Ranger 2000 XLT 2.5L, rear wheel drive i noticed that the overdrive band anchor is missing. The band is lay down on the drum, and moving around freely. However, i have no parts droped in transmission pan.:(
Is it possible to "fish out" the band anchor from the case, and install on the band without transmission disassembling?


Join the Elite Explorers for $20 each year.
Elite Explorer members see no advertisements, no banner ads, no double underlined links,.
Add an avatar, upload photo attachments, and more!
.


Hello. When i removed valve body on my Ford Ranger 2000 XLT 2.5L, Rear wheel drive i noticed that overdrive band anchor is missing. Band is lay down on drum, and moving around freely. However, i have no parts droped in transmission pan.:(
Is it possible to "fish out" band anchor from the case, and install on band without transmission disassembling?

Is either end of the band broken off? Is the anchor broken? Could broken part be resting on top of valve body? Image does not open. imp


Band looks ok, at least hooks, and rivets. No parts on pan, and valve body. Can't see anchor inside.


The band is broken or burnt to the point of needing replaced if the anchor fell out that a in vehicle repair is not going to work.


The band is broken or burnt to the point of needing replaced if the anchor fell out that a in vehicle repair is not going to work.
Thank you. May falled down anchor cause internal transmission demage? How to recognise burnt band? It's hard to see without inspection camera where is anchor, and band onlay condition.
I thought that valve body has blown gaskets, or shift solenoid fail, then transmission began to kick at starting in "D" selector position, and shifting to 2-nd gear with vibration from time to time. But valve body gaskets not blown, solenoids looking good TCC-8.9 ohms, EPC-3.4 ohms, SS1, SS2, SS3, CCS has 25 ohms.


Band Condition

I doubt you will be able to inspect the lining of the band with the trans installed. Here is a pic of a burned-up band though:


I think previous advice is accurate - the trans will have to come out and the band will have to be replaced ($20 part). It's up to you as to how many other parts you want to replace while in there.

It's definitely possible that the anchor damaged other parts, though it may just be sitting loose somewhere. You won't know until you get it apart.

Here's my rebuild 5r55E rebuild thread: 5R55E Rebuild DIY Diary

I elected to only replace necessary parts + gaskets + fluid + int & OD bands (but but not reverse). I had some failed hard parts as well though... spent about $200 on parts and $150 on tools (not conting the valve body - which was likely not needed).

This is a pretty big job to do. Like most others repairs, the first time is the hardest, but is also rewarding. Plan for some down time on this one. Best practice is to teardown and inspect, then order/buy parts, then rebuild.


I doubt you will be able to inspect the lining of the band with the trans installed.
Thank you for thread, and burned band foto example. Looks like transmission teardown is inevitable, and it's time to get transmission repair manual.:confused:


Manual

I have the manual for the 5r55e, which I can share if you PM me your e-mail. But it looks like the 2000 ranger 2.5L has has the 4r44e. The two models are quite similar though, the valve body will be different, and possibly the steel/friction combinations.

Alternatively you can get the 4r44e manual online for $6 here:

http://ucanfixit.ca/index.php/brows...d-4r44e-4r55e-transmission-repair-manual-atsg

That's where I got mine. I would not attempt to do a rebuild without the manual. Hopefully parts are not too hard to come by in your area.

Thanks a lot, but i'am already download ATSG PDF manuals for 4R44E, 4R55E, 5R55E transmissions.
Despite i did have experience of manual transmissions rebuilding, and have lots of tools, including digital torque wrench, dial&digital indicators, extractors, and so on. But i know for sure that automatic transmission repair requires many special, and alignment tools.
Thanks to ebay parts, and rebuilding kits not a big problem, but not "so cheap" with shipping like in US.:(


Continuation of the story with missing transmission band anchor.
IMAG1706_zps262hsef1.jpg

Sorry can't upload this pic before.


I can see a piece of the band there, if you can get a hold of it with a tool, maybe you can move it into position enough to inspect the band where the anchor should be. If it's broken, that trans has to come out.

I'm assuming you already removed the anchor apply strut, if not that's going to be a lot of metal in there.


And then i finally got time to tear down transmission, and prepare&weld steel rolled "transmission supporting tractor", with 20t. hydraulic jack on it's top, just to avoid wrestling with top heavy "tranny". Transmission rested on this strange ugly "construction", and i pulled it out of engine easily on the rails. And then marked hight level directly on jack plunger with paint marker. I'm secure transmission with two straps, screw bracket to hold torque converter in place(safety first), and eventually pull it down on wood blocks.:)
Then i removed bell housing i fond band anchor and strut resting between "hammer&anvil" of OD drum and case bottom. But here comes the bad news. Band was badly burned to the rivets. Apply strut somehow locked inside the case, and stamped drum from the side. The greatest mistery that frictions is still move freely inside well stamped drum, and the case has no cracks after this heavy punch. Drum has the tears, and traces of high temperature discoloration. Looks like there is no chance to polish this drum to proper condition. This is sad situation, but it could be even worse, if the apply strut would smash central support, with reluctor ring, and speed sensor. I looked for OD drum, and they cost about $100 for used drum, with shipping from US. Don't know what to do, maybe it possible to polish this drum, or just replace it.
I'am sorry, but my native language is russian, and my english grammar may couse misconceptions. :(

IMAG1834_zps8auhi19t.jpg
TS2096104_zpsyl5yu6ib.jpg
IMAG1843_zpsqgbbbxzc.jpg
IMAG1846_zps0eh1ah1v.jpg
IMAG1980_zpscphqdnxr.jpg
IMAG1967_zpsodnmowek.jpg
IMAG2173_zpslgnelsrk.jpg
IMAG2013_zps9pkracs0.jpg
IMAG2052_zpsjvp5o8se.jpg
IMAG2054_zpsdekf9leq.jpg


That is some serious carnage right there! Looks like a new apply strut assembly, band, and OD drum are in order. I suspect the band itself was the initial cause of failure, allowing the apply strut to become loose and get jammed up. I would inspect the servo as well.


I would not want to use the drum either, that's a pretty big dent.

The band is aftermarket, someone has been in here before.

The band struts look to be good and the case damage is not a problem from what I can tell. Definitely check the servos and the rest of the transmission if you can, especially before ordering any parts.


I would inspect the servo as well.
Frightened that OD servo piston lips teared to shreds, because too much travel without apply strut support i did it first of all. Fortunately they looking good.
I noticed traces of rough sanding, on servo hydraulic cylinder. Thought someone tried to "polish", or remove corrosion oxidation. Central bore holes has less wear then i expect to see. No wide ellipse "machining", perfect round, just a little "steps", which is not sensible by finger tip. Hope i can smooth it out with 600 grit sandpaper, and then mirror with felt dremel polishing burr.

IMAG1881_zpsskvvtm1o.jpg

IMAG1871_zps88ksqd1f.jpg
IMAG1882_zpshnvwq4gj.jpg
IMAG1883_zpsng14lusu.jpg
IMAG1880_zpseoc594iy.jpg
IMAG1876_zpswetlinfl.jpg


The band is aftermarket, someone has been in here before.
I suspect that too, noticed inscribed "OD" right on the pressure plate. By the way OD drum clutch frictions looking good.

IMAG2059_zps6sv6jwqg.jpg

IMAG2239_zps2giynqi1.jpg


Inspite i plan to order OD drum i decide to inspect coast clutch piston and lip seals. But i had no clutch spring compressor. I been obliged to sacrifice my old faulty bearing puller with bended hooks. I cut it's legs right down to size, and weld them with TIG to 7mm steel ring. Updated puller did it's last service well, working as a special tool. Springs inside are good, outer seal lip slightly flat on the edge, inner looking good. Already done this procedure with direct, and forward clutches and i'll post pictures tomorrow.

IMAG2576_zpsp6iwwveb.jpg
IMAG2624_zpsdoiapgin.jpg
IMAG2629_zpsxbu46hkm.jpg
IMAG2632_zpsnjdsguvm.jpg

IMAG2633_zpsg6zzrsoi.jpg


IMAG2638_zpsfcimodl3.jpg
 

Attachments

  • IMAG2633_zpsg6zzrsoi.jpg
    IMAG2633_zpsg6zzrsoi.jpg
    513.9 KB · Views: 288


I think the outer seal may be installed backwards by whoever was in there last. The outside edge should have a lip that is angled towards the bottom of the drum when installed.


I think the outer seal may be installed backwards by whoever was in there last. The outside edge should have a lip that is angled towards the bottom of the drum when installed.

According to ATSG 4R44E manual picture, coast clutch inner&outer seal lip should expand to opposite direction from clutch springs, and both of them angled inside the drum bottom. But outer seal lip edge is definately flattened, and worn out.

Coast%20clutch%20seal%20lip_zps9il9e3eu.png


To hold the case in upwards position during disassembly i had to use home made fixture, fabricated from scrap rusty 3mm steel plate. I used extension housing gasket as a template, drill bolt holes, and cut circle with dremel tungsten-carbide router, with cutting oil. I put it on the steel stand and secure with "F" type clamps. I plan to use this fixturing plate to lock case on the table then it's time to tighten valve body, which is demounted long time before.
First on the turn bell housing and pump assembly. Next OD drum assembly, with pump thrust washer, and imput shaft. Rest of OD drum&band "dramatic" pics shown in posts #12,

Next planet gear OD sun gear with adapter, OD planetary carrier with OD ring gear, OD planet thrust bearing, and one way clutch with reluctor ring. I fond "unknown" washer with plastic yellow ring stucked inside carrier shell which is not shown in 4R44E, 4R55E ASTG manual. Is it in right place?
IMAG1960_zpsziuvwyse.jpg
IMAG2231_zpsbdpmscs9.jpg
IMAG1962_zpsmqfyu7wp.jpg
IMAG1984_zps3hfyepci.jpg
IMAG2055_zpsbblzutzy.jpg
IMAG2198_zps3qntfs8o.jpg
IMAG2068_zps36wniyhj.jpg
IMAG2184_zpsnrh9aofd.jpg
IMAG2185_zpsyvyfutki.jpg


Join the Elite Explorers for $20 each year.
Elite Explorer members see no advertisements, no banner ads, no double underlined links,.
Add an avatar, upload photo attachments, and more!
.


That yellow ring was also on the updated OD planetary when I replaced mine, it is in the right place and is affixed to the planetary.


Back
Top