-
Performance Upgrades - Maintenance - Modifications - Problem Solving - Off-Road - Street Trucks.
Covering the Explorer, ST, Sport, Lincoln Aviator, Sport Trac,
Mercury Mountaineer, Mazda Navajo, Ford Ranger, Mazda Pickups, and the Aerostar.
Featuring H.I. - Human Intelligence.
Register Today It's free!
- Forums
- Generation Specific Forums
- 1995 - 2001 Explorer Ranger Merc. 2nd Generation
- Modified 1995-2001 Explorers
You are using an out of date browser. It may not display this or other websites correctly.
You should upgrade or use an alternative browser.
You should upgrade or use an alternative browser.
ARP head studs and head gaskets
- Thread starter 4pointslow
- Start date
Elite Explorer members see no advertisements, no banner ads, no double underlined links,.
Add an avatar, upload photo attachments, and more!.
- Joined
- April 3, 2008
- Messages
- 3,273
- Reaction score
- 882
- City, State
- Gloucester City, NJ
- Year, Model & Trim Level
- 98 2Dr,2,000 & 04 4dr xlt
Engine back in
@ Dono,
I only post the easy pictures. lol.
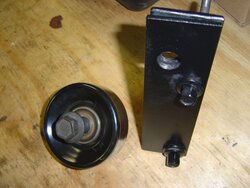
Something or should I say someone moved me to measure the crankshaft pulley. The front face of it measured 6 inches (see picture). The groves where the belt rides however was about 5 3/4 to my surprise.
The water pump pulley was approximately 4 7/8. I did not measure any other ones at this time.
How much longer do you think that crankshaft damper will last? .....
@ Dono,
I only post the easy pictures. lol.
Something or should I say someone moved me to measure the crankshaft pulley. The front face of it measured 6 inches (see picture). The groves where the belt rides however was about 5 3/4 to my surprise.
The water pump pulley was approximately 4 7/8. I did not measure any other ones at this time.
How much longer do you think that crankshaft damper will last? .....
Attachments

- Joined
- April 3, 2008
- Messages
- 3,273
- Reaction score
- 882
- City, State
- Gloucester City, NJ
- Year, Model & Trim Level
- 98 2Dr,2,000 & 04 4dr xlt
Engine back in
Engine is back in, got most of the stuff under the truck done yesterday(the hard stuff). Things will slow down now, I have to start working on the wire harness.
Engine is back in, got most of the stuff under the truck done yesterday(the hard stuff). Things will slow down now, I have to start working on the wire harness.
Attachments


- Joined
- April 3, 2008
- Messages
- 3,273
- Reaction score
- 882
- City, State
- Gloucester City, NJ
- Year, Model & Trim Level
- 98 2Dr,2,000 & 04 4dr xlt
Bracket
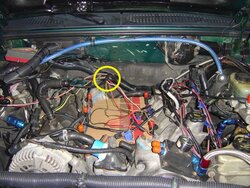
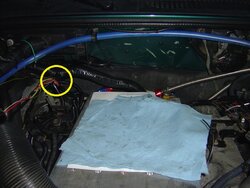
This damn bracket had a stud on it and it faced down where the engine mount was in the way so you could not get a socket on it. The bracket was to strong to bend by hand to get the harness out of the way so I worked on this little 10 mm bolt for 25 minutes with an open end wrench. I decided that was not going to happen again so I opened it up with a pair of pliers and removed it to hammer out the stud. I used a threaded clip on the engine mount bracket and ran a bolt from the top where you can get to it.
This damn bracket had a stud on it and it faced down where the engine mount was in the way so you could not get a socket on it. The bracket was to strong to bend by hand to get the harness out of the way so I worked on this little 10 mm bolt for 25 minutes with an open end wrench. I decided that was not going to happen again so I opened it up with a pair of pliers and removed it to hammer out the stud. I used a threaded clip on the engine mount bracket and ran a bolt from the top where you can get to it.
Attachments


- Joined
- April 3, 2008
- Messages
- 3,273
- Reaction score
- 882
- City, State
- Gloucester City, NJ
- Year, Model & Trim Level
- 98 2Dr,2,000 & 04 4dr xlt
Engine in
A long time ago I made an extra pulley bracket to get more wrap on the pulleys. I decided since it lasted this long I should put some paint on it.
I got a bunch of other stuff done and today I will be at it again, I love three day weekends.
A long time ago I made an extra pulley bracket to get more wrap on the pulleys. I decided since it lasted this long I should put some paint on it.
I got a bunch of other stuff done and today I will be at it again, I love three day weekends.
Attachments
2000StreetRod
Moderator Emeritus
- Joined
- May 26, 2009
- Messages
- 10,597
- Reaction score
- 334
- City, State
- Greenville, SC
- Year, Model & Trim Level
- 00 Sport FI, 03 Ltd V8
brackets
I've had to remove and install that wiring harness twice working under the vehicle using a wrench that could only rotate the mounting nut a few degrees at a time. Next time I'll duplicate your excellent idea.
Thanks for posting the photo of your extra idler pulley bracket. I detected belt slip at the alternator pulley when my battery charge was low and the alternator was outputting high current. I'll have to do something similar to your belt configuration.
Did you purchase the metal thermostat housing top? If so, please post how the installation goes.
Thanks for the post about the head to evaporator case interference issue with the head studs.
- Joined
- April 3, 2008
- Messages
- 3,273
- Reaction score
- 882
- City, State
- Gloucester City, NJ
- Year, Model & Trim Level
- 98 2Dr,2,000 & 04 4dr xlt
Metal Thermostat Housing Top
I did not get a metal thermostat housing top. The only ones I saw were for different years / models.
My 1998 angles up slightly so the ones that are available wont work for me.
I did not get a metal thermostat housing top. The only ones I saw were for different years / models.
My 1998 angles up slightly so the ones that are available wont work for me.
- Joined
- April 3, 2008
- Messages
- 3,273
- Reaction score
- 882
- City, State
- Gloucester City, NJ
- Year, Model & Trim Level
- 98 2Dr,2,000 & 04 4dr xlt
Pulley bracket
Here is another picture of my pulley bracket set up (top picture).
It is cheasy but it worked. There are 2 pieces of 3/16 metal strips from Home Depot. I think they are 2 inches wide.
The long bolts are heads bolts from some vehicle I don't remember. The fat nut and bolt is from an older GM strut to spindle bolt. The two metal spacers are from old shocks. There is two washers behind the pulley as well.
If I build a 4.0 SOHC engine I will make it all pretty, painted etc. If that happens I will get rid of my ugly bracket and go with RPcaster's pulley set up. It looks much nicer in design, and would even dress up the engine compartment a little. I was looking for a picture of it installed but did not find one. I know there is a picture of it installed somewhere. The bottom picture is the one from his site.
Attachments


2000StreetRod
Moderator Emeritus
- Joined
- May 26, 2009
- Messages
- 10,597
- Reaction score
- 334
- City, State
- Greenville, SC
- Year, Model & Trim Level
- 00 Sport FI, 03 Ltd V8
dual pulley
Here's photo of the one in the original Explorer Express kit.

It had a snout support.
Here's photo of the one in the original Explorer Express kit.
It had a snout support.
- Joined
- January 22, 2007
- Messages
- 10,154
- Reaction score
- 1,815
- City, State
- selkirk, manitoba
- Year, Model & Trim Level
- 98 supercharged 347 sport
thanks for the damper pic jon. i will have to measure the one on my spare motor as i will have to get one made for the new motor when it goes in.
as for that bracket for the wire harness, i hate those. in the past i have had to reach up with a long pry bar, get it on the very edge so i wouldnt hit the wires and bend it out of the way. those are a pita.
speaking of pita arent those top 2 bell housing bolts just wonderful to get at?
as for that bracket for the wire harness, i hate those. in the past i have had to reach up with a long pry bar, get it on the very edge so i wouldnt hit the wires and bend it out of the way. those are a pita.
speaking of pita arent those top 2 bell housing bolts just wonderful to get at?
- Joined
- April 3, 2008
- Messages
- 3,273
- Reaction score
- 882
- City, State
- Gloucester City, NJ
- Year, Model & Trim Level
- 98 2Dr,2,000 & 04 4dr xlt
bell housing bolts
When I pulled the engine the heads were off. The bolts were real easy to get to.
Not the same story when I put it back in, the heads were on and those bolts were a pita! I found that a flex head bent handle ratchet with a pipe on it for extra torque, through the wheel well, worked best for me. Still a pita though.
Ford's procedure has you lower the transfer case mount to go over top of the bell housing to get to those bolts. I read that and was like yea, right, not doing that.
2000StreetRod
Moderator Emeritus
- Joined
- May 26, 2009
- Messages
- 10,597
- Reaction score
- 334
- City, State
- Greenville, SC
- Year, Model & Trim Level
- 00 Sport FI, 03 Ltd V8
wobbles
This is what I used to torque the top two bolts.

Wobble joint at the green arrow for the driver side. Wobble joints at green and blue arrows for the passenger side and I don't have a transfer case to contend with.
This is what I used to torque the top two bolts.
Wobble joint at the green arrow for the driver side. Wobble joints at green and blue arrows for the passenger side and I don't have a transfer case to contend with.
- Joined
- April 3, 2008
- Messages
- 3,273
- Reaction score
- 882
- City, State
- Gloucester City, NJ
- Year, Model & Trim Level
- 98 2Dr,2,000 & 04 4dr xlt
Tools
That's about what my set up looked like when I was R&R'ing my transmission.
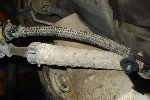
I started working with my wire harness, I am only about a third of unwrapping it. This is not a very user friendly harness, there are a lot of splices that make things complicated. It's not technically hard for me because I understand what each wire is for but it is time consuming. The wires are all twisted and inter mingled too, so you can not just separate a sensor from the rest unless you take the pins out of the connector. Then there is the one connector that seems to be holding on to the pins for dear life and just wont let go. lol.
Check out this spaghetti.
That's about what my set up looked like when I was R&R'ing my transmission.
I started working with my wire harness, I am only about a third of unwrapping it. This is not a very user friendly harness, there are a lot of splices that make things complicated. It's not technically hard for me because I understand what each wire is for but it is time consuming. The wires are all twisted and inter mingled too, so you can not just separate a sensor from the rest unless you take the pins out of the connector. Then there is the one connector that seems to be holding on to the pins for dear life and just wont let go. lol.
Check out this spaghetti.
Attachments

2000StreetRod
Moderator Emeritus
- Joined
- May 26, 2009
- Messages
- 10,597
- Reaction score
- 334
- City, State
- Greenville, SC
- Year, Model & Trim Level
- 00 Sport FI, 03 Ltd V8
reworked wiring harness
This is how mine turned out.

The trigger wire is for the dyno.


This is how mine turned out.
The trigger wire is for the dyno.
- Joined
- April 3, 2008
- Messages
- 3,273
- Reaction score
- 882
- City, State
- Gloucester City, NJ
- Year, Model & Trim Level
- 98 2Dr,2,000 & 04 4dr xlt
wire harness
That came out very nice! Great pictures too.
Can you remove it by itself now?
I will be working on mine again today.....
That came out very nice! Great pictures too.
Can you remove it by itself now?
I will be working on mine again today.....
2000StreetRod
Moderator Emeritus
- Joined
- May 26, 2009
- Messages
- 10,597
- Reaction score
- 334
- City, State
- Greenville, SC
- Year, Model & Trim Level
- 00 Sport FI, 03 Ltd V8
a lot of time
It took me a lot of time. One of those splices you're encountering is the reason I only had power to 3 of my injectors. When I eliminated one of the splices to split the wiring according to banks I missed one of the connections.

It took me a lot of time. One of those splices you're encountering is the reason I only had power to 3 of my injectors. When I eliminated one of the splices to split the wiring according to banks I missed one of the connections.
- Joined
- April 3, 2008
- Messages
- 3,273
- Reaction score
- 882
- City, State
- Gloucester City, NJ
- Year, Model & Trim Level
- 98 2Dr,2,000 & 04 4dr xlt
Wiring
I got some more done on the wiring. Had to redo some of it too. Got to love it.
Now I am running out of electrical tape. lol
In the first picture you can see where some of the wires came out in the middle right behind the supercharger. Now it comes out a little more towards the passenger side. It is starting to look a little cleaner back there. I got the lower intake manifold cleaned up and bolted down. The intercooler is installed and so are the coolant lines to it.
I put all new injector O rings in and installed them and the fuel rails on the engine. After lengthening the coolant temperature wires I was going to install the adaptor plate for the M122. Before I RTV it all up I test the fuel system for leaks and guess what, It leaks! I have to remove the drivers side injectors to see what happened. I guess I will get to that next weekend.
Attachments
- Joined
- January 22, 2007
- Messages
- 10,154
- Reaction score
- 1,815
- City, State
- selkirk, manitoba
- Year, Model & Trim Level
- 98 supercharged 347 sport
i was going to ask if your going to make the last race, but i guess the racing season is done now
2000StreetRod
Moderator Emeritus
- Joined
- May 26, 2009
- Messages
- 10,597
- Reaction score
- 334
- City, State
- Greenville, SC
- Year, Model & Trim Level
- 00 Sport FI, 03 Ltd V8
electrical tape
I gave up using electrical tape long ago. I couldn't find any that wouldn't come loose after a while and it was too difficult to wind in restricted areas. Instead I use convoluted flexible looms/conduit with cable ties. Another advantage is that if there is room left I can add another wire in the conduit without much difficulty. The disadvantage is it doesn't keep out moisture, oil, and dirt like tape does. However, that doesn't seem to be a problem when the splices are soldered and heat shrink wrapped.
You're making good progress and it's cleaning up nicely.
The first time I pressure tested my injectors I didn't have the rails fastened down and when I turned on my Aeromotive fuel pump the injectors popped the rails up and fuel went everywhere.
Elite Explorer members see no advertisements, no banner ads, no double underlined links,.
Add an avatar, upload photo attachments, and more!.
- Joined
- April 3, 2008
- Messages
- 3,273
- Reaction score
- 882
- City, State
- Gloucester City, NJ
- Year, Model & Trim Level
- 98 2Dr,2,000 & 04 4dr xlt
Race
I still have time but it is getting down to the wire (pun intended)
The event I want to get to is Friday the day after Thanksgiving, it is an all day event so plenty of time to test and tune. Atco Raceway is even open after that for test and tune in December. Last year I missed Friday and made it there Saturday, I wont be surprised if it happened again this year.
i was going to ask if your going to make the last race, but i guess the racing season is done now
I still have time but it is getting down to the wire (pun intended)
The event I want to get to is Friday the day after Thanksgiving, it is an all day event so plenty of time to test and tune. Atco Raceway is even open after that for test and tune in December. Last year I missed Friday and made it there Saturday, I wont be surprised if it happened again this year.
Featured images


Featured images
Similar Threads
- Replies
- 265
- Views
- 12,811
- Replies
- 4
- Views
- 2,836
- Replies
- 23
- Views
- 12,199
- Replies
- 5
- Views
- 3,048