Bkennedy's SAS and Rebuild Thread | Page 13 | Ford Explorer Forums - Serious Explorations

  • Register Today It's free!

Bkennedy's SAS and Rebuild Thread

As some of you know, I am working on building a parts list for a shortened Dana 44, long radius arm with coil overs SAS. 5:13 gears to match my rear axle and an ARB, maybe an electric locker. I have a pretty good list so far. At the same time, I am going to swap out the rear drum brakes for discs off of a 99 Explorer.

Please note: The plan is to keep this project as simple as possible with mostly off the shelf parts. I am not a fabricator, just a decent welder with a what I would consider the minimum required tools (chop saw, cut off wheels, air tools, welder, etc.), who likes doing his own work. Your opinions are welcome, but what I really need is technical advice. I have been thinking about this for several years and now have the time and cash to make it happen. Please keep on topic with your advice and don't go off on a side track about how you would do it as a four-link, or caged arms, or leave the axle full-width because that is not what I want. I want a simple-ish set up that works.


Join the Elite Explorers for $20 each year.
Elite Explorer members see no advertisements, no banner ads, no double underlined links,.
Add an avatar, upload photo attachments, and more!
.


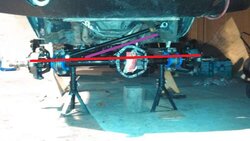
Today was a good day. I got the transmission cross member in, got the radius arm frame mounts tacked up, got the radius arms in, and got the axle under the Explorer centered and at ride height(ish). All of my measuring fifteen times to make sure I got it right seemed to have worked. The axle is two inches forward from stock!
IMG_20131119_172208_035_Large_.jpg

IMG_20131119_172245_529_Large_.jpg

IMG_20131119_172355_163_Large_.jpg

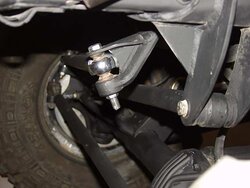
In these next two pictures, you can see where I want the track bar to end up at the frame mount (as close against the frame as possible). I think I need a stock Explorer pitman arm to even the steering up with the track bar since I am planning on going tie rod over. Please post some SAS track bar pics and let me know if you used the stock pitman arm or a drop like I have now.
IMG_20131119_172326_528_Large_.jpg

IMG_20131119_172604_096_Large_.jpg


Join the Elite Explorers for $20 each year.
Elite Explorer members see no advertisements, no banner ads, no double underlined links,.
Add an avatar, upload photo attachments, and more!
.


Nice :D That sure looks good under there.:chug:


Here's mine. If I remember right it was from my Trail Master lift.
 

Attachments

  • home3.jpg
    home3.jpg
    25.6 KB · Views: 492


So, school me on track bars:
I know that the track bar and drag link should be close to the same length and on the same plane.
But, do you want them as flat as possible, or does the angle matter, as long as the above is met??
If they need to be as flat as possible, I can decrease the angle of the steering with going tie rod over and keeping the drop pitman arm.
For the track bar, should I raise the axle mount versus dropping the frame mount?
I understand the drop track bar frame mounts put tremendous amounts of force on the frame.

I think it's just more important that they are parallel.


The more horizontal the track bar is at ride height, the less side-to-side movement the axle will see as it moves up and down.


I think it's just more important that they are parallel.
This. Having them the same length is good, but having them parallel is more important.

The more horizontal the track bar is at ride height, the less side-to-side movement the axle will see as it moves up and down.
This. Ideal would be having both of them flat with the earth... this is usually impossible due to clearance issues.

Basically if you have the choice, always built the track bar mount tall on the axle and short off the frame end. This not only gives you more clearance around the diff when the driver's tire is stuffed, but think about the forces on the track bar mount itself. All of the stress from the track bar is push/pull on both the axle and the frame from driver's side to passenger with very little stress front to back.

It's easy to build a very strong triangle type mount on the axle to counteract this force, because you have a foot long empty spot on the housing. But on the frame, you're screwed. You can gusset the mount front to rear, but that only makes it strong in the wrong direction. Remember, all your forces are driver to passenger, with little to any working front to back.

I have no clue if that makes sense or not. lol


As for strength, you can see that my track bar mount is mounted to a plate which wraps the frame not to the frame itself. The first mount FST built was welded direct to the frame and it busted the first time out.

Jefe busted his track bar mount when we were doing Martinez Canyon, and I've seen a couple of the guys who used F150 mounts break theirs... Definitely one of the most important aspects of the SAS.


The more horizontal the track bar is at ride height, the less side-to-side movement the axle will see as it moves up and down.

Actually, I should have said that horizontal should ideally be halfway between full bump and full droop, because rock crawlers typically have more droop travel than they do bump travel.


Thanks, fella's. This is a big help. I thought I was on the right track.
James, so what your saying is.........
If I have a target shock movement of 5" up and 9" down, then I would ideally set the track bar to be between level with the ground and 4" up, to split the difference between up and down travel.
I saw a track bar raise kit on Duff that looks like it would fit, but also looks like it would be easy to make. I just don't know if its worth the day it would take me, or if I should just spend the $70.

Looking at the axle today, I noticed the track bar mount is not level with the ground, but tilted slightly downward towards the front of the axle. I saw a bunch of pictures on line and some were like this, some not. The knuckles are near level at the tie rod mounts, showing the caster is real close, so I think the axle was designed this way.

With those measurements of travel, in the ideal world the axle end would be 2" lower than the frame end.


With those measurements of travel, in the ideal world the axle end would be 2" lower than the frame end.

I don't think that will happen. With the up travel, the track bar would hit the pumpkin if it was level.
Duff says the raise kit they sell will work. They also said that if my track bar mount is not sitting 90 degrees to the ground my caster might be a little off. They suggested to wait until I get it on the road before going up to the 7 degree bushings.


Thanks, fella's. This is a big help. I thought I was on the right track.
James, so what your saying is.........
If I have a target shock movement of 5" up and 9" down, then I would ideally set the track bar to be between level with the ground and 4" up, to split the difference between up and down travel.
I saw a track bar raise kit on Duff that looks like it would fit, but also looks like it would be easy to make. I just don't know if its worth the day it would take me, or if I should just spend the $70.

Looking at the axle today, I noticed the track bar mount is not level with the ground, but tilted slightly downward towards the front of the axle. I saw a bunch of pictures on line and some were like this, some not. The knuckles are near level at the tie rod mounts, showing the caster is real close, so I think the axle was designed this way.
I think you'll be ahead of the game if you cut the stock mount off the axle and build one.

Keep in mind you need to build your steering at the same time. Ive always built the tie rod 1st, then do the drag link and track bar at the same time. I can explain this better with cheesy ms paint pics. I'll get back to ya when I'm off work.


I can explain this better with cheesy ms paint pics. I'll get back to ya when I'm off work.
Oooh, it's been a while since a james t ms paint creation has shown up. We are in for a treat!!


I think you'll be ahead of the game if you cut the stock mount off the axle and build one.

Keep in mind you need to build your steering at the same time. Ive always built the tie rod 1st, then do the drag link and track bar at the same time. I can explain this better with cheesy ms paint pics. I'll get back to ya when I'm off work.

I understand how a radius arm suspension works, I just had a few questions in my mind about track bars. I needed confirmation before I dived in, so I don't make costly ($ and time) mistakes. I already have a track bar, which I got from BC Broncos. It is three inches longer than stock, and I know it will work because someone here already has it on their SAS coil over rig. I am not building my steering, but having it made at BC Broncos because I like their stuff. I haven't ordered it yet, because I wanted to make sure my angles were correct. Sometimes, its easier for me to pay a little more to get parts that someone already figured out will work.

I do like cheesy ms paint pics. Make sure to use the thickest, crayon looking lines......:D;)


Ok, 1st of all I don't know how BC's does their steering... I am assuming you're going heims? Anyhoo, I am a big fan of having tabs welded to the tie rod. I know a lot of places build it so that the draglink heim and tie rod heim go through the same bolt on the passenger knuckle. This works, but the tabs (pic below) are better for 2 reasons.

1- It holds the joint straight up so you never max out angle on the joint when the passenger tire is drooped out

2- You can easily change this in case you don't have proper angles or length by simply removing them with a cutting wheel and welding back on... whereas running both joints through the same bolt you are basically stuck with the length and angle on your drag link

sorry for the muddy dark pic
 

Attachments

  • bk2.jpg
    bk2.jpg
    53.9 KB · Views: 474


Okay, here is a pic with your draglink (purple) at the same angle as the track bar. Even running the joint on top of the pitman arm wont work as it's obviously going to make your draglink too short.

1st thing I would do is get a stock pitman arm.

If you're wanting to keep your trackbar as-is, I don't think you'll be able to raise it up off the housing and will need to do a drop mount off the frame. Hard to tell from a pic, but it looks like it would only work if you shortened the bar or it's going to get into the spring. Shortening it would be easy, just cut it down and have it re-threaded. Your call.

This is a total SWAG, but it looks like a stock pitman and a track bar mount that is about 4" from center of heim to bottom of frame would allow you to use a draglink that will be close to the same length as the track bar.
 

Attachments

  • bk1original.jpg
    bk1original.jpg
    83.5 KB · Views: 462


Thanks. BC Broncos uses the saddle on the tie rod for the drag link with heims. That is one of the reasons I am going with them.
The pictures helped. The track bar is three inches longer than stock, with six inches of threading so I can cut it down if needed.
BC Broncos steering pic (they also use a tapered "bolt" that I like)


BC Broncos saddle is welded to the tie rod. How about this (I like drawing but I could not get the lines any thicker...WTH)??

IMG_20131119_172326_528_Large_aa.jpg


If the track bar is raised three inches at the axle mount, then the angle will be less severe and allow me to have a shorter drop at the frame mount. And, with the saddle for the drag link, they should line up with the pitman arm with both being at an acceptable angle, and nearly the same length.
Does this work??
If I used the stock pitman arm, then it looks like the angle of both the drag link and the track bar would be more severe, which I am trying to avoid.


I understand how a radius arm suspension works, I just had a few questions in my mind about track bars. I needed confirmation before I dived in, so I don't make costly ($ and time) mistakes. I already have a track bar, which I got from BC Broncos. It is three inches longer than stock, and I know it will work because someone here already has it on their SAS coil over rig. I am not building my steering, but having it made at BC Broncos because I like their stuff. I haven't ordered it yet, because I wanted to make sure my angles were correct. Sometimes, its easier for me to pay a little more to get parts that someone already figured out will work.

I really liked BC's stuff. Great customer service and great product. I loved their coils. I drove mine on the street alot and my heims would wear out and get clunky after running down the road and being in the elements. Sure, they are strong as anything, however, they would get clunky enough to give death wobble after a year. I got tired of shelling out the cash and redoing heims every year so I rebuilt the steering with Chevy Tierods. They also had significantly more travel for the drag link. The 3/4" heims do not have enough travel with a 3/4" bolt (no misalign spacers) on the drag link to avoid limiting travel when mounted horizontally (directly to the knuckle). They would actually hit on compression one way, then hit on droop the other way. I even bent my drag link flat to start them at 0 misalignment at ride height, but it wasnt enough. So I had to find other knuckles that weren't drilled and ream them for OTK steering. I found a guy locally to thread DOM and machine wrench flats for me. Fairly easy with a lathe he said.

I would definately go with a drop pitman arm and build your tracbar mount to match to keep everything as flat as possible. Ruff stuff sells some that are radiused for the axle that push the mount in front of the axle out of the way of the diff. My travel was limited by my tracbar not being flat enough and moving the axle left to right when the passenger side would stuff or droop-reaching the limits of the unweighted travel of my conventional radius arm rear mounts on the drooping tire. Also, my tires would stuff very differently left and right due to the steep tracbar when the suspension cycled. It was hard to build the bump stops to land correctly and there was odd rubbing. The shocks had to have a ton of clearance around because of left to right axle movement, forcing me to move them out away from the frame and into the tire rubbing zone (which one side did rub in certain situations where my tires were turned and stuffed a certain way). Keeping the trac bar flat wont eliminate side to side movement in cycle, but it will keep it more reasonable than what I had starting steep and going from there.


Join the Elite Explorers for $20 each year.
Elite Explorer members see no advertisements, no banner ads, no double underlined links,.
Add an avatar, upload photo attachments, and more!
.


A picture of my original steering/ trac bar- Heims with 3/4" bolts and spacers- no insert style misalignment spacers
SAS4.jpg~320x480


Another angle
SAS5.jpg~320x480


This is the best pic I can find of the later steering I did with the drop pitman arm. Also- the drop pitman arm was shorter from steering box hole to drag link mount so it gave me more room for steering.

IMG_3624.jpg~320x480


The ruff stuff mount we used to build my buddies lower mount on his 85 FS bronc SAS. they have another that pushes it out front.

P1011061.jpg~320x480


And the upper with ruff stuff bracket

P1011060.jpg~320x480


Back
Top