-
Performance Upgrades - Maintenance - Modifications - Problem Solving - Off-Road - Street Trucks.
Covering the Explorer, ST, Sport, Lincoln Aviator, Sport Trac,
Mercury Mountaineer, Mazda Navajo, Ford Ranger, Mazda Pickups, and the Aerostar.
Featuring H.I. - Human Intelligence.
Register Today It's free!
- Forums
- Generation Specific Forums
- 2002 - 2005 Explorer Mountaineer 3rd Generation
- Modified 2002 - 2005 Explorers
You are using an out of date browser. It may not display this or other websites correctly.
You should upgrade or use an alternative browser.
You should upgrade or use an alternative browser.
BWM Brown Wire Mod 3rd Gen
- Thread starter P. doggy
- Start date
Elite Explorer members see no advertisements, no banner ads, no double underlined links,.
Add an avatar, upload photo attachments, and more!.
jutgin
Well-Known Member
- Joined
- December 6, 2007
- Messages
- 560
- Reaction score
- 1
- City, State
- Chattanooga, TN
- Year, Model & Trim Level
- 2002 ST
I finally found the brown wire on my 04 today. The harness does not enter the passanger area on this model year. You will find the harness in question very accessible. It is located under the hood on the passenger side. Would someone please let me know how to post images so that I can share the pictures I took.
Matthew, I'm wondering if you could post some pics of what you found. I have an 02 but the brown wire I found and cut didnt disengage the 4x4. The one I found and cut was the same as at the start of this thread. It was in the wire channel on the passenger front floor. Everything looked just the same as the pics here but it did nothing! Help! I really want to do this mod
macknos94
Explorer Addict
- Joined
- December 13, 2007
- Messages
- 1,457
- Reaction score
- 2
- City, State
- Harrisburg, pa
- Year, Model & Trim Level
- 2003 mountaineer premier
would this mod work on my 2003 mountaineer preimer. it has the awd system and i just would like to see how my gas would be. and if it would work where would the wire for it be
Curtis
Explorer Addict
- Joined
- November 15, 2001
- Messages
- 1,685
- Reaction score
- 11
- City, State
- Orlando, FL
- Year, Model & Trim Level
- 04 XLT 4x4
would this mod work on my 2003 mountaineer preimer. it has the awd system and i just would like to see how my gas would be. and if it would work where would the wire for it be
Nope, I think your SOL with AWD
ktford
Well-Known Member
- Joined
- April 13, 2006
- Messages
- 217
- Reaction score
- 0
- City, State
- Brisbane Australia
- Year, Model & Trim Level
- 2005 XLT & '04 XLT
It is suggested that the later model X's don't run the brown wire inside the cabin, for them simply cut the brown wire at the back of the transfer case and run a connected wire to where ever you wish to mount your switch.
Scotty
Scotty
misconceived
Well-Known Member
- Joined
- July 10, 2005
- Messages
- 178
- Reaction score
- 0
- City, State
- EAST of NOWHERE U.S.A.
- Year, Model & Trim Level
- '04 XLT
It is suggested that the later model X's don't run the brown wire inside the cabin, for them simply cut the brown wire at the back of the transfer case and run a connected wire to where ever you wish to mount your switch.
Scotty
It does sound easier to do the mod this way but I'd be concerned about exposure to the elements.
I've already banged up the underside of my X enough. I don't need the wire getting ripped out, my transfer case being disabled & having no clue that it has happened.
 :
:Matthew77
New Member
- Joined
- October 12, 2007
- Messages
- 9
- Reaction score
- 0
- City, State
- Greeencastle, PA
- Year, Model & Trim Level
- 2004 Exploder XLT
ok first off let me apoligize for the long delay in posting. I need to get afew more post on here and then I will proceed with my pictures and testimony as to how I did this on my 04.
ghoster
Well-Known Member
- Joined
- July 14, 2006
- Messages
- 815
- Reaction score
- 1
- City, State
- Long Island , NY
- Year, Model & Trim Level
- 2004 Explorer Eddie Bauer
come on bro!ok first off let me apoligize for the long delay in posting. I need to get afew more post on here and then I will proceed with my pictures and testimony as to how I did this on my 04.
i went to do this today..there is a brown wire but did nothing ( i just cut it)..
JCUZ
Explorer Addict
- Joined
- September 4, 2007
- Messages
- 1,204
- Reaction score
- 12
- City, State
- Canberra, Australia
- Year, Model & Trim Level
- 2004 Explorer Limited V8
ok first off let me apoligize for the long delay in posting. I need to get afew more post on here and then I will proceed with my pictures and testimony as to how I did this on my 04.
I have been waiting for someone to do this on an 03/04, as I couldn't find the brown wire in question, but then mine is an Export model, so perhaps it's on the driver's side of the car (RHS)?
Anyway, looking forward to see how you did this.
JCUZ
Explorer Addict
- Joined
- September 4, 2007
- Messages
- 1,204
- Reaction score
- 12
- City, State
- Canberra, Australia
- Year, Model & Trim Level
- 2004 Explorer Limited V8
had mine done for two weeks now, no dramas here, I'm in Brisbane 2005 model, cut mine behind the gearbox, 2eze thus far
Scotty
Don't suppose you could post some pics up (especially of where you cut the wire)?
JCUZ
Explorer Addict
- Joined
- September 4, 2007
- Messages
- 1,204
- Reaction score
- 12
- City, State
- Canberra, Australia
- Year, Model & Trim Level
- 2004 Explorer Limited V8
I know this has been posted before, but here is the post with pics and a better title for those searching.
This is the procedure I used on a 2002. It should work on up to a 2005. These are the steps I followed. I am not saying this is the best and this is just a guide. Give your self about 2-3 hours to be safe.
1.Remove Dash. Start by removing the dash piece around the radio, center vents and air control. I applied a flathead screwdriver to the bottom of the plastic dash piece and pried up. This might leave a small mark in the dash piece below it, where the shaft of the screwdriver rests. Be careful. The dash should pop out. It should gradually start popping off. There are about six pops (clips) that should happen.
2. Mount the switch. I wanted mine in a easy-to-reach spot and visible. Since I have an XLS, the spot in the pics works great.

It is also easy to replace the small dash piece if needed. I also used a lighted switch, so I needed power for the light. I used the second wire from the right on the wiring harness to the 4x4 option buttons.

4. Run the wiring. I grounded my switch out to the radio (yellow wire). The red wire is the power wire spliced into the wiring harness mentioned above. I ran it to the power input on the switch.

The acc. or load wire on the switch, I ran behind the glove compartment. You can make the glove comp. swing all the way down by squeezing the catches inward.

After it is all wired, check the switch. Turn the key to the on position and check the switch. Should light up. Carefully replace the dash piece. Make sure not to pinch any wires. Close the glove compartment.
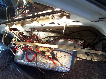
5. Find the Wire. If you remove the step plate on the passenger side, there is a wire channel underneath. You will also want to pull off the lower plastic trim piece, on the far right-hand side, under the glove comp. Remove the top cover of the wire channel; it is black and made of plastic. This will now show 2 bundles of wires; one large and one small. You want the small bundle.

The plain brown wire is the one of interest.

6. Install relay and wires. Cut the brown wire. Strip the ends and crimp or solder on a wire to both sides of the brown wire. There should be three bolts where you pulled off the plastic under the glove comp. One should be bare. This is where I mounted my relay and grounded out my relay.

If you do not have a mount, you can it tuck back in the body. I used a 12V/30A relay. In this photo,
Yellow = Ground
Green = Switch
Black = Input from brown wire (runs toward rear of vehicle)
White = Output to brown wire (runs to front of vehicle)
7. Check. After it is all hooked up, check it out. Start the vehicle. If the light is on, on the switch, all 4x4 options should work. If the light is off, it should be 2x4.
8. Put the plastic back on. Take for a test drive. Should work.

Here is the wiring diagram. Note that this is just a diagram and the positions are not relative to those on the vehicle.

Notes. You now have new feature. You can still get the transfer case to shift into low. 2x4 Low! With the tranny in Neutral and with your 4x4 switch turned off, press the 4x4 low button. You should have low range but no 4x4. I have ran this mode several times and have no adverse effects. Feel free to ask questions. I am always glad to help.
Have Fun, Jared G.
One minor correction to this - the power to the switch is so that the switch kicks the relay on - when it's on, it directs power between the black and white wires (ex-brown wires). So even if you don't have a lighted switch, you will still need power - grounding the switch is what makes the light on the switch light up.
It appears that the transfer module livers under/behind the glovebox in 2003+ explorers, so this is where I intend to tap into for mine (have yet to confirm the brown wire is actually there, but if it's not, then transfer case wiring is what I'll intercept).
ktford
Well-Known Member
- Joined
- April 13, 2006
- Messages
- 217
- Reaction score
- 0
- City, State
- Brisbane Australia
- Year, Model & Trim Level
- 2005 XLT & '04 XLT
sweet, tis good to have the ability to go 2wd, I'm picking up a '04 model in the morning, two X's must be more fun than one, will be doing my new one str8 away and can't wait to get a blower for it later in the year
Scotty
Scotty
ghoster
Well-Known Member
- Joined
- July 14, 2006
- Messages
- 815
- Reaction score
- 1
- City, State
- Long Island , NY
- Year, Model & Trim Level
- 2004 Explorer Eddie Bauer
am i going to have to start cutting all the brown wires one by one and figure out which one it is? lol
I got under my explorer to do a mod (i'll post pics when finished) and saw that behind the tranny..were the 4wd thing (sorry the name just slipped my mind) is theres a few wires and one of them is brown..wonder if thats it?
I got under my explorer to do a mod (i'll post pics when finished) and saw that behind the tranny..were the 4wd thing (sorry the name just slipped my mind) is theres a few wires and one of them is brown..wonder if thats it?
Elite Explorer members see no advertisements, no banner ads, no double underlined links,.
Add an avatar, upload photo attachments, and more!.
JCUZ
Explorer Addict
- Joined
- September 4, 2007
- Messages
- 1,204
- Reaction score
- 12
- City, State
- Canberra, Australia
- Year, Model & Trim Level
- 2004 Explorer Limited V8
I have hooked everything up, except the actual cutting of the brown wire. Instead of grabbing power for the switch from another wire, I have jumped the switch power from the transfer wire (connection 30 on the relay) - this way, instead of the light lighting up all the time, it will actually only light up when the Auto 4WD kicks in, so I'll be able to tell when it is actually operating in 4WD mode (unlike now, where you don't really know).
Of course, with the switch off, it will just be 2WD, as intended.
Wiring Summary
At transfer case
"From" transfer wire - to pin 30 on the relay, and "source"/+ve on the switch
"To" transfer module brown wire to pin 87 on the relay
relay
pin 87 on the relay goes to the "To" transfer module brown wire (ie bit closest to the transfer case).
pin 30 on relay goes to "from" transfer module brown wire (the other end of the brown wire cut near the transfer case)
pin 86 on relay goes to "load" pin on switch
pin 85 goes to earth
switch
load wire on switch to pin 86 on relay
ground pin on switch to earth
source/+ve pin on switch to transfer module "from" wire (via pin 30 on relay)
Featured images


Featured images
Similar Threads
- Replies
- 0
- Views
- 863
- Replies
- 10
- Views
- 4,740