Dizmone
New Member
- Joined
- July 21, 2004
- Messages
- 3
- Reaction score
- 0
- City, State
- Independence, MO
- Year, Model & Trim Level
- '94 XLT 4x4
Well, I recently experienced a mishap when installing new shocks. I broke the stud off of the shock mount. 
Anyways, I used my handy search button like a mad man, and while I did find sufficient info on what I needed and what to do, I didn't really find any decent pictures. So I took it upon myself to go ahead and snap a few photos as I fixed my X. Heres my story and How-to.
--------------------------------------------------------------------------------
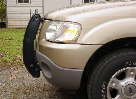
So I decided to get some new shocks for the X since it still had the 14 year old originals with 113k miles. Not a big deal, just a quick one, maybe two, hour job. WRONG!
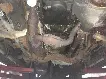
Starting with the front right shock, I started to remove the lower shock mount nut and SNAP! I'm left with a broken stud.


So I begin the long process of fixing this problem . . .
First I went to NAPA where they sold a replacement stud for only $3.70. Heck yes! I bought two assuming the driver's side will do the same thing. Grand total comes to $7.96. The part # is P-19 on the reciept, but the sticker says P00019. Either way just use the pic below as a reference.

*Note:
-The mount requires a 5/8" hole to be drilled out of the radius arm.
-The integrated nut in the center needs a 22mm wrench/socket.
-The nut on the left, that goes behind the radius arm, needs a 15/16" wrench/socket
-The small nut on the right that secures the shock needs a 18mm wrench/socket.
(I didn't have a 22mm wrench or a long socket. I also didn't own a 15/16" wrench and there wasn't enough room to fit a socket behind the radius arm, so I opted to the nice universal vise grips and channel-lock pliers.)
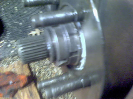
I started by grinding off the rest of the stud, then grinding the remains as flush as I could with the rest of the radius arm. I considered just trying to pound the rest of the stud head out of the arm, but after observing the amount of rust everywhere, I pretty much told myself the head was one with the arm and didn't exit anymore.


I then drilled a small pilot as close to center as possible.

Perfect Aim!

I then worked my way up to a 5/8" drill bit. Its obviously best to start small and use a slightly bigger bit until you reach 5/8", instead of starting with a massive bit.

Then I hit another road block. Finding a 5/8" drill bit with a 3/8" shank for my drill. I needed the hole to be at 5/8" to fit the new stud, so I thought it was no big deal to just go pick one up.
Everywhere I looked, there was only a 5/8" bit with a 1/2" shank. After more than an hour hunt, I thought I was gonna have to dish out $30 for a new chuck, but at last, I found one at Sears. $21.51 for one bit, ugh.
So I got the final hole made, applied some ThreadLocker ($5.05) around the hole and on the mount threads and installed the new mount. (Note: The 15/16" nut has its own built-in thread lock so buying the liquid is optional. I just wanted to make sure it was the last time I ever have to mess with it.)


Lastly, I got the shock installed, and sprayed some rust converter along with some clear coat to hopefully stop any new rust from forming, especially on the new stud.
The finished product . . .


Welp, one shock down, three more to go. I went ahead and bought two replacement bolts for the rear lower shock mounts just in case they snap. At least if the rears bolts do break, I can just slide out the old bolt and put a new one in. Here's hoping the driver's side won't snap, but I'm banking on repeating the process I just shared with you. The project put me out $34.52 and a handful of hours between working and searching.
I hope this helps anyone who runs into this unfortunate event. I have a feeling this How-to will come in handy with the first gens getting older and more ran down.
Good luck,
Damone
Anyways, I used my handy search button like a mad man, and while I did find sufficient info on what I needed and what to do, I didn't really find any decent pictures. So I took it upon myself to go ahead and snap a few photos as I fixed my X. Heres my story and How-to.
--------------------------------------------------------------------------------
So I decided to get some new shocks for the X since it still had the 14 year old originals with 113k miles. Not a big deal, just a quick one, maybe two, hour job. WRONG!
Starting with the front right shock, I started to remove the lower shock mount nut and SNAP! I'm left with a broken stud.
So I begin the long process of fixing this problem . . .
First I went to NAPA where they sold a replacement stud for only $3.70. Heck yes! I bought two assuming the driver's side will do the same thing. Grand total comes to $7.96. The part # is P-19 on the reciept, but the sticker says P00019. Either way just use the pic below as a reference.
*Note:
-The mount requires a 5/8" hole to be drilled out of the radius arm.
-The integrated nut in the center needs a 22mm wrench/socket.
-The nut on the left, that goes behind the radius arm, needs a 15/16" wrench/socket
-The small nut on the right that secures the shock needs a 18mm wrench/socket.
(I didn't have a 22mm wrench or a long socket. I also didn't own a 15/16" wrench and there wasn't enough room to fit a socket behind the radius arm, so I opted to the nice universal vise grips and channel-lock pliers.)
I started by grinding off the rest of the stud, then grinding the remains as flush as I could with the rest of the radius arm. I considered just trying to pound the rest of the stud head out of the arm, but after observing the amount of rust everywhere, I pretty much told myself the head was one with the arm and didn't exit anymore.
I then drilled a small pilot as close to center as possible.
Perfect Aim!
I then worked my way up to a 5/8" drill bit. Its obviously best to start small and use a slightly bigger bit until you reach 5/8", instead of starting with a massive bit.
Then I hit another road block. Finding a 5/8" drill bit with a 3/8" shank for my drill. I needed the hole to be at 5/8" to fit the new stud, so I thought it was no big deal to just go pick one up.
Everywhere I looked, there was only a 5/8" bit with a 1/2" shank. After more than an hour hunt, I thought I was gonna have to dish out $30 for a new chuck, but at last, I found one at Sears. $21.51 for one bit, ugh.
So I got the final hole made, applied some ThreadLocker ($5.05) around the hole and on the mount threads and installed the new mount. (Note: The 15/16" nut has its own built-in thread lock so buying the liquid is optional. I just wanted to make sure it was the last time I ever have to mess with it.)
Lastly, I got the shock installed, and sprayed some rust converter along with some clear coat to hopefully stop any new rust from forming, especially on the new stud.
The finished product . . .
Welp, one shock down, three more to go. I went ahead and bought two replacement bolts for the rear lower shock mounts just in case they snap. At least if the rears bolts do break, I can just slide out the old bolt and put a new one in. Here's hoping the driver's side won't snap, but I'm banking on repeating the process I just shared with you. The project put me out $34.52 and a handful of hours between working and searching.
I hope this helps anyone who runs into this unfortunate event. I have a feeling this How-to will come in handy with the first gens getting older and more ran down.
Good luck,
Damone
 This will help many people I'm sure.