nekulibin
New Member
- Joined
- April 9, 2007
- Messages
- 1
- Reaction score
- 0
- City, State
- Montreal
- Year, Model & Trim Level
- 2002 Limited
How to find which of the sensors is not working?
The sensor test described below will determine which of the ultrasonic backup sensors (likely only one) is to be replaced without any dis-assembly.
As it turned out only one of ultrasonic sensors on my Explorer backup warning system was bad. In order to determine if a sensor is working, listen close to the sensor -- a working sensor clicks audibly if you put your ear to it. Engage the parking breaks, put blocks under the wheels; better have someone you trust press on the service breaks, while you are listening at the rear bumper. (I had the sensor harness out by the time of this test, so I was standing on the side of the vehicle with the sensors easily accessible for immediate replacement. The sensors are electrically hardened and can be swapped live. Once a non-clicking sensor was replaced the system started operating immediately. I did not find an easy way to test these digital sensors when disconnected from the vehicle harness, however the above clicking test is fast and effective for our purposes.)
The reverse parking sensors on my 2003 Limited did not work. Just like most of the people here who are complaining about the sensors not working, it would switch off as soon as you shift to reverse. In Park, you could press the sensor disable switch and turn the light off, but as soon as you shifted to Reverse, the disable light would come back on and the sensor system would shut off.
From doing some research, I found out that this is the way that the Explorer reports "hey, one of the sensors has failed."
While Ford wanted over $100 apiece for them, and other online vendors sold them for $60 each, I found a guy selling surplus sensors on eBay for $8 each. Not knowing which/how many of my sensors were bad, I decided to buy four of them - with shipping around $36.
I got the sensors quickly, and put them in yesterday. Once I got everything back together, everything worked perfectly! I'm very pleased!
Here's a guide as to how I did mine.
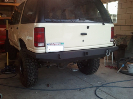
Open the rear liftgate and remove the four philips screws on each side holding the rear taillights in place. Gently pull each taillight to the rear until it releases. Remove the lightbulb assemblies from the lens (rotate counter clockwise). Set the lenses aside.
On each side in the area just above the bumper cover exposed by the removed lenses, you will see two screws with hex heads (you will need a socket to remove them). One of the screws is horizontal (head facing straight up), and the other one is screwed into an angular bracket (facing up and to the front). You need to remove only the angular one - the horizontal one fastens a bracket to the bumper cover and should remain fastened. You may want to hit the screws with some PB Blaster first to loosen them up.
Underneath the bumper cover, on each side (on the sides, near the lower front of the bumper cover), are two more screws, one on each side. You will have to lay under the back of the truck to see them. Remove these screws - use PB Blaster on these as well.
Along the top of the bumper cover are a series of plastic pins. All of these have to be removed. If you don't have a pin tool, you can gently use two flat-blade screwdrivers. Slip the screwdrivers into the small slot on each pin, and use them to gently work the center locking pin out about 1/4". You may want to just start it with the screwdrivers and pull it out with your fingers. Once it's pulled out, the rest of the pin can be removed from the bumper cover. It's OK if the locking pin comes all the way out - just remove the rest of the pin, then fit the locking pin back into the main pin body.
Get something soft - a large blanket, sleeping bag, etc. and lay it on the ground under the rear bumper. This is what the bumper cover will rest on, so you don't scratch the paint on it.
Starting on the driver's side, pull the bumper cover up and to the rear until it disengages from the pin lock. Repeat on the passenger side. Gently remove the bumper cover. It will be fastened to the truck on the passenger side by a wiring harness. You can leave this wiring harness connected. Lay the bumper cover on the ground, with the paint side facing down.
The wiring harness is fastened to the EPS (styrofoam) on the passenger side. Gently pull out the pin holding the harness to the styrofoam to free the wires.
Using a deep 1/2" socket, remove the three large flat steel nuts on the plastic bolts that hold the styrofoam in place. Gently remove the styrofoam from the inside of the bumper cover. You will now be looking at the back of the parking sensors.
Very very gently, on the inside of the bumper cover, lift the two tabs on the side of each sensor, then push the sensor through from the outside (paint side) of the bumper. Press down on the end of the connector lock and gently pull the sensor off of the connector. Push the new sensor onto the connector until it locks into place. Push the sensor back into the hole in the bumper until it locks into place. Repeat for each sensor.
Replace the styrofoam, ensuring the plastic bolts go up through the holes, and the plastic tabs on the inside of the bumper cover hold everything in the correct position. Make sure the wiring harness is routed correctly. Reinstall the flat steel nuts onto the plastic nuts. Reinsert the plastic wiring harness plug into the styrofoam.
Gently lift the bumper cover back onto the bumper and position it into place. On the lower front sides of the bumper cover, you will see plastic tabs that fit into holes on the bodywork. Ensure the tabs fit into the holes correctly. Push the bumper cover until it seats properly. Reinstall the two top screws to hold it in place, then reinstall the bottom screws.
Reinstall each plastic pin - with the center locking pin still extended, push the main part of the pin into each hole until it is snug against the bumper cover, then push the locking pin in to lock it into place.
Take each taillight lens and reinstall the light bulb assemblies. Make sure you put the right bulb in the right hole! Turn clockwise to lock into place. Replace each lens in place. Make sure the metal screw fits into the locking tab, and that the plastic tabs fit into their respective holes. Once you've got it lined up, give the lens a good push to lock it into place. Replace the two philips screws to fasten it into place. Repeat with the other lens.
You're done! Enjoy your functioning parking sensor! The whole process took me about an hour to do, and that's with never seeing the assembly before, or having any idea of how to get the bumper cover off.
The sensor test described below will determine which of the ultrasonic backup sensors (likely only one) is to be replaced without any dis-assembly.
As it turned out only one of ultrasonic sensors on my Explorer backup warning system was bad. In order to determine if a sensor is working, listen close to the sensor -- a working sensor clicks audibly if you put your ear to it. Engage the parking breaks, put blocks under the wheels; better have someone you trust press on the service breaks, while you are listening at the rear bumper. (I had the sensor harness out by the time of this test, so I was standing on the side of the vehicle with the sensors easily accessible for immediate replacement. The sensors are electrically hardened and can be swapped live. Once a non-clicking sensor was replaced the system started operating immediately. I did not find an easy way to test these digital sensors when disconnected from the vehicle harness, however the above clicking test is fast and effective for our purposes.)