Whitmustang
New Member
- Joined
- March 21, 2012
- Messages
- 2
- Reaction score
- 0
- City, State
- Tx
- Year, Model & Trim Level
- 2011 Ford Explorer
I must start by saying this worked on my 2011 Explorer Limited but it is up to you to verify any circuit before splicing into it. Sorry for all the links but I'm not sure how to post photos.
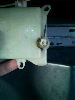
First you need to locate the gray harness plug located directly beneath the fuse box on the drivers side kick panel. (In the image below I have already made the connection this is just to give reference to its location).
http://imageshack.us/photo/my-images/689/imag0174v.jpg/
There are several wires on this harness, I think eight, but there are also several open wire holes in the plug. The top right hole of the plug is open and this is the plug I tapped into. In order to test for accessory power I had to insert a small nail into the open hole and make contact with the prong to verify the circuit, the prongs only had power while the harness was plugged in.
(The red arrow points to where the wire should go, in this picture it is already installed).
http://imageshack.us/photo/my-images/69/5555ja.jpg/
Once I was sure this was the circuit, I took a harness similar to this one.
http://www.scosche.com/car-audio/product/246
I know it sounds crazy but then I took it apart to get to one of the wires with the factory connection on it like this.
http://imageshack.us/photo/my-images/403/imag0173g.jpg/
another one for size reference
http://imageshack.us/photo/my-images/337/imag0178w.jpg/
Once you have the wire out cut it free with a few inches to splice into. Now take it to your factory harness you located earlier. Disconnect the harness from the car and you will see a white clip that can be pulled up like this.
http://imageshack.us/photo/my-images/263/imag0170jf.jpg/
Pull the clip making sure not to pull any wires out in the process. In order to disengage the clip the two square clips in the center of the harness must be pulled up while you pry on the white clip. Proceed to insert the wire clip and wire you removed from the donor harness into the open hole indicated earlier and re-engage the harness lock. Go ahead and plug the harness back in and check the wire for accessory power, once it is confirmed you can go ahead and make your connection for your device.
Note #1: Once you have inserted the new wire into the harness be sure not to touch any ground source or it will short the wire.
Note #2: If you aren't comfortable removing the clip on the factory harness first practice on the donor harness until you are confident you can do it.
")