How to: - Solve ABS problems on a 1995 Aerostar. | Ford Explorer Forums - Serious Explorations

  • Register Today It's free!

How to: Solve ABS problems on a 1995 Aerostar.

Prefix for threads which are instructional.

BrooklynBay

Moderator & long time member.
Staff member
Moderator
Elite Explorer
Joined
November 11, 2005
Messages
56,683
Reaction score
1,186
City, State
Brooklyn, NY
Year, Model & Trim Level
88 89 93 95 96 Aerostars
The Haynes repair manual # 10411 Automotive Anti-Lock Brake Systems Techbook explains various test procedure for testing the Kelsey-Hayes (Lucas Varity) systems in chapter 6. Here is a quote from page 6-5:

Ford: Do not shut off the engine when retrieving codes or the code will be cleared. Locate the diagnostic connector (single-pin connector with a black/orange wire*) in the passenger compartment. Ground the connector for one second. When you're done reading the code, shut off the engine. This will clear the code.
*Note from Autozone's website: RABS I uses an orange/black wire, and RABS II uses a black/orange wire for the diagnostic connector.


Page 6-6 has a list of fault codes:
Codes-------------------------------------------------- Probable Cause
1 Not used.
2 Open isolation valve wiring or bad control module.
3 Open dump valve wiring or bad control module.
4 Closed RWAL valve switch.
5 More than 16 dump pulses generated in 4WD vehicles (disabled for 4WD).
6 Erratic speed sensor reading while rolling.
7 Electronic control module fuse pellet open, isolation output missing, or valve wiring shorted to ground.
8 Dump output missing or valve wiring shorted to ground.
9 Speed sensor wiring/resistance (usually high reading).
10 Speed sensor wiring/resistance (usually low reading).
11 Brake switch always on, RWAL light comes on when speed exceeds 40 MPH.
12 Not used.
13 Electronic control module phase lock loop failure.
14 Electronic control module program check failure.
15 Electronic control module RAM failure.


Join the Elite Explorers for $20 each year.
Elite Explorer members see no advertisements, no banner ads, no double underlined links,.
Add an avatar, upload photo attachments, and more!
.


This is what the problem looks like:
Brake_RABS_lights_on_.JPG

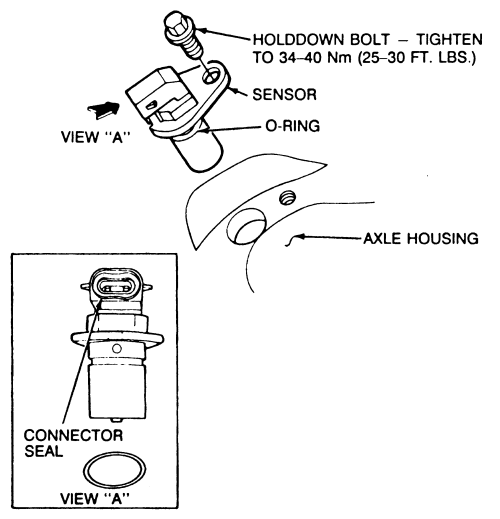
The red brake light, and the RABS yellow light indicate that there is a problem with the ABS system. Here's the location of the defective rear wheel sensor on the top of the differential:
Rear_ABS_speed_sensor_on_the_top_of_the_differential_.JPG

A half inch box wrench is used to remove the single bolt that holds it in place:
A_box_wrench_is_removing_the_bolt_.JPG

It's a good idea to check the reluctor ring inside of the differential for damage with an inspection mirror. It's impossible to look directly down into the bore without a mirror or a fiber scope. My camera was very close, and it was nearly impossible to get it focused:
A_view_of_the_reluctor_ring_.JPG

It's a good idea to check the rear differential fluid level. Mine was 2 quarts low:
Adding_differential_fluid_in_the_sensor_hole_.JPG

I'm sure that the lack of sufficient fluid to keep everything cool contributed to the sensor failing. Here's the original Ford OEM sensor:
Ford_RABS_sensor_.JPG

A resistance comparison test was done between the Ford E37F-9E731-AA, and Wells SU2175 sensors. Here is the Ford sensor:
Resistance_of_a_defective_RABS_sensor_.JPG

Here is the Wells sensor:
Resistance_of_a_new_RABS_sensor_.JPG

The Wells sensor reads 1,862 ohms, and the Ford sensor reads 1,060 ohms. The indicator lights on the dashboard were still illuminated after starting the vehicle even though the sensor was replaced. After shutting it down, and waiting a few minutes, the code was cleared:
No_more_brake_or_RABS_light_.JPG

No more brake or RABS lights!


Autozone has a link with diagnostic flow charts, a system self test procedure, and a list of diagnostic codes: http://www.autozone.com/autozone/re...rTitle=System+Testing&partId=0900c1528006e0b0

This link has information on the rear speed sensor: http://www.autozone.com/autozone/re...terTitle=Speed+Sensor&partId=0900c1528006e0b0
0900c1528006e136.gif

This link has component locations: http://www.autozone.com/autozone/re...le=Component+Location&partId=0900c1528006e0b0
COMPONENT LOCATION.
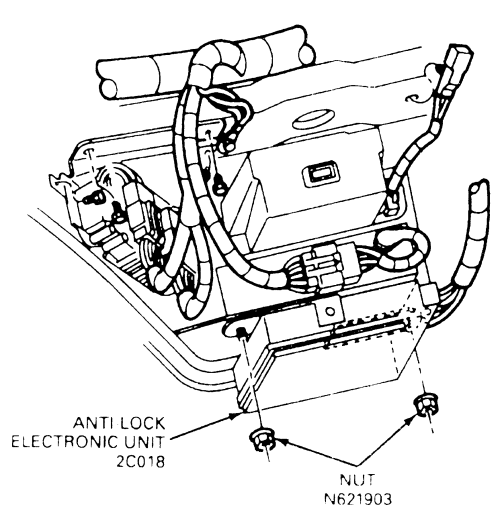
The RABS module is mounted on the driver's side of the wheel house under the instrument panel. [My note: The module is in the bottom center of the dashboard under the ashtray, and above the floor mounted cup holder]. Refer to this link: http://www.autozone.com/autozone/re...geId=0900c1528006e16a&partId=0900c1528006e0b0, and the following picture:
0900c1528006e16b.gif

The dual solenoid electro-hydraulic valve is located on the fender apron below the master cylinder.
The speed sensor, and excitor ring are located in the rear differential housing.
The RABS diagnostic connector is located on the main wire bundle inside the driver's side of the van under the dash slightly rearward of the No. 53 pin connector.
The yellow ANTI-LOCK warning light is in the instrument panel.
The diode/resistor element is located about 3 in. (76mm) left of the instrument cluster connector in the cluster wiring harness. [My note: It's a few inches above the RABS module's wiring harness connector. It's part of the harness, and it has a label around it saying "diode"].
The sensor test connector with a cap is located forward of the No. 53 pin connector on the left fender apron.

This link has a lot of information for a 1997 F150: http://roadsterchatphotos.com/rc/video/absf150-reelwheelonly.pdf

This link has information on the Kelsey-Hayes RABS system: http://www.aa1car.com/library/abs_kelseyhayes_rwal.htm
This list of fault codes has additional information compared to the other list:
RWAL Fault codes.
Codes for Dodge RWAL, Ford RABS, and GM RWAL applications are similar, but have a few differences:

1. Should not occur (replace the controller if it does).
2. Open isolation valve circuit or defective ABS module.
3. Open dump valve circuit or defective ABS module.
4. Grounded or closed RABS or RWAL valve switch.
5. Excessive actuations of dump valve during ABS braking.
6. Erratic speed sensor signal.
7. Shorted isolation valve or defective ABS module.
8. Shorter dump valve or defective ABS module.
9. High resistance or open speed sensor circuit (resistance should be 1000 to 2500 ohms).
10. Low speed sensor resistance (Dodge & Ford only).
11. Open speed sensor circuit (GM only).
12. Stop lamp switch circuit (Dodge & Ford).
13. ABS module speed processor (Dodge & Ford only).
14. ABS module program (Dodge & Ford only).
15. ABS module RAM memory failure (Dodge & Ford only).

This link has a rear wheel sensor application chart: http://vi.ebaydesc.com/ebaymotors/w...3&_odkw=abs+brake+bleeding&_osacat=0&caz.html


This link has information on the Delta P switch that is unique for the Aerostar: http://www.asashop.org/autoinc/jan99/techtips.htm. Here's a copy of the page:

Ford Rear Anti-Lock Brakes
Posted 1/18/1999
By Jamie MacFarland


The Ford Aerostar has been equipped with rear anti-lock brakes (RABS) since 1990.

Though all of Ford's rear anti-lock systems are basically the same, one mild difference is the addition of a pressure differential switch (Delta P) found in the Aerostar's fluid level circuit. This Delta P switch is found in one of two places: On 1990-1991 Aerostars, the Delta P switch is found screwed into the front of the master cylinder. On 1992 and newer Aerostars, this switch is located on the combination valve assembly. In either location, the job of the Delta P switch is to alert the driver and RABS module in the event of a hydraulic problem.

The Delta P switch has given many technicians headaches, mostly due to the lack of proper documentation (or complete absence of documentation) in many service manuals. Typically, if there's a problem in the fluid level circuit, customers will complain that the anti-lock warning light is on or both the red brake warning light and the anti-lock warning light are on.

The bottom line on this circuit: The RABS module needs to see battery voltage at pin No. 2. And if it does not, the anti-lock system assumes that there's a problem and illuminates the anti-lock warning lamp. The problem that slows down many technicians during diagnostics when this happens is the absence of a trouble code for this fault (on pre-1992 RABs 1 vehicles). This lack of a trouble code, coupled with the often poorly documented testing procedures, has led to the unnecessary replacement of many anti-lock modules. Beginning in 1992, the RABS 2 system began incorporating a code 12 - the result of low voltage to pin No. 2 of the RABS module.

Note: It is possible to get a code 12 on a pre-1992 Aerostar if the anti-lock module has been replaced because a RABS 2 module is what you'll get if you go to the parts department for a module replacement. The RABS 2 module is compatible for older models and so is used as a replacement for the earlier RABS 1 modules.

The two most common problems you'll encounter in the fluid level circuit of an Aerostar is 1) a poor connection at the fluid level switch located under the master cylinder reservoir (resulting in only the anti-lock warning lamp being illuminated) or 2) the Delta P switch is grounding out the circuit (resulting in both the red brake warning lamp and the anti-lock warning lamp). This Delta P switch is designed to ground the circuit when there's a pressure difference between the primary and secondary hydraulic circuits (broken brake line, etc.). Often the Delta P switch will ground out the fluid level circuit - when in reality there is no hydraulic problem at all. To see if the Delta P switch is the cause of the illuminated warning lamp(s), disconnect the two-wire connector (on the Delta P switch) and jump the two wires together. If the light sequence returns to normal, the Delta P switch is the cause.

To save time: Before you even try to pull a code, verify that the red brake warning lamp illuminates when the ignition switch is turned to the crank position. This is a bulb check function incorporated in the red brake warning lamp circuit. If you don't see the red brake warning lamp when you crank the engine over ... find out why not! Chances are good that the lack of illumination during the bulb check routine is the result of a poor connection at the fluid level circuit. And remember, on pre-1992 Aerostars, there is no trouble code for this condition!

Jamie MacFarland is ASE master and L1 certified. He is an IDENTIFIX repair hotline Ford specialist with 13 years of experience.


Here's another tech bulletin with a copy of the page: http://www.carquest.com/common/downloads/partsTechBrakeCQB 01-24.pdf
Bulletin CQB 01-24

Subject: Red brake light and Amber ABS light on after failed brake hose,
loss of pedal or master cylinder replacement.

Vehicles Involved: Various Aerostar vans, most common on 1995.

Condition: Combination valve illuminates red brake warning light because of
hydraulic brake pressure differential, and will not recenter during
conventional bleeding.

Repair Procedure: Whenever you have an Aerostar van that has an amber ABS light on, first check the red brake warning light to see if it is only on during the bulb check, and engine crank. After performing a visual inspection, attempt to retrieve codes. Remember that on RABS II equipped Aerostar vans the ABS diagnostic connector is located in the middle, underside of the dash toward the driver’s side. It is a black wire with an orange tracer attached most often on RABS II systems to a single red wire. Follow the procedure to separate these wires, and retrieve codes. If a code is displayed for the fluid level switch in the master cylinder, follow the diagnostic steps in an ABS manual for diagnostics. If you then find yourself at a dead end following the tree chart, realize that the pressure differential switch from the combination valve is in the fluid level wiring circuit. If the valve has switched isolating one half of the brake system, the circuit is grounded illuminating the red light. This will cause the ABS light to also be illuminated. The valve frequently will not recenter itself when the system is bled at the wheels. The following is a solution that frequently works. Crack the steel brake lines at the combination valve while holding light pressure on the brake pedal. You may find that it is also necessary to tap the side of the combination valve to have the pressure differential plunger recenter itself.


Parking brake switch.

The next installment of this thread deals with the troublesome parking brake switch. The reason that I say this is because I've had problems with this switch on 3 out of 5 of my vans. The switch is an open design, so dirt gets pushed into it very easily. The contacts are in the open position while the parking brake lever is down, so the contacts fill up with whatever gets on the floor in that area.

This is where you start. You remove the upper screw which is easy to get to:
Removing_the_upper_screw_.JPG

Then you remove the lower screw which is harder to get to:
Removing_the_lower_screw_.JPG

The cover is lifted up, and pushed to the side:
The_area_where_the_parking_brake_switch_is_located_.JPG

As you could see, dirt falls down into this area, and messes up the contacts of the switch. The switch is held in with one bolt, and is very difficult to get off unless you use a box wrench since it's very close to the seat. A 1/4" drive ratchet or a breaker bar couldn't fit, and my box wrenches were in the house, so I just put a socket onto it, and turned it with a pliers. It wasn't a big deal since it wasn't tight. Here is a picture of the switch while the contacts are in the open position:
The_parking_brake_switch_gets_dirt_in_this_area_.JPG

This is how you clean the switch:
1. Spray WD40 or electrical contact cleaner on it, and let it soak for about a minute.
2. Open the switch, then insert a small phillips screwdriver between the disc on the top, and the contact bar on the right side of the picture. Turn the screwdriver, and the part that pushes in to get all around the inner disc.
3. Inspect the inside of the switch, and insert a small flat screwdriver to remove any dirt that was scraped off of the contacts.
4. Spray more WD40 or contact cleaner into it, and see if everything is clean.
5. Check the switch with a continuity tester to see if it's electrically closed while it's in the closed position. Pushing the switch should break the connection, while letting go should enable the connection to have continuity.


How to repair the resistor/diode module.

There is a combination resistor/diode pack located on the wiring harness near the ABS module. The friction tape has to be cut in order to get to it. A replacement is not available, so a new one has to be made out of discrete parts. The resistor is a 1,000 ohm, half watt resistor, and the diode is a standard silicon diode. Both parts were purchases from Radio Shack.
Resistor_diode_crimped_.JPG

The end has a 3 prong trailer connector unlike the original which was integrated into the harness:
Resistor-Diode_module_.JPG

Here is the opposite side connected to the vehicle:
3_prong_trailer_connector_.JPG

The addition of a removable plug makes it easier to troubleshoot, and repair any future ABS problems related to the wiring. All of the exposed metal parts, crimp connectors, and wires were wrapped with electrical tape.


I had both the ABS and brake light on when I bought mine. The seller said he had his guy look at it, and one wheel cyl was seeping slightly, but he thought the brake shoes being somewhat worn, was setting off the lights! Sounded fishy, so I did some general research, and was told a bad bulb in the 3rd brake light could set it off. And I DID have one out! I ended up breaking the plastic pin on the socket and had to dig up a replacement. I also checked the master cyl, and it was low. Topped it off, and changed the light, and no more ABS/brake lights!


wow! what an excellent thread. Thank you. I purchased another Aerostar 3 weeks ago, a 1997 extended 4.0 and it has the RABS light ON, (but not the Parking Brake light). Trying to get it to go off but properly, i.e., fixing the problem that's causing it. The brakes are fine.


I'm checking the RABS light staying on in my 1997 Aerostar 4.0 extended; I have the following questions:

1) "On 1992 and newer Aerostars, this switch is located on the combination valve assembly..." where is the combination valve assembly?

2) "verify that the red brake warning lamp illuminates when the ignition switch is turned to the crank position. This is a bulb check function incorporated in the red brake warning lamp circuit. If you don't see the red brake warning lamp when you crank the engine over ... find out why not!"
This check assumes the Emergency Brake is engaged, right? In my Aerostar, it comes on and stays on IF the Emergency Brake is engaged, but it doesn't come on if the Emergency Brake is not engaged. It goes off when the Emergency Brake is released. (but the RABS light stays ON).

3) "a poor connection at the fluid level switch located under the master cylinder reservoir (resulting in only the anti-lock warning lamp being illuminated..."
I pulled the connector under the master cylinder / fluid reservoir which has 3 wires. The RABS light stayed ON, engine running

I am about ready to conclude it is the sensor in the differential housing, unless there is another check to do like the "combination valve assembly" and jumping the two wires which I haven't found.

thanks for any tips.


1. Under the master cylinder behind the battery. It's on a bracket mounted by a screw to the frame.

2. The normally closed switch is behind the emergency brake lever as shown in the above photos. The contacts complete a series circuit to illuminate the red brake light when the brake arm is pulled out. The contacts are broken once the brake arm is fully seated.

3. A continuity tester could be used to check the connections on the combination valve, pressure sensor, and the master cylinder low fluid float assembly.


I checked the top-mounted third brake light on the hatch door. It was missing a bulb for the same reasons as Adam's, broken bulb holder pins. I fixed it temporarily with a "u" nail and the light now has two new bulbs and working. RABS light still ON.

I'll look for the combination valve today. The brake fluid level is good.


Motormite/Dorman/Help sells this stop light assembly. I once replaced it in my 1993 van. Autozone was the lowest price for the combination valve when I bought one a few years ago. It also has a lifetime warranty. RockAuto sells it too, so you could compare prices. I didn't check Tousley Ford Parts, so that's another option.


ok, I'll check Motormite, Autozone has that line of parts but I haven't seen the stop lamps on the wall display. I think CarQuest is the one that has them on display, but I'll check with Rock Auto too. Thanks.

as to the Combination Valve, I can't find it or I am missing what it looks like. I looked for a drawing but no luck. I want to jump its two wires to see if the RABS light goes off.


ok, now I know what it is, I was looking for something mounted on the firewall.

the troubleshooting checks (at the beggining of this thread) say to "jump the two wires at the combination valve to see if the RABS light goes off". That's what I was going to do, but if it might create a problem, I won't touch it.


RABS dash light

something weird happened between yesterday and today with my 1997 Aerostar RABS light:

yesterday I started to read the Owners Manual and I found a quote where it says: "if the RABS light stays on or behaves erratically, check Fuse Number 7".

I squeezed myself under the dash with a flashlight to remove the cover of the fuse box and pull Fuse Number 7 to check it. (HINT: the little plastic fuse puller included in the fuse box cover is totally useless, I knew that from experience with two other Aerostar and came armed with needlenose pliers).

ok, so I pull Fuse Number 7 (yellow 10 amp), and it looks fine, not blown. But I went ahead and pulled another 10 amp fuse (Number 8) and pushed it into the Number 7 fuse plug, and installed Number 7 fuse into the Number 8 plug.

to my surprise, when I used the Aerostar to go to the post office today, the RABS light went through its self-check and turned off by itself.

this can't be!! (I thought), so I went and did my errands at the post office, restarted the van and it did exactly the same thing. The RABS light is now off by itself, i.e., it fixed itself simply by replacing the fuse.

the trick about replacing or moving fuses around even if they look ok, I learned from 22 years of owning a Jaguar. Sometimes a fuse looks fine but it is not, replacing the fuse when something electrical is erratic, corrects many symptoms in Jaguar cars.

I never did any troubleshooting for the RABS light, with the exception of changing one fuse with another, and look at the results!! One less egg to fry!


no corrosion on the fuse, shiny as the other. did not test with ohms tester but will do it today. (I moved it to position Number 8). I concluded it is a weak/bad fuse.

I drove the van again yesterday and it lights up during startup then goes and stays off. I'm elated!

UPDATE: I tested the fuse with my analog multimeter:
it shows continuity but the needle is erratic, doesn't stay put, at least when compared to other fuses I tested in which the needle stays "stable". It's the fuse. But if you look at the fuse element, it looks fine.


Join the Elite Explorers for $20 each year.
Elite Explorer members see no advertisements, no banner ads, no double underlined links,.
Add an avatar, upload photo attachments, and more!
.


ABS light came back on.

1) replaced Speed Sensor, no change.

2) did the orange/black test wire, got Code 12: "low fluid detected during ABS stop",
or "Stop lamp switch circuit (Dodge & Ford).

3) topped off brake fluid reservoir, disconnected and reconnnected wiring plug below reservoir, no change.

4) disconnected ground cable from battery to try and reset RABS light, no change.

5) checked all stop lights, no bad bulbs, everything works, including pedal switch, no change.

Any other tip?


Back
Top