LD50 Full-size axle thread `93 Ex | Page 30 | Ford Explorer Forums - Serious Explorations

  • Register Today It's free!

LD50 Full-size axle thread `93 Ex

LD50 Full-size axle thread `93 Ex SAS

Hey fellow Explorer enthusiasts!

Well I never thought I`d do it, but it`s time.
I originally thought I would go to a smaller rig one day but I`m going to beef up the Explorer instead. Since I already have a huge thread on my previous work I decided to start fresh.

If you would like to see my previous mods, you can navigate from my signature link, or click here:
http://www.explorerforum.com/forums/showthread.php?p=523171#post523171

~

My plans are to install a D44 and 9-inch into the station wagon and run 35 inch tires. Hopefully she`ll still get in the garage, but if it don`t then oh well. During this I also have some body work to do.

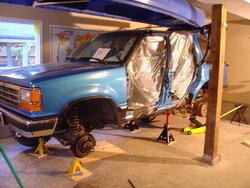
Right now I have the rear end out, I took off the spare tire hanger and removed the muffler and rear most heat shield. (doors are off for body work)Next the gas tank comes out so I can prep the underside for rust protection, from the t-case back. In the meantime I am trying to sell some parts for cash.

First big decision is what gear ratio. The 4.10`s on 33s was nice, but I think I`d like a bit more torque than that so I`m thinking 4.88 or 5.13s.
 

Attachments

  • prep.JPG
    prep.JPG
    62.9 KB · Views: 10,430


Join the Elite Explorers for $20 each year.
Elite Explorer members see no advertisements, no banner ads, no double underlined links,.
Add an avatar, upload photo attachments, and more!
.


You have done a very good job with this. Whenever I get around to doing my SAS, I will have a good guide here.


Join the Elite Explorers for $20 each year.
Elite Explorer members see no advertisements, no banner ads, no double underlined links,.
Add an avatar, upload photo attachments, and more!
.


I have to say, after reading this thread from beginning to end, i am no only enamored, but inspired. When i pick up my next Explorer, this will surely be an invaluable reference.


9 inch axle reinforcement

Well thanks.


Alright, axle reinforcement.
First of all I had to repair the crack I had previously mentioned.
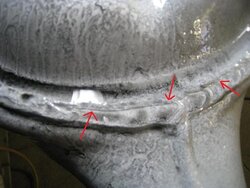
I found that when I got the axle out, cleaned it up and buffed it I couldn't see where that crack was. Fortunately I have access to some non destruction testing equipment in the form of a Magnetic particle inspection kit. What it consists of is a contrast aid paint, which you first spray on, Then you have a spray can with a fluid mixed with very fine metallic particles.
When you spray that on and activate a magnetic yoke, it creates a magnetic field from yoke end, through steel, back to yoke. Any cracking is then immediately recognizable because the magnetic field is affected by any crack, which causes the small metal particles in the solution to "line up" at a crack indication.
-pretty fun stuff
 

Attachments

  • 9 inch reinforce 2.jpg
    9 inch reinforce 2.jpg
    44.5 KB · Views: 587
  • 9 inch reinforce 3.jpg
    9 inch reinforce 3.jpg
    43.5 KB · Views: 589
  • 9 inch reinforce 4.jpg
    9 inch reinforce 4.jpg
    42.7 KB · Views: 599


Then I used a grinder to grind a groove along the crack, going a bit further for good coverage.
For weld I used an Arc (rod) welder at 90 amps, and using 1/8 7018 low hydrogen rod. I also applied just a little bit of pre-heat to the weld area using a propane torch.
 

Attachments

  • 9 inch reinforce 5.jpg
    9 inch reinforce 5.jpg
    53.2 KB · Views: 583
  • 9 inch reinforce 6.jpg
    9 inch reinforce 6.jpg
    49.4 KB · Views: 594


I wanted to check to see how much the axle may or may not be out of align, and it`s fairly easy to check.
Reinstall the 3rd member and shafts with a couple bolts and fasten some straight edges on the outer part of the shaft you would normally bolt your tires to. Since I got a locker in there I just measured, spun the yoke till my straight edges moved 1/4 rotation at a time, and measured every time. Any alignment issues will be seen in the measurements. I found maybe 1/16 difference front to back at about 1 foot out. Good enough for me.
 

Attachments

  • 9 inch reinforce 1.jpg
    9 inch reinforce 1.jpg
    60.1 KB · Views: 580


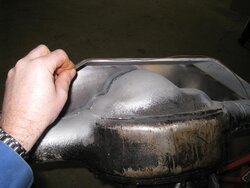
I am making my own reinforcement and started with some 1/4 inch x 3 inch flatbar cut 29" long and bent 30* on each side, 5.5 inches from center of bar.
Then I ground out an elipse on each end so it hugs the housing.
 

Attachments

  • 9 inch reinforce 9.jpg
    9 inch reinforce 9.jpg
    50 KB · Views: 590
  • 9 inch reinforce 8.jpg
    9 inch reinforce 8.jpg
    55.1 KB · Views: 587
  • 9 inch reinforce 7.jpg
    9 inch reinforce 7.jpg
    54.5 KB · Views: 587


I`ll show a little more detail on how I made my template when I do the other side but for now I have the top done.
 

Attachments

  • 9 inch reinforce 12.jpg
    9 inch reinforce 12.jpg
    84.8 KB · Views: 556


To make the templates I used what we call here "Bailing wire"
It is just a stiff wire that holds it`s shape pretty good when you bend it.
Once I had the shape of the template I needed I transferred it to cardboard, which I trimmed up till it fit nice. I then used the template to mark an outline on my steel, which I then cut with a cutting torch.
After you have it cut out it is a matter of checking fit, grinding a bit more, checking, grinding til it fits.
Then I welded it on and painted it today.
 

Attachments

  • 9 inch reinforce 13.jpg
    9 inch reinforce 13.jpg
    69.7 KB · Views: 533
  • 9 inch reinforce 14.jpg
    9 inch reinforce 14.jpg
    65.6 KB · Views: 527
  • 9 inch reinforce 15.jpg
    9 inch reinforce 15.jpg
    66.7 KB · Views: 538
  • 9 inch reinforce 16.jpg
    9 inch reinforce 16.jpg
    75.8 KB · Views: 536


Is your housing still straight? The last one I did like that bent the crap out of the housing when it cooled.


Is your housing still straight? The last one I did like that bent the crap out of the housing when it cooled.

Thats when you need to weld slowly in small segments allowing it to cool between segments. Takes a while but you wont kill your tubes.


Ive done 2, havent warped either one- what i did was 1" beads, four to six at a time, spaced far apart... just like you'd do a weld on beadlock. Wait about 10 minutes between each session keeping the housing completely covered in a welding blanket. Once finished, leave the welding blanket on it till its room temperature.

Of course, a stock 9" housing isnt very straight from the get go. There's a 50% chance you'll make it worse and a 50% chance you'll make it better. :p:


The housing is amazingly straight. I double checked using the flatedge method afterwards and had the same almost 1/16th variation front to back at a foot out. By front to back I mean direction of travel at installed angle. Actually was thinking that if the third member was fully tightened it would be closer to dead on, I only had 4 nuts on it.

I went slow and did smaller increments as indicated above. Although I preheated for the first piece I did not later and did not use a weld blanket.

Just putting it all back together now!


Hello, Greetings from Spain

This thread is awesome I could not stop reading until the end ... congratulations, I envy all that makes your copiare Explorer and I think some things ....
Mine I have it with Rancho 9000 and control unit, twin Warrior153 2 ", reinforced spring 2" body lift 3 "and wheelarches 33x12.5R15 oversized wheels. I'll post some pictures when I learn.


Had to laugh, I tried putting my spare tire on one of the front hubs and it wouldn`t fit. I got the spare when I got my 31 inch tires 3 AND A HALF YEARS AGO.
(The tire guy gave it to me in place of my old stock one, I left it in there when going to 33`s because a 33 wouldn`t fit and figured it would do in a flat tire situation).

Good thing I never got a flat.

Here`s a pic of my 9 inch with perches moved in.
The stock width on the 9 inch axle from center of perch to center of perch was 44 inches. The Explorer is 39 inches. I did some math so that`s 2.5 inches a side. I did them dead even with the old perch angle, I hope that`s the right way to do it...

i love the little red wagon thats awsome!!!!:thumbsup:


Bump for a good thread.

LD50,please keep those pics up.I will be doing a 4x2 Ranger SAS next year.BTW,have you attempted adding a front sway bar?Any thoughts on adding one?


Wow look at that, a message from Spain.
I didn't realize I didn't post pics of that axle mounted, have to get on that.

Ben2go:
I thought about a sway bar but it is not too bad with my Ranchos set at max stiffness, I actually leave them set there because it seems to feel the best on road and off. The thread should still be here, I actually use it myself when I can't remember stuff...


My idea for brake line was just to get something long, so at the parts store we came up with these:

Brake hose part #BH38261
Brake hose part #BH38260

They are 2 feet long and made to be mounted in the middle somewhere, but in my case I slid the bracket up to the end and used it as an upper fastening bracket.
After trying different locations, this seemed best.

I tried sourcing these parts for my ranger build and they show up as only 13 inches long. Can you tell me the application they were for.
Thanks
Danny


Bump for a good thread.

LD50,please keep those pics up.I will be doing a 4x2 Ranger SAS next year.BTW,have you attempted adding a front sway bar?Any thoughts on adding one?

I am doing a Ranger SAS and I think the stock Ranger Sway bar might work in the end. I think it needs to be reversed and then it will connect up to the fronts of the radius arms. Not 100% as I haven't tried but I think it will work.


Join the Elite Explorers for $20 each year.
Elite Explorer members see no advertisements, no banner ads, no double underlined links,.
Add an avatar, upload photo attachments, and more!
.


I tried sourcing these parts for my ranger build and they show up as only 13 inches long. Can you tell me the application they were for.
Thanks
Danny

I just ran out and measured one of my front lines, thet are in fact 24" long.

I want to say they were F350 front lines. some sort of large truck anyway.
these were Lordco part #s


Back
Top