MoabB2's Body Restoration Thread | Page 3 | Ford Explorer Forums - Serious Explorations

  • Register Today It's free!

MoabB2's Body Restoration Thread

410Fortune said:
that radiator looks low? could jsut be me and the pic...looks like a nice rad support, good work :)

Looks low to me too. Are we sure that this will be above the frame?


Join the Elite Explorers for $20 each year.
Elite Explorer members see no advertisements, no banner ads, no double underlined links,.
Add an avatar, upload photo attachments, and more!
.


all you need to worry about is behind the bumper and protected from rocks based on your approach angles


410Fortune said:
Nothern makes awesome units, they can recommended to me after my Ron Davis 2 core aluminum had header failure....

that sucker will cool that V8 just fine, mine hardly hits 210 even towing the boat, my trans has yet to see 165.

Mine is a similar size, only mine is not as tall, but is wider.
Nice work, again. Having a bolt on support will make it oh so easy to get the engine and trans in as one unit...

I hope that the cooling issues I was having beforehand were caused by a weak radiator. I hope that this new radiator will do a sufficient job.

I also think that bolting on the rad support is a great idea! That should make the re-install of the engine and trans a piece of cake. Slide it in, mount it, and then bolt on the rad support....hahaha. ;)


410Fortune said:
all you need to worry about is behind the bumper and protected from rocks based on your approach angles
I run some tow hooks down there that are lower than everything else....if I was to hit something I hope that it would slide on the tow hooks first.

Even still though...you don't want to mess around with putting a hole in that radiator...i'd rather it be very out of the way.


The Radiator support sits a little lower then I would have liked, It sits about 1 1/2" Inches lower then the Frame Rails. And the Radiator sits about 1 - 1 1/2' Inches Above it. So the Radiator should be protected, And I hope the Support is protected by the Front Bumper Guard or the Pull Hooks.


Richard


Mid Day Update.

Well Today I Removed the Parking Brake Cable (That one Clip in the Cab is a PITA to get off)

Fabricated and Welded in the Retainers for the Radiator Support.

Then got started on the removing the Mounting plate for the Steering Column an brake mount etc. (Because it has rusted through behind it.)

Well then I found out that the Steering Column has to be removed to get to it....

And well everything has to be removed to get the Steering Column out...

1989BroncoII80.jpg


1989BroncoII81.jpg


Then drilled the Welds out

1989BroncoII83.jpg


And theres the Rust. (Its going to be fun to fix this...)

1989BroncoII84.jpg


Theres another 5 hours shot to hell...

Richard


PICT6056.jpg


This is an old pic of the 302 in there for fabbing up purposes. Removing that support does really help putting and taking out the engine and tranny. You can see how much I took out to get that allmost 30" wide radiator in there also. The opening you see in that radiator support structure was cut out up to those side angle pieces you see. They were stock configuration. The support that's going back in there is 1 and 1/2" DOM tubing that will be removable. It's allmost finished. Your doing a great job on that build and fun to watch. Like to be there with you working on it.

Just added. By support I mean the top horizontal piece from side to side.


(June 28th)
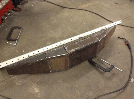
Well I got the Badly Rusted Area Cut Out.

1989BroncoII85.jpg


This Firewall was a real Pain to work with, There is an Aluminum Support Mount on the other side, The Dash Pad also made it difficult, And worst of all the Fire wall is only 32 Gauge (0.0097") Like welding to damn Tin Foil...

Very Difficult to weld to with my Welder... Had to do it Very Cold and Very Slow. Pretty much if you even touched it, it would blow through.

There was two Patches stuck in (Because I'm Replacing two Levels of steel)
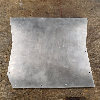
Here is the First Patch Welded in.

1989BroncoII86.jpg


Then here is the Top Patch Welded in.

1989BroncoII87.jpg


To do this it took about 8 hours of welding... I have never welded something so thin...

1989BroncoII88.jpg


Then all the welds were Ground smooth.

1989BroncoII89.jpg


And the Mounting plate was welded back on.

1989BroncoII93.jpg


There should be no sign of this Work when I'm done.

Then I moved onto the Holes in the Pillars Put there to have the Pillar Light.

Here is the Patch cut out to fill the Hole.
1989BroncoII90.jpg


This was difficult do to the windshield being less then a inch away from the Patch. So this also had to be a very cold Weld.

1989BroncoII91.jpg


Then the Hole on the Driver Floor pan was Cut out, Patch Cut for it, And the New patch welded in.

1989BroncoII92.jpg


Then Started on Stripping the Fenders.
Here is the Bondo Work that was done to the Driver Side Fender,( Not to bad of damage, Looks like he hit a Garbage Can or something.) There is also Bondo In the Driver side Rocker Panel (I hope there is none in the Door)
1989BroncoII94.jpg


Here is the Fully Stripped Driver Side Fender.

1989BroncoII95.jpg


1989BroncoII96.jpg


And here is the Fully Stripped Passenger side Fender.

1989BroncoII97.jpg


And here is were I am on the Hood.

1989BroncoII98.jpg


Richard


Well finished Stripping the Hood, And got started on Disassembling the Doors.

Here are the Stripped out Doors.
Passenger:
1989BroncoII99.jpg


Driver:
1989BroncoII100.jpg


Here is where Someone tried to Brake into the Truck,
He tried to pry the Bottom of the door two times.
1989BroncoII101.jpg


And here is where he tried again at the Top of the Window trying to pry it down.

[Notice Top of Picture.]
1989BroncoII103.jpg


Here is where when they Replaced the Regulator Motor, They Cut the side of the door open, Instead of drilling a few Rivets...

1989BroncoII102.jpg


The glass was a real pain to get out, (Because the Mount is Riveted on after the Glass is put in, And the Bracket don't exactly fit through the Opening... Had to Seperate the top of the door enough to get it to clear.
When I re-assemble the Door the Rivets will be drilled out of the Bracket the glass will be put in and the Bracket will be bolted to the Glass.


The Door Handle will have to be Removed do to the Color Change, And the Design of the Handle.
The Rivets will have to be Removed and the Handle will be Bolted back on to the Truck.

1989BroncoII104.jpg


Here is everything out of the Doors (Marked of course).

1989BroncoII105.jpg


To Dis-Assemble both doors it took about a day and a half.
The sad thing is I can Dis-Assemble a Classic car door in a half hour...
Damn Ford and Rivets!!!!


Richard


rookieshooter said:
Your doing a great job on that build and fun to watch. Like to be there with you working on it.
side.

Thanks,
It has been one hell of a project so far. (In a good and Bad way)
I hope I can get back to the Interesting stuff soon.

I have also looked into your build, A lot of very good Ideas put into one truck. Dead Link Removed


July 3rd, 4th, and 5th.


Well I finished Stripping the Hood.
1989BroncoII106.jpg


Removed the Door Handles, Preped the Surface.
And started the First Step of Stripping on the Passenger Door.
1989BroncoII107.jpg


1989BroncoII108.jpg


Here is the Passenger after 60 Grit on the Sander/Polisher, Then the 3M Strip Disc, And 100 Grit on the DA.
1989BroncoII109.jpg


Then Wiped the Driver Door down with Wax and Grease Remover and got started on the Driver door.
1989BroncoII110.jpg


Here is the Mud that was in the Bottom of the Driver Side Door.
1989BroncoII111.jpg

1989BroncoII112.jpg


Here is the Damage on the Stripped Door.
1989BroncoII113.jpg

1989BroncoII114.jpg


It's hard to tell from the Picture but here is how much the Door has been Deformed (From a 1/8th to a 1/4 of an inch.)

1989BroncoII115.jpg

1989BroncoII116.jpg

1989BroncoII117.jpg


And here are all the Completely Stripped Panels, I'm working on the Hatch Right now, (I hate working with FiberGlass.) All that Remains after that is the Rocker Panels. Then she is Completely Stripped. :)

1989BroncoII118.jpg


Richard


geebus talk about a brand new truck!
*****in work and detail, me likey!


What are your plans concerning gas tank?


rookieshooter said:
What are your plans concerning gas tank?

Yes we plan to use a gas tank. :D JK!

What do you mean? I still have my stock Bronco II tank. I may have to plumb in a emmissions sensor required for the OBD2 Computer. Right now I just have the sensor plumbed into the fuel line and it is throwing a code.


MoabB2 said:
Yes we plan to use a gas tank. :D JK!

What do you mean? I still have my stock Bronco II tank. I may have to plumb in a emmissions sensor required for the OBD2 Computer. Right now I just have the sensor plumbed into the fuel line and it is throwing a code.

Just wondering if you were going to use the original one. When I looked inside mine with a flashlight there was all kinds of rust scale. All that nice work your doing like stripping all the paint off I thought you may add some kind of coating which they do make to the inside of the tank if needed or replace. I'm going to have to get another because mine is so bad. Someone makes a heavy wall plastic type tank also that you don't have to ever worrry about that scale problem. But if yours is fine then no problem. As usual nice work.


Rookie, my 88 BII tank had 0 rust or anything inside, it looks brand new in there, I think if fuel is kep in them they do not rust??


410Fortune said:
Rookie, my 88 BII tank had 0 rust or anything inside, it looks brand new in there, I think if fuel is kep in them they do not rust??

That's probably why mine had so much rust. It sat for allmost 2 years with no gas. :eek: Good reason to allways keep um filled.


subscribing... nice work, you look very well set up to do this in your car-hole


Join the Elite Explorers for $20 each year.
Elite Explorer members see no advertisements, no banner ads, no double underlined links,.
Add an avatar, upload photo attachments, and more!
.


vervepipes said:
subscribing... nice work, you look very well set up to do this in your car-hole
What's a car-hole?


Back
Top