Brian1
Elite Explorer
- Joined
- February 2, 2000
- Messages
- 5,387
- Reaction score
- 643
- City, State
- Albuquerque, NM
- Year, Model & Trim Level
- 1991 XLT
- Callsign
- KG5BAQ
I made a new bumper for my Explorer and just finished it up today. It has been built in stages over the past 6 months when I had time The overall design was kept in mind so no changes had to be made along the way.
I needed a tire carrier once I got bigger tires since the new spare wouldnt fit under the chassis anymore and it was taking up too much cargo area. I also wanted a bumper to match my front bumper and to provide better off-road protection and recovery points. It also needed an integrated receiver hitch since I tow trailers on occasion. The new bumper increased my departure angle which was greatly needed. I was always hitting my rear receiver hitch on something while wheeling.
Start off with the CAD design using Solidworks


From there I started cutting the material. A carboard template of the frame plates was made then plasma cut out of 1/4" steel. 2 sets of holes were drilled for stock and 1" body lift height.

The clevis tabs are welded to the front and back of the bumper and to the frame plates for added strength

From here the bumper started taking shape. I cut a strip of 1/8" diamondplate and stitch welded it to the bumper on the underside.

The bumper portion pretty much finished up

The hinge is a custom design of mine. It uses a 1 1/4" socket head cap screw in double shear, a bronze bushing in thick wall DOM tube and thrust bearings. A nut was welded into the bumper before the caps were put on the sides. I use a clamp from Destaco (??) rated for over 1000lbs. The weight of the carrier when closed rests on a small Delrin pad. It also has a backstop to rest up against and protect it from swinging into the body.
I drove the Explorer around and wheeled it for a few trips before starting the swing out portion. After a few months I assembled the hinge and made the base of the swing out. Then I drove around and wheeled it like that for a few more months.
1/2 way finished

Then I figured I better finish it and I started to finish the swing out carrier a few days ago.
Checking tire fit:

Fabbing the tire hub. I found some old lugs and nuts that came off the explorer and used 3 of them. I also used some pipe to center the wheel on so when the tire is lifted up the weight can be rested on it while the holes are lined up with the lugs. It will also act as a lock for the tire. It is drilled for a padlock to fit into. The hub is on a receiver hitch that uses 2 1/2" bolts to secure it to the main carrier. This way it is adjustable for differet tires and backspacing. 1 of the 1/2" bolts will be tack welded for added theft prevention.

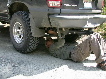
The finished carrier/bumper


And with the tire installed:


The tire carrier will have modular accessories added to it later when I figure out what I want on it (hi-lift, basket, Jerry cans, etc.) They will simply bolt on to the tire carrier using u-bolts.
I designed and built the carrier for a maximum size of a 37" tire which the Explorer will use at a later date. I completly forgot to add in some gussets before it was painted but will do so before a 37 is put on. It is strong enough now for the 31.
Extra pictures can be seen at http://photobucket.com/albums/b141/Brian4x4/Offroad Fab projects/Explorer Rear Bumper/
I needed a tire carrier once I got bigger tires since the new spare wouldnt fit under the chassis anymore and it was taking up too much cargo area. I also wanted a bumper to match my front bumper and to provide better off-road protection and recovery points. It also needed an integrated receiver hitch since I tow trailers on occasion. The new bumper increased my departure angle which was greatly needed. I was always hitting my rear receiver hitch on something while wheeling.
Start off with the CAD design using Solidworks
From there I started cutting the material. A carboard template of the frame plates was made then plasma cut out of 1/4" steel. 2 sets of holes were drilled for stock and 1" body lift height.
The clevis tabs are welded to the front and back of the bumper and to the frame plates for added strength
From here the bumper started taking shape. I cut a strip of 1/8" diamondplate and stitch welded it to the bumper on the underside.
The bumper portion pretty much finished up
The hinge is a custom design of mine. It uses a 1 1/4" socket head cap screw in double shear, a bronze bushing in thick wall DOM tube and thrust bearings. A nut was welded into the bumper before the caps were put on the sides. I use a clamp from Destaco (??) rated for over 1000lbs. The weight of the carrier when closed rests on a small Delrin pad. It also has a backstop to rest up against and protect it from swinging into the body.
I drove the Explorer around and wheeled it for a few trips before starting the swing out portion. After a few months I assembled the hinge and made the base of the swing out. Then I drove around and wheeled it like that for a few more months.
1/2 way finished
Then I figured I better finish it and I started to finish the swing out carrier a few days ago.
Checking tire fit:
Fabbing the tire hub. I found some old lugs and nuts that came off the explorer and used 3 of them. I also used some pipe to center the wheel on so when the tire is lifted up the weight can be rested on it while the holes are lined up with the lugs. It will also act as a lock for the tire. It is drilled for a padlock to fit into. The hub is on a receiver hitch that uses 2 1/2" bolts to secure it to the main carrier. This way it is adjustable for differet tires and backspacing. 1 of the 1/2" bolts will be tack welded for added theft prevention.
The finished carrier/bumper
And with the tire installed:
The tire carrier will have modular accessories added to it later when I figure out what I want on it (hi-lift, basket, Jerry cans, etc.) They will simply bolt on to the tire carrier using u-bolts.
I designed and built the carrier for a maximum size of a 37" tire which the Explorer will use at a later date. I completly forgot to add in some gussets before it was painted but will do so before a 37 is put on. It is strong enough now for the 31.
Extra pictures can be seen at http://photobucket.com/albums/b141/Brian4x4/Offroad Fab projects/Explorer Rear Bumper/
") Again, nice work. I wish I had the tool and the space.
Again, nice work. I wish I had the tool and the space. I'm surprised you don't really see more anti theft on spares.