-
Performance Upgrades - Maintenance - Modifications - Problem Solving - Off-Road - Street Trucks.
Covering the Explorer, ST, Sport, Lincoln Aviator, Sport Trac,
Mercury Mountaineer, Mazda Navajo, Ford Ranger, Mazda Pickups, and the Aerostar.
Featuring H.I. - Human Intelligence.
Register Today It's free!
- Forums
- Generation Specific Forums
- 1995 - 2001 Explorer Ranger Merc. 2nd Generation
- Stock 1995 - 2001 Explorers
You are using an out of date browser. It may not display this or other websites correctly.
You should upgrade or use an alternative browser.
You should upgrade or use an alternative browser.
How to: Overhead console display fix - 2nd Gen
- Thread starter Thallarsen
- Start date
Prefix for threads which are instructional.
Elite Explorer members see no advertisements, no banner ads, no double underlined links,.
Add an avatar, upload photo attachments, and more!.
Thallarsen
Well-Known Member
- Joined
- February 21, 2000
- Messages
- 126
- Reaction score
- 8
- City, State
- Potomac, Maryland
- Year, Model & Trim Level
- '99 5.0 Limited AWD
:biggthump
Electrohacker
Explorer Addict
- Joined
- March 15, 2004
- Messages
- 1,248
- Reaction score
- 4
- City, State
- Clinton Twp, MI
- Year, Model & Trim Level
- '96 XLT V8 4WD
this is what happened when they switched to lead free solder
Terrymann
New Member
- Joined
- January 28, 2010
- Messages
- 2
- Reaction score
- 0
- City, State
- Atlanta Georgia
- Year, Model & Trim Level
- 2002 Explorer Sport
It WORKS
Thanks so much for this thread. Just finished my solder job and it's like brand new. Dealer wanted 127.00 for the part. Need address to send you an offering!!!!
Thanks so much for this thread. Just finished my solder job and it's like brand new. Dealer wanted 127.00 for the part. Need address to send you an offering!!!!
Terrymann
New Member
- Joined
- January 28, 2010
- Messages
- 2
- Reaction score
- 0
- City, State
- Atlanta Georgia
- Year, Model & Trim Level
- 2002 Explorer Sport
It WORKS
Thanks so much for this thread. Just finished my solder job and it's like brand new. Dealer wanted 127.00 for the part. Need address to send you an offering!!!! This is as of January 28, 2010
Thanks so much for this thread. Just finished my solder job and it's like brand new. Dealer wanted 127.00 for the part. Need address to send you an offering!!!! This is as of January 28, 2010
Thallarsen
Well-Known Member
- Joined
- February 21, 2000
- Messages
- 126
- Reaction score
- 8
- City, State
- Potomac, Maryland
- Year, Model & Trim Level
- '99 5.0 Limited AWD
No need. A 'thanks' is offering enough.
Glad I was able to be of help.
The next time you figure out something that others might be interested in knowing about, whether it's a fix, solving a problem, or offering adivice, share your knowledge. It's a good feeling that lasts much longer than a couple of bucks.
However if you really want to donate a couple of bucks, send it to Haiti, via redcross.org . I'm no bleeding heart, but the circumstances that those people are currently in are worse than 75% of the household pets in the US.
A couple of bucks goes a long way.
Mountaineer1999
New Member
- Joined
- January 30, 2010
- Messages
- 4
- Reaction score
- 0
- City, State
- Boston
- Year, Model & Trim Level
- 99 Mountaineer
Thallarsen,
Thank you for this fix. I have a '99 XLT AWD 5.0 with this problem. I pulled the circut board and immediately noticed that I only had 1-510 resistor. Although it does look as if there may be evidence that the solder failed on both ends of the missing resistor, I can't really be sure. I looked to see if it dropped off when I pulled the board out and couldn't find it.
Since your explorer, which has 2-510 resistors, has a sunroof and a 2nd connecting harness, where my non-sunroof model only has 1 connector, I was wondering if all non-sunroof models only had 1-510 resistor, rather than the 2.
If you, or anyone else, can give me an answer, I'd really appreciate it. BYW, I'm having a tough time trying to find a replacement 510 resistor...any ideas?
Mountaineer1999
New Member
- Joined
- January 30, 2010
- Messages
- 4
- Reaction score
- 0
- City, State
- Boston
- Year, Model & Trim Level
- 99 Mountaineer
Art J,
Mine is a non sunroof and I just fixed it today. Awesome directions and photos! One bad solder, but when I tried to resolder the 510 resister literally "fell off" which is what I bet happened to yours. Look around, its got to be somewhere!
Mine is a non sunroof and I just fixed it today. Awesome directions and photos! One bad solder, but when I tried to resolder the 510 resister literally "fell off" which is what I bet happened to yours. Look around, its got to be somewhere!
Mountaineer1999
New Member
- Joined
- January 30, 2010
- Messages
- 4
- Reaction score
- 0
- City, State
- Boston
- Year, Model & Trim Level
- 99 Mountaineer
Let me start out by describing my specific overhead display: Mine is in a '99 Explorer Limited with sunroof. The display provides digital compass bearings and temp. The housing also has the two 'spot' lights for driver and passenger.
If yours isn't exactly the same, but similar, I'll bet that the problem is identical to mine. This problem is related to solder failure, similar to the Mach radio display problem.
It's a resistor (or capacitor) that due to considerable heat, eventually loses its soldered contact at the board. You can confirm that this is the culprit by firmly pressing the button, thus putting slight pressure on the board housed inside the display housing. If the display fades in slightly then goes out - or stays on for a few hours/days, then goes back out, you have likely tweaked the board slightly and brought temporary contact to the problematic resistor.
The fix will take less than an hour if you're comfortable with soldering. If you've never soldered before, this may not be a good fix to learn on, because it is such a small component. I suggest finding an electronics guy to resolder the component. It's such a minor job that it shouldn't be much at all.
Anyway, what you'll need:
Here are the steps:
- Torx T-10 and driver.
- Soldering iron capable of small soldering repairs
- Desoldering braid (I didn't really need it, but for the perfectionist...)
- Good solder for small electronic work (silver based?) Radio Shack is a good resource.
- Magnifying glass. Preferably the kind with the 'helping hands' alligator clips, in which you can position the glass over the work. You'll need two hands for the solder.
1. Remove the overhead console. This is done by pulling back the trim around the sunroof (if equipped) just enough to expose the black tab
This tab holds the rear portion of the console in place when tucked behind the sunroof trim (since I don't know the non-sunroof application, you're on your own here). Mine had some sticky adhesive that keeps the trim in place. The console should drop down slightly at this point.
2. Gently pull on both sides at about the middle of the console. It's held in by two pressure clips. It should pop out of the roof fixture without too much force.
3. Disconnect the two harness connectors (possibly only one if not equipped with a sunroof).
4. Working on a flat surface, remove the Torx screws (11 total for sunroof models). There's no need to remove the two rearmost screws on the black plastic bracket, or the two screws holding the harness plug receptacle (Connector 1 - sunroof models).
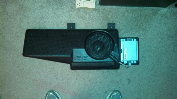
5. Lift the black plastic insert housing the light bezel and buttons from the console surround.
The spotlights and temp/compass display board come out as one unit, as they are attached with connectors.
6. Unplug the connector from the white display housing
7. Using a small screwdriver, pry around each of the four retainers that hold the white plastic cover in place over the black bottom housing.
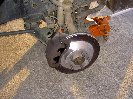
8. After lifting the white plastic cover from the black bottom housing, you'll be able to remove the circuit board with the display glass. Take care not to bend the display glass.
9. Now that you have the board removed, you can identify the failed component. With a magnifying glass, carefully check the integrity and the solders at each end of the resistors labeled "510". This is where I found the failure. Yours is likely at one or both of these. This photo is a closeup. Note that these resistors are only about 1/4" end to end.
10. As you can see, I'm not a master solderer, but it worked. There was one resistor that was clearly broken from it's original solder, but the one next to it wasn't looking too stable, so I resoldered both. These little suckers get pretty hot when the display is operating normally, so make sure that your solder is good. This is where you take your time, and make sure that you have a stable solder at all resoldered points. If it's not such a good solder, it will fail before too long. You can test your repair by plugging in the connector to the board, then plugging that directly to the harness in the car. If you get a display, you've fixed the problem!
11. Reassemble in reverse order. One thing to note, is that the small spotlights' housing have two small tabs that fit into the black 'center' housing that has the buttons, light cover, etc. You'll need to fit the spotlights into the housing first and foremost before reassembling the console.
12. Good Luck!
Although this worked for me and all others who tried it and got back to me, I can't guarantee that it will work for you. So attempt this at your own risk. Please post to the thread to let others know whether this worked for you.
Mountaineer1999
New Member
- Joined
- January 30, 2010
- Messages
- 4
- Reaction score
- 0
- City, State
- Boston
- Year, Model & Trim Level
- 99 Mountaineer
Thallarsen,
Made the repair today to a non-sunroof model in a 99 Mountaineer 5.0 w/ 225K miles. Display quit earlier this week, found your repair and it worked like a charm! Hand held magnifying glass found the problem, isolated to a bad solder on one end of the centered "510" resistor. First attempt disloged the whole unit!, just as well. A little flux and new solder allowed for a nice repair and it worked! Glad to have the compass and temp back. Thanks - FYI - eBay slouths asking $19.99 to 59.99 for the same info - stay true!!!
Made the repair today to a non-sunroof model in a 99 Mountaineer 5.0 w/ 225K miles. Display quit earlier this week, found your repair and it worked like a charm! Hand held magnifying glass found the problem, isolated to a bad solder on one end of the centered "510" resistor. First attempt disloged the whole unit!, just as well. A little flux and new solder allowed for a nice repair and it worked! Glad to have the compass and temp back. Thanks - FYI - eBay slouths asking $19.99 to 59.99 for the same info - stay true!!!
Thallarsen
Well-Known Member
- Joined
- February 21, 2000
- Messages
- 126
- Reaction score
- 8
- City, State
- Potomac, Maryland
- Year, Model & Trim Level
- '99 5.0 Limited AWD
After searching high and low for a solution to this fix, I figured this one out on my own. When I posted this thread, this info. wasn't anywhere on eBay. I can only guess that some 'entrepreneurs' read this thread, and figured that there was a buck to be made off of somebody else's efforts.eBay slouths asking $19.99 to 59.99 for the same info - stay true!!!
Oh well.
mpinto19k
Member
- Joined
- January 10, 2010
- Messages
- 17
- Reaction score
- 0
- City, State
- Colorado Springs, CO
- Year, Model & Trim Level
- 2003 Explorer Sport
After searching high and low for a solution to this fix, I figured this one out on my own. When I posted this thread, this info. wasn't anywhere on eBay. I can only guess that some 'entrepreneurs' read this thread, and figured that there was a buck to be made off of somebody else's efforts.
Oh well.
Well I thank you as well did it about 2 days ago on my 2003 Explr Sport worked perfect!
jon99explorer
Member
- Joined
- December 1, 2007
- Messages
- 30
- Reaction score
- 0
- City, State
- Michigan
- Year, Model & Trim Level
- 05 Sport Trac XLT Premium
Many thanks to Thallarsen for the writeup!
I just finished putting mine back in my 99 AND It Works!!!!!!!
I had a couple of hangups doing this, but it's all good now.
#1 Mine was missing one of the 510 resistors, so I bought a package of 68 ohm resistors from Radio Shack & soldered one in, & re-flowed the solder on the intact one.
#2 I also should have taken pics as I disassembled the unit because when I put the map lights back into the console I put them in backwards. I got them to screw down tight to the console, but the console now wouldn't fit into the snap holes up in the roof.
After some head scratching & unfortunate language, I figured out what I did wrong.
Thanks again for a great tech article!!!!!
Jon
http://1972vega.wordpress.com/
tkeitht
New Member
- Joined
- February 14, 2010
- Messages
- 2
- Reaction score
- 0
- Year, Model & Trim Level
- 2001 Sport Trac
The resistor in my explorer doesnt appear to have enough conductive paste on the end which broke free from the board. I wanna replace it so I can get a good solder connection on both ends. Anyone with an ohm meter happen to know the resistance of this one?
roddick12
New Member
- Joined
- March 6, 2010
- Messages
- 1
- Reaction score
- 0
- City, State
- Acworth, GA
- Year, Model & Trim Level
- 2000 Explorer XLT
Overhead console fix
Thallarsen, thanks so much for helping me get my temperature/compass fixed. I followed your directions and it worked perfectly. Even though I could not see (even with a magnifiying glass) that the solder was broken on either end of the 510 resistors I soldered the ends of each one and now my temperature/compass works again. I called a Ford dealer near me to see how much the part was and they wanted $169. I did have a tiny bit of trouble with the torx screws so I bought some similrar hex screws at Home Depot and they worked fine. BTW, I've never soldered anything in my life but I borrowed a soldering gun, practiced for 5 minutes and did it myself. Thank you again.
Thallarsen, thanks so much for helping me get my temperature/compass fixed. I followed your directions and it worked perfectly. Even though I could not see (even with a magnifiying glass) that the solder was broken on either end of the 510 resistors I soldered the ends of each one and now my temperature/compass works again. I called a Ford dealer near me to see how much the part was and they wanted $169. I did have a tiny bit of trouble with the torx screws so I bought some similrar hex screws at Home Depot and they worked fine. BTW, I've never soldered anything in my life but I borrowed a soldering gun, practiced for 5 minutes and did it myself. Thank you again.
sparky50
New Member
- Joined
- March 7, 2010
- Messages
- 2
- Reaction score
- 0
- City, State
- Huntington Beach, CA
- Year, Model & Trim Level
- 2003 Sport Trac XLT
Just wanted to take a minute to thank Thallarsen for his post. I was googling around looking for some info on how much it would cost to replace the compass / thermometer and I stumbled upon this thread last night.
Went out this morning, took it apart, couldn't see a problem but went ahead and soldered each of the "510" resistors and lo and behold it works like new.
Thanks for the excellent well written post. The pictures were even more helpful than my shop manual.
Went out this morning, took it apart, couldn't see a problem but went ahead and soldered each of the "510" resistors and lo and behold it works like new.
Thanks for the excellent well written post. The pictures were even more helpful than my shop manual.
ford first
New Member
- Joined
- March 8, 2010
- Messages
- 2
- Reaction score
- 0
- City, State
- altoona,pa
- Year, Model & Trim Level
- 98 xlt
over head temp reading
I had the same trouble with the overhead temp guage and the 510 resistores were the problem. that for the hepl.
I had the same trouble with the overhead temp guage and the 510 resistores were the problem. that for the hepl.
ford first
New Member
- Joined
- March 8, 2010
- Messages
- 2
- Reaction score
- 0
- City, State
- altoona,pa
- Year, Model & Trim Level
- 98 xlt
over head temp reading
I had the same trouble with the overhead temp guage and the 510 resistores were the problem. that for the help.
I had the same trouble with the overhead temp guage and the 510 resistores were the problem. that for the help.
Elite Explorer members see no advertisements, no banner ads, no double underlined links,.
Add an avatar, upload photo attachments, and more!.
lgmorris
New Member
- Joined
- March 27, 2010
- Messages
- 1
- Reaction score
- 0
- City, State
- panama city florida
- Year, Model & Trim Level
- 2000 explorer eddie
worked great
 worked like a charm no real issues. Took a few moments to remove the sun roof harness, but after that about 10 min. and was putting back in my truck. Thanks for the help.
worked like a charm no real issues. Took a few moments to remove the sun roof harness, but after that about 10 min. and was putting back in my truck. Thanks for the help.Featured images


Featured images
Similar Threads
- Replies
- 0
- Views
- 1,160
- Replies
- 6
- Views
- 2,375
- Replies
- 155
- Views
- 132,752