Rear stabilizer bar bushings (19mm -> 23mm) | Page 2 | Ford Explorer Forums - Serious Explorations

  • Register Today It's free!

Rear stabilizer bar bushings (19mm -> 23mm)

So, i finally got out the stabilizer bar, had go and buy few tools to get the last stubborn bolt out that was simply too rusted. Question: how does one put new bushings into the sway bar since the ends seem to prevent it?


bolt-cut1.jpg

This one simply wouldn't come out, too rusted.
culprit.jpg

This one was the one causing trouble.
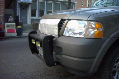
bolt-cut2.jpg

The end result
how-to-remove.jpg

Do i have to cut out the old bushing or heat it, etc?


Join the Elite Explorers for $20 each year.
Elite Explorer members see no advertisements, no banner ads, no double underlined links,.
Add an avatar, upload photo attachments, and more!
.


Torch is by far the easiest method to remove end link bushings. Propane or MAPP gas works, doesn't take long to melt the bond. Make sure you do this outside and have a bucket of water within reach, very smoky. I removed them once using a large socket, c-clamp, and penetrant, but torch is much easier.
How-To Burn out Suspension Bushings: The Right Way - Suspension.com

Remove the old sway bar frame bushings CAREFULLY with a sharp utility knife or hack saw using dish soap. Don't damage or scratch the bushing contact surface on the bar.

ES sway bar frame bushings are split and can be spread apart. Use gloves with the supplied "Formula 5" lube, very sticky.
Rear Sway Bar?

As you mentioned in post #21, use washers or shims to make the brackets flush with the mounts. Lot's of force on the brackets when turning. I've heard of one breaking during a hard turn resulting in a rollover. Use Grade 5 hardware or higher to mount the frame brackets.


With the original rubber bushings, i had idea of melting them out with torch, but that would have been bit messy and quite frankly over complicated, with the sway bar links i'll do that, but the sway bar bushings i managed to get out simply by getting sharp kitchen knife and cutting them out ;) Had to be bit careful as the bushings kept moving, but managed to cut them out, took about 3 minutes for both bushings.

Edit: managed to get most of the rust out too and painted the sway bar with rust primer.


Update to the project.

I took the bushings to local machine shop which were able to drill the bushings to correct size. Drilling didn't require freezing of bushings, what was needed was the original bracket plus bit of sheet metal to bolt the bracket so it doesn't move when it's being drilled. From what i heard the drilling wasn't very hard, drill bit played crucial role. Pillar/column type drilling machine was used.

below pictures of drilled product and drill bit (23mm) that was used, hope this information helps someone in future with same problem.


drillbit1.jpg


drillbit2.jpg


drilled.jpg


I will post more images when the sway bar links and bar have been installed.


Excellent. Thanks for follow up and pics. Poly should be a noticeable handling and feel upgrade over worn stock bushings.

Keep us posted with your poly end link bushings R&R. I've done MANY of them, but sounds like you're more than capable.


Okay, finished the install and went for test drive, the difference in handling is HUGE. Had bit too long bolts and couldn't be arsed to cut them shorter, but i am willing to live with that, maybe later.

I will still have to go and buy few bigish washers to protect the sway bar link bushings more (top ones).
Here are the pictures of finished product(s):


links.jpg


longbolt1.jpg


longbolt2.jpg


Edit: Yes, i know the sway bar got hit few times during install and new rust is pushing through, will fix that too later :p


Great thread


Back
Top